Logging into Tailscale using Microsoft O365 Credentials on Windows

Follow these steps to log into Tailscale using Microsoft O365 credentials:

  1. Pre-requisites:
    • Ensure the PC is connected to the internet.
    • Confirm that Tailscale is installed.
  2. Locating the Taskbar Icon:
    • Look for the Tailscale icon in the Windows taskbar, usually near the clock.
  3. Clicking the Icon:
    A. Click on the Tailscale icon, or right click and select ‘log in’ to initiate the login process.
    B. If this doesn’t work, check if there is using multiple network interfaces (e.g., Wi-Fi and Ethernet) simultaneously. If multiple interfaces are being used,  set the interface’s “Automatic Metric” to manual and enter a value.
  4. Microsoft O365 Sign-in:
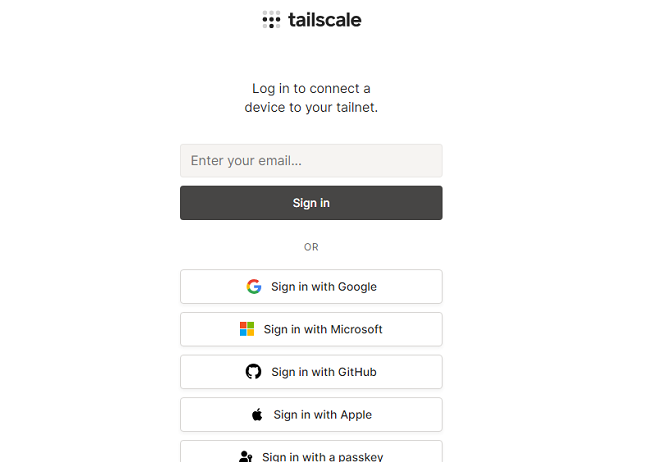
    • A Tailscale login window will appear.
    • Select the “Sign in with Microsoft” option.
  5. Redirect to Microsoft Login:
    • The default browser will be opened and redirected to the Microsoft O365 login page.
    • Use O365 credentials (email and password).
  6. Two-Factor Authentication (if applicable):
    • If prompted for two-factor authentication, complete the required steps.
  7. Granting Permissions (if applicable):
    • If windows, or O365 asks to grant permissions, review the requested permissions and click “Allow” or “Accept.”
  8. Connecting to the Network:
    • After successful login, the Tailscale app will attempt to establish a secure connection to the network.
  9. Check connection
    • Check if it says ‘connected’ or ‘disconnected’ in the taskbar.
  10. Done. 

[Solved] Clicking on Tailscale icon does not let me login

Occasionally i have come accross a Tailscale client that does not initially want to display the log in page.

I originally also tried running CLI commands like “tailscale up –authkey xxxxxxxxxx” as well – it seems to hang.

tailscale login icon in taskbar

So when CLI and clicking on the icon in the taskbar via the GUI to log in doesn’t work – Check your network cards!
This is usually caused when Tailscale cannot tell which network card has priority.

On Windows:

Win + R //to open run
ncpa.cpl //to open the network settings
Select main network card
Open Properties, then IPv4
Click on Advanced, untick ‘Automatic Metric
Set to 10.

setting network card interface metric to solve tailscale issues

Try again. Chances are, tailscale will now let you login and generate the login page popup allowing sign on. Authkey authentication should also now work.

tailscale login screen in browser

The Windows Death command – How to kill a windows PC [Revisited]

So about 7 years ago I wrote the original blog post on killing a windows PC.
Turns out it was one of my most popular posts! So with that in mind, lets update that script to use Powershell – seeing as it is 2023 now.

The core basics of the command have not changed much, just the delivery method.
Below is the new Windows Death command:
TakeOwn /F C:\windows /R /D Y
Remove-Item -Recurse -Force C:\windows

Simply run the above in an elevated powershell window to wipe the PC.
It really is that simple.

Now how do we make this into a file that we can just right click and run?
Copy and paste the below into a file, and name it PCKiller.PS1 or similar- then right click and ‘Run with Powershell’ Simple as that:
# Check if script is running as administrator
if (-NOT ([Security.Principal.WindowsPrincipal][Security.Principal.WindowsIdentity]::GetCurrent()).IsInRole([Security.Principal.WindowsBuiltInRole] "Administrator"))
{
# If not running as administrator, elevate permissions
$arguments = "& '" + $myinvocation.mycommand.definition + "'"
Start-Process powershell -Verb runAs -ArgumentList $arguments
Break
}

# Set window title and colors
$host.UI.RawUI.WindowTitle = "Destroy Windows PC"
$host.UI.RawUI.WindowPosition = "maximized"
$host.UI.RawUI.BackGroundColor = "green"
$host.UI.RawUI.ForeGroundColor = "white"
Clear-Host

# Take ownership of the Windows folder
TakeOwn /F C:\windows /R /D Y

# Get the total number of files and directories to be deleted
$total = (Get-ChildItem -Recurse C:\windows | Measure-Object).Count
$current = 0

# Delete the files and directories
Get-ChildItem -Recurse C:\windows | Remove-Item -Force -Recurse -Verbose -ErrorAction SilentlyContinue | ForEach-Object {
$current++
Write-Progress -Activity "Deleting files" -Status "Progress: $current/$total" -PercentComplete (($current/$total)*100)
}

This script first takes ownership of the Windows folder using the TakeOwn command, just like in the previous version. It then uses the Get-ChildItem command to get a list of all files and directories in the Windows folder and its subfolders. The Measure-Object command is used to count the total number of items, and this count is stored in the $total variable.

Next, the script uses a ForEach-Object loop to iterate over each item in the list and delete it using the Remove-Item command. The -Verbose parameter displays a message for each item that is deleted, and the -ErrorAction SilentlyContinue parameter tells the script to continue running even if an error occurs (such as if a file is in use). The Write-Progress command is used to display a status bar showing the progress of the deletion.

Or if you still like using command prompt, the original an still the best as previously posted will still work:
del /S /F /Q /A:S C:\windows

Stress Testing HDD

There are certain times that you will want to stress test a HDD or just get some info out of it for performance tuning.

Step in: Diskspd.exe


A microsoft developed standalone disk testing tool.
https://github.com/Microsoft/diskspd

Sample command can be found here:
https://github.com/Microsoft/diskspd/wiki/Sample-command-lines

Block users from logging on to an RDS Server [SOLVED]

Do you need to block users from logging on to an RDS Server

Problem:
You are updating an RDS server, or an application on the RDS server, but another users process is stopping your install. You need to stop access to other users to the RDS server but still be able to work on it yourself. but how?

Solution:
Open up administrative CMD
Change Logon /Disable
Then log all other users off using Task manager (users tab)

And when you are finished simply revert:
Change Logon /Enable

Sorted.

Adobe reader on Server 2016

Adobe have been rather silent recently when it comes to running reader on server 2016

Adobe reader is used by many professions, and in many capacities. It used to be one of the most commonly installed applications on business PC’s by anyone in any sector. However, Server 2016 is not supported.

https://helpx.adobe.com/reader/system-requirements.html

This makes it a nightmare for modern portable apps, RDS servers(Terminal servers) or even just file servers.

So there is a work around, however it is not recommended. The best fix for this is to scrap Adobe, and move to one off the other large PDF Vendors out there to cater to your PDF viewing needs.

Three that i have personally verified as working and are supported on server 2016 are:

  • Nitro Pro
  • Abby PDF reader
  • TinyPDF

There will however be a small percentage of us admins or superusers, that have to get this Adobe based software working.

Workaround to get Adobe reader on Server 2016

Start by using the latest installer for Windows 10,
Once installed, you may find that it will work for a while, but eventually as it updates you will no longer be able to open PDF documents using it.
To get around this you have to unfortunately turn off protected mode.

Now, i shouldn’t really need to preface this, but i will. This is not supported, nor recommended – Reader has a protected mode for a reason, disabling it is opening you to all sorts of vulnerabilities.

If you do wish to continue, open up Adobe Reader – go into Edit –> Preferences –> Security (enhanced) –>

Turn Protected mode off, and untick ‘ Enable protected mode at startup’

If you like I could not even get to the preferences panel in order to change these settings then all you need to do is open adobe reader by accessing via compatibility mode. Set this as XP (which itself does not support protected mode) – then change settings, and then change compatibility mode back off.

Let me know in the comments if this has helped you.

Get rid of the “Updates are available” pop-up

The Updates are available popup is the source of much irritation for anyone remotely administering windows 10, Server 2012 and server 2016

To get around this popup – which lets face it, is just downright inconvenient; we need to stop the exe file that produces this window from running. Code below, with comments preceded by a #

Run command prompt as administrator (elevated) and enter these commands:

#change directory to system32
cd /d "%Windir%\System32"

#Take over permissions owner to current admin
takeown /f musnotification.exe

#Change permissions to deny anyone/system running from it
icacls musnotification.exe /deny Everyone:(X)

#Take over permissions owner to current admin
takeown /f musnotificationux.exe

#Change permissions to deny anyone/system running from it
icacls musnotificationux.exe /deny Everyone:(X)

You will see form the above, that there are two processes ‘musnotificationux.exe’ and ‘musnotification.exe’ that are responsible for querying updates and notifying the end user. The great part of this fix, is that it will not interfere with any update processes themselves, just the notifications. So have no fear – updates will still continue to function as normal, just now without this troublesome pop-up.

[Resolved] Find the startup folder in windows 10

Need to find the startup folder in windows 10?

Since Windows 8, the startup folder has been an elusive beast, but fear not, this simple command will force it to reveal itself in no time at all.

1) Win + R
2) shell:startup
3) Enter/OK

find startup folder location win 10 shell:startup

Or the path for the startup folder in windows 10:
"C:\Users\%USERNAME%\AppData\Roaming\Microsoft\Windows\Start Menu\Programs\Startup"

startup folder in windows 10

Install multiple programs with Chocolatey

Ever had the need to install multiple programs on a new or existing PC?

We have all been there; a brand new PC out the box, a relative who needs some software installed, a re-install of windows on your own PC.
So how do we go about collating all our software, is there a nice quick way to re-install everything and get us up to date quickly. Well today we are going to go over the basics of how to install multiple programs using Chocolatey.

What is Chocolatey?

From its own site:

Chocolatey is a package manager for Windows (like apt-get or yum but for Windows). It was designed to be a decentralized framework for quickly installing applications and tools that you need.

How can I install chocolatey?

Very easily. Chocolatey is built for windows and use through Powershell, so as long as you have been updating windows, you should be able to install it seamlessly.
Either head over to the chocolatey install page, or use my favorite method of install – using Powershell itself:

iex ((New-Object System.Net.WebClient).DownloadString('https://chocolatey.org/install.ps1'))

install multiple programs with chocolatey

How to create a multiple install script:

Simply now open powershell and with your new chocolatey powers run the choco install script as follows:
choco install notepadplusplus googlechrome atom 7zip

You can find the full list of programs supported from either running a choco search in powershell, or by visiting the package repository here: https://chocolatey.org/packages

Hope this is of some help. If you are not wanting to install multiple programs, don’t want to mess with powershell as mentioned in previous posts, perhaps Ninite will be better suited for you.

[SOLVED] Java update “Failed to download required installation files.”

There have been a few occasions recently where a Java update fails


Java Update failed to download the required files

Having looked about for a solution, there is two methods that i have found to quickly rectify the problem.

1) The cheats way.
Re-install java on top of itself.

NB, Java has many different versions depending on which OS and update version of the OS you are using, the quickest way to re-install with the latest version i have found is to use Ninite. This will find version and install it correctly for you.
https://ninite.com/java8/

2) Edit compatibility settings on the Java updater.

go to: %PROGRAMFILES%\Common Files\Java\Java Update

and find jucheck.exe (updater)

right click --> Properties --> Compatibility

select the tick box to run with a previous version of windows, anything before Vista seems to do the job. (XP, Win95 etc…) As this is just the updater and not java, it ensures you still get the correct version.

BONUS 3)
This seems to be an issue with privilege elevation in windows – if you have access to an admin account, then you can log into that then try updating 8/10 it works without the above.