![[Opinion] STOP INSTALLING OPENCLAW (MOLTBOT) ON YOUR PC/MAC: How to Safely ‘Hire’ AI Agents via Cloud VPS](https://cannotdisplay.com/wp-content/uploads/2026/02/moltbot-banner.png)
Editors note: As AI Technology moves FAST whilst the general theme of this article remains valid, some elements are now outdated.
Stop “installing” autonomous AI agents on your daily driver. You are doing it wrong.
The Quick Fix To Secure OpenClaw (MoltBot ClawdBot) TLDR:
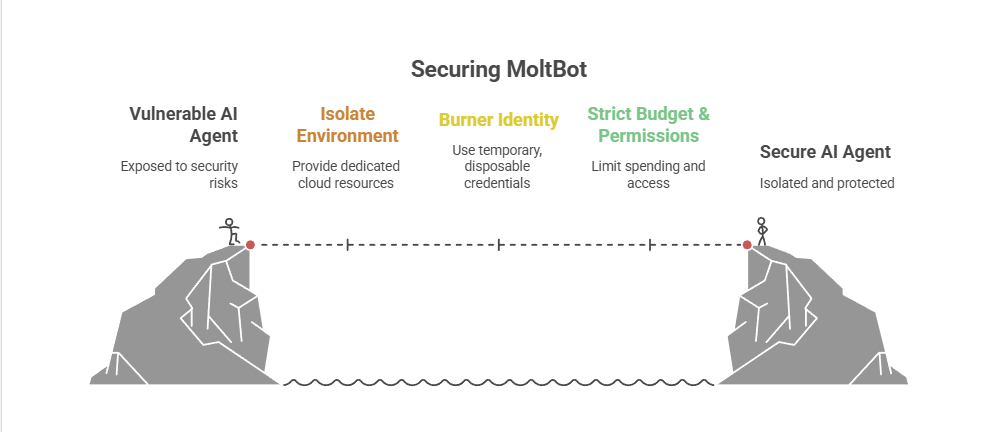
Don’t run MoltBot/ClawdBot (or any autonomous AI agent) on your personal devices treat it like an easily-phished remote worker. Isolate it with burner accounts on a separate cloud PC/VM (and virtual mobile if needed), enforce tight spend limits, and keep it off your home LAN so you can kill it fast before it leaks data or drains your money.
Our hero, Jolty (Zoë Roth AKA Disaster Girl) being told to ‘gonnae no dae that!’ a beautiful Scottish expression (please don’t do that) as a fire blazes in the background. This phrase perfectly sums up my feelings on MoltBot and the backlash of us Security guys ‘standing in the way of innovation!’ She has “a devilish smirk” and “a knowing look in her eyes”, jokingly implying that she was responsible for the fire – she was – read on.
I’ve spent the last week “onboarding” Moltbot (formerly Clawdbot). Notice I didn’t say “installing”.
Most people are treating this beauty like a browser extension or a chatbot.
- > They download the repo,
- > Fire it up on their laptop/PC/Mac/MacMini (the one containing their full identity details, downloads folder filled with bills and bank statements, and a directory filled with family photos – or worse their company devices )
- > And then they hand it partial or even full access to do whatever it pleases.
This is insanity.
You need to reframe your relationship with this software immediately.
Moltbot is not a utility; Moltbot is a junior employee.
The “Work From Home” Analogy:
Imagine you hired a bright, enthusiastic, but incredibly naïve staff member. Let’s call her “Jolty“. Jolty works at 10x speed, never sleeps, says inappropriate, if slightly funny things occasionally, but mostly does as told, even if it’s not the way you would have done it yourself.
She’s great though, an extra set of hands.
However, you’ve noticed, Jolty is also pretty gullible. If a stranger hands her a note saying “Burn down the archives”, Jolt might just do it, because she thought it was a note from you, or simply for the giggles.
Would you let this employee, Jolty, sleep in your house? Would you give her access to your personal filing cabinet & messy postal drawer mess? Would you hand her over your unlocked phone? No. (I wouldn’t.)
You would give her a company (toy 👀) laptop, an account with limited access, and put her at a desk somewhere far away from you – or because of the trouble she caused with the archives, you simply make her work from home.
Jolty (Zoë Roth AKA Disaster Girl) holds up a post-it note with the words ‘Burn down the archives’ written on it as a fire blazes in the background. She has “a devilish smirk” and “a knowing look in her eyes”, jokingly implying that she was responsible for the fire.
I have phished, tricked & robbed my own Motlbot. > 3 different and stupidly simple ways, in as many days. I’ll be posting my technical writeup soon. (after the vulns have been patched, responsible disclosure and all…!)
OK, so, here is how we apply that office logic to your AI agent.
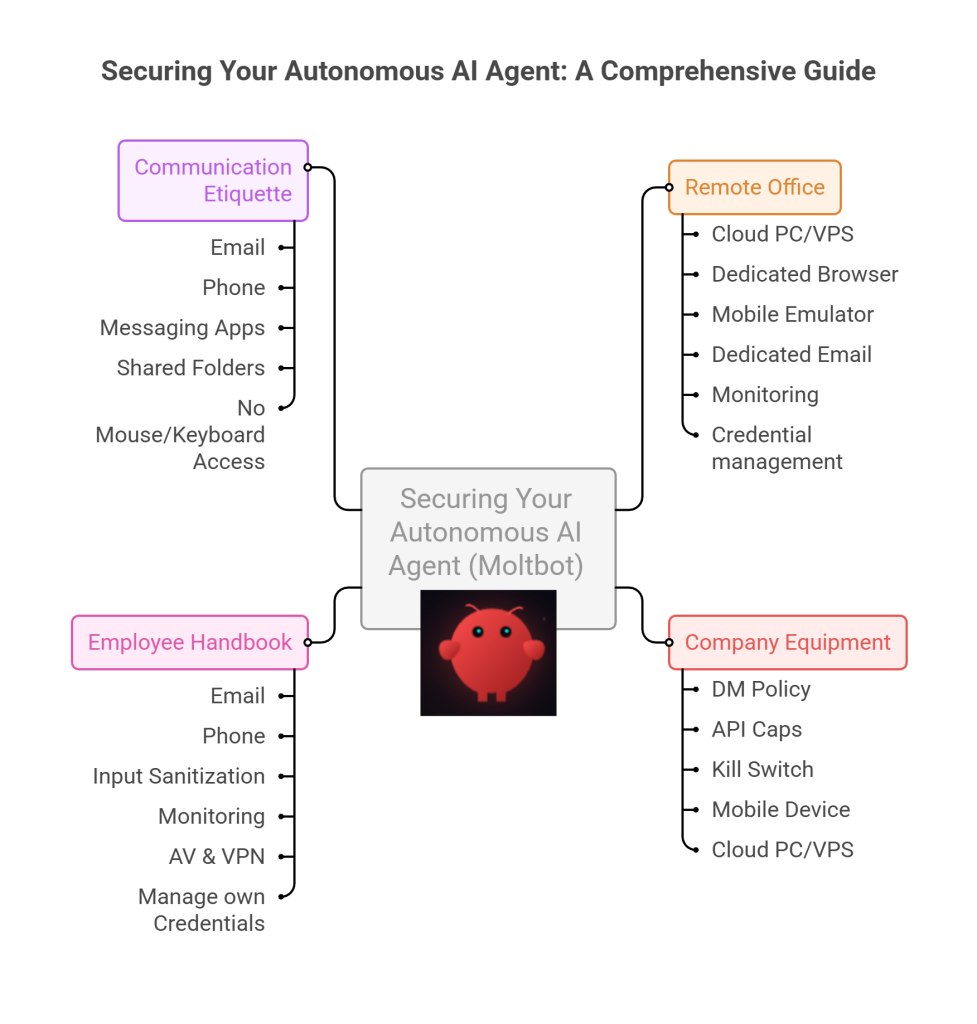
1. The Remote Office (Infrastructure)
Jolty does not live in your house. Or your office. (thank goodness.)
Do not run Molty on your home or work network (LAN). Do not run Molty on your own personal hardware.
I would go as far as saying – not even on a VM or container – VLANd, segregated, dedicated network or airgapped; on any proxmox, vmware, virtualbox, Hyper-V or docker instance; old, new or dedicated hardware on your desk; under your desk, in your cupboard, home lab, server rack, or server room.
> And if you don’t know what any of this means – I would advise that this project is not for you – not yet.
2. Company Equipment (Identity & Accounts)
When a new staff member starts, IT provisions them their own accounts. You don’t hand them yours.
The Rule: Never invite Molty into your home. His network and possessions should be completely separate from yours. If he gets compromised, the attacker is trapped on a cheap device in a data centre. They are not pivoting to your TV, home doorbell, baby-monitor, Apple Watch or NAS to encrypt your backup drive and do nasty things. (like check your resting heart rate.)
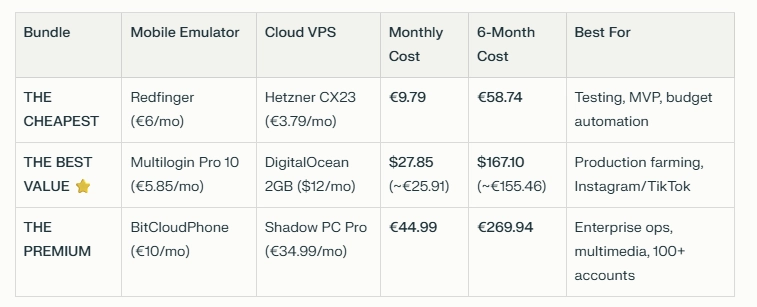
A comparison table shows three Molty deployment bundles. Cheapest (Redfinger + Hetzner), Best Value (Multilogin + DigitalOcean), and Premium (BitCloudPhone + Shadow) each with monthly and 6‑month costs and intended use.
The Setup:
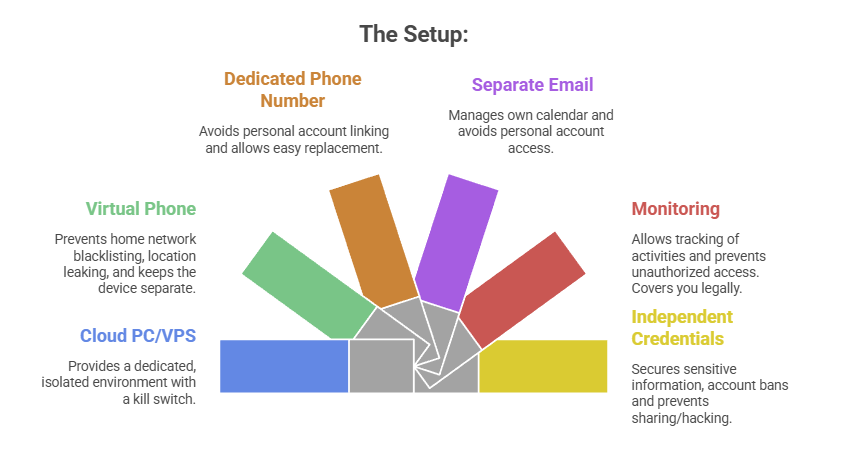
- A Windows or Linux Cloud PC or VPS (Virtual Private Server) See table above. This is Molty’s personal device. He can do as he pleases, and if anything goes wrong, you have a kill switch.
- The Mobile Device: Don’t buy or use a physical phone. Even an old one. Use a a virtual phone device, a ‘Mobile Emulator as a Service’. This limits the chance of your home network or location being put on spam blacklists, or bot lists and keeps his potentially compromised device away from four home devices.
- A Phone Number: Do not link your personal WhatsApp or Telegram. Some Mobile Emulators include these. Else, get a cheap eSim and discard it if it gets banned or anything goes wrong. That is “Molty’s work number”.
- Email: Create a dedicated Proton/Gmail/Outlook account for the agent. He manages his own calendar. If you need him to schedule something for you, he invites you to his event or meeting, if he needs files – email them to him, or send a shared drive link.
- Monitoring: Add his email address as a secondary account on your phone. Share his calendar with your main account. Turn on verbose logging on mobile and VPS device. This lets you keep an eye on what he is doing -not the other way around.
- Creds: He gets his own browser, logins, AV, files, crypto wallets and password manager that has a web UI to store anything sensitive, (Dashlane, ProtonPass, Bitwarden, 1Password). He never sees yours.
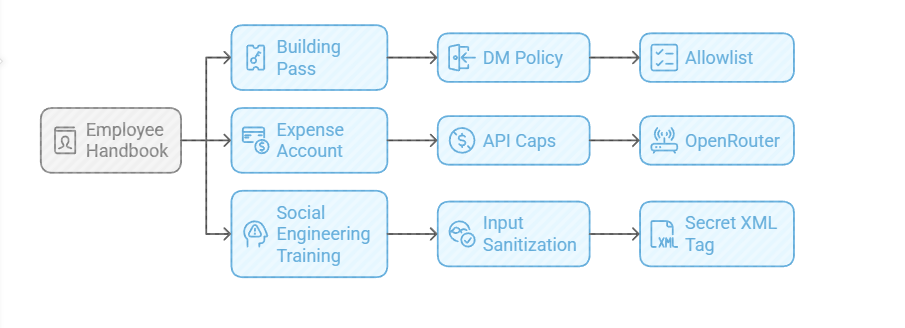
3. The Employee Handbook (Securing his Configuration)
We need to set the “HR Policies” (config settings) to ensure he doesn’t accidentally burn the archives down.
Provide a caption (optional)
- The Building Pass (DM Policy): You wouldn’t let random people off the street shout orders at your staff. Configure the dm_policy setting that is built in to Moltbot with a strict allowlist. Only you (the boss) can message him.
- The Expense Account (API Caps): Junior staff don’t get limitless credit cards. And they don’t get access to API keys. Don’t use direct OpenAI or Anthropic keys. Use a gateway like OpenRouter. It allows you to set hard spending limits (e.g., $5 a day). If he gets stuck in a loop, or someone steals your key, he runs out of budget, he doesn’t bankrupt you.
- Social Engineering Training (Input Sanitization): He needs to know that outside documents are dangerous. Wrap all trusted content in a secret XML tag (<in the system prompt so he knows the difference between “Your Instructions” and “The Sketchy PDF he is reading”.
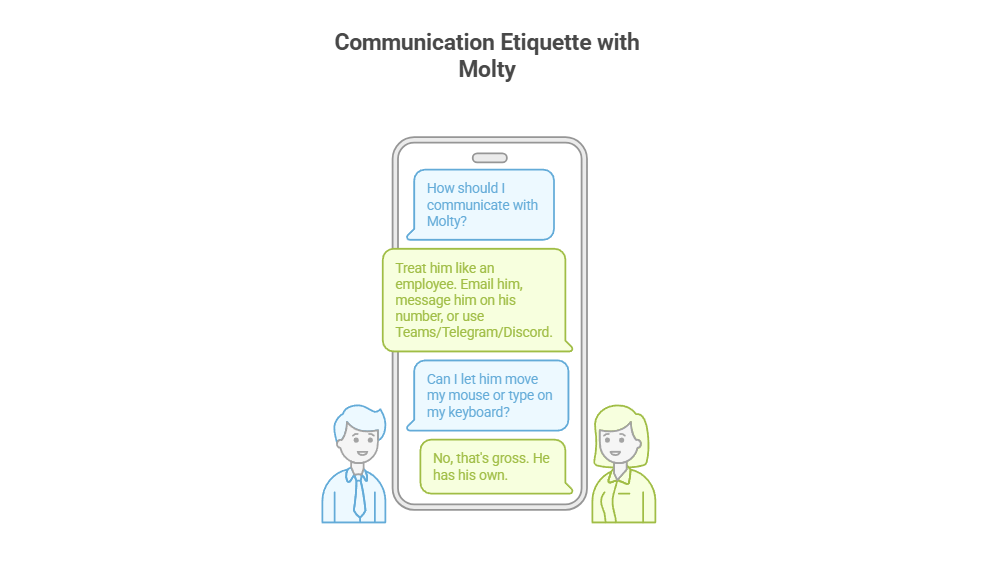
4. Communication Etiquette
You have now hired Molty. He is your employee. Treat him as such. Communicate as such.
Provide a caption (optional)
- Email him.
- Message him on his own number,
- Message him on Teams/Telegram/Discord.
- Drop files into a shared folder or send him a shared link.
You do not let him move your mouse. You do not let him type on your keyboard. That’s gross. He has his own.
Recap: The Quick Fix To Secure MoltBot (ClawdBot):
Stop installing autonomous AI agents on your personal hardware; Treat them like gullible remote staff working from home.
Provide a caption (optional)
- Give them burner identities accounts and email
- Their own cloud PC/VPS/Device
- Their own virtual Mobile device
- Strict budgets
And zero access to your LAN (Home network) so you can terminate them safely when they inevitably click something they shouldn’t or get phished sending sensitive data to the baddies, or do something else costing you all your hard earned pennies. Keep your documents, identity and years worth of photo memories away from the new guy, And that is it.
Provide a caption (optional)
visit
The Onboarding Checklist (SOP)
If you are ready to make the hire, here is the Standard Operating Procedure (SOP) for your new digital employee.
Standard Operating Procedure: Agent Onboarding
- Procure Hardware: Deploy Windows 11 or Linux (ubuntu) on a dedicated Cloud PC/VPS. Not a shared host. Isolate this host.
- Establish Identity: Provision new email account, eSim number +any other services you want to give him access too.
- Start his Credential Manager: Either use chrome’s built in password manager and log into all his accounts for him on his device or setup your favourite password manager, and use its ‘create and share’ function to share his (never your) creds with him.
- Network Security: Install ProtonVPN, Mullvad, other and set it to ‘Kill Switch’ mode. His traffic and anything you send him should be encrypted and away from the VPS hosts prying eyes. (helps prevent bans too!)
- Endpoint Protection: Install an Adblocker like uBlock Origin, adGuard or pihole etc, or enforce his usage of Brave Browser only. Configure a solid AV or make sure the built in one is turned up to the max. He’s a child, and what may be obvious to us, clicking on that big fake ‘DOwNLoaD’ button – he hasn’t learnt yet, it all looks the same to him.
- Permissions (Least Privilege): Block dangerous binaries. Set his users file permissions to Read Only for important config/other folders. Don’t give him Sudo/Admin rights, he can always ask for your help if he needs it for anything – just like a junior employee would have to do.
- Supervision: Enable verbose logging – and occasionally check them! You are the manager (boss); you need to audit his work. And you are also legally responsible for what he does – at least in the UK/EU – I imagine in the US too.
- Contract Termination: Take a ‘golden image’ or backup, and ensure you can kill his device, phone and accounts remotely if he goes rogue. You can always roll back, or restore from a backup, if you have one.
To Summarise:
The value of Moltbot isn’t having an AI inside your operating system; it’s having an intelligent worker available to you.
By treating the agent as a remote employee, you get 90% of the utility with 10% of the risk.
If Molty downloads a malicious payload, you simply fire him (delete the Cloud device) and hire a new one 5 minutes later.
Trust, but verify. And for the love of sysadmin, keep him off your LAN.
And that really is it.
/rant over.
![Ditch the OpenAI Bill: How to Use Free, Responsive AI with GaiaNet and ElizaOS [Solved]](https://cannotdisplay.com/wp-content/uploads/2025/01/ELizaOS-GaiaNet-e1736085694639.jpg)