[SOLVED] UniFi AP Firmware 6.7.31: Breaking Wireless Meshing and Causing Channel Hopping – Here’s the Fix.

Unifi Firmware 6.7.31 Mesh Problem and Fix

A recent official firmware update for several popular UniFi Access Points, version 6.7.31 (Released: Tuesday, September 23rd, 2025), is causing significant network instability for some users, particularly those who rely on wireless meshing or custom channel configurations. While the official release notes claim “Improved overall AP stability,” user reports indicate the opposite can be true.

This release is only for these models:

  • U6-LR/U6-Lite/U6+
  • UAP-nanoHD/FlexHD/BeaconHD/IW-HD
The Quick Fix TLDR:

UniFi firmware 6.7.31 is causing mesh instability due to a channel hopping bug. To fix this, manually downgrade the affected Access Point to a stable version like 6.7.17 via the UniFi Controller’s Manual Firmware Update setting using the direct download URL.

The Issue: Constant Channel Hopping Breaks Meshing

Users have reported that after auto-updates or updating Access Points such as the UAP-FlexHD to version 6.7.31, the devices begin to ignore manually configured channel plans and start “drifting channels constantly”.

This behaviour is particularly destructive for wireless mesh networks, where APs must remain on the same channel to maintain their uplink connection. The constant channel changes effectively sever this link, leading to:

  • Isolated APs dropping from the network.
  • Frequent client disconnections and reconnections.
  • Overall network instability and performance degradation.

Logs confirm this behavior, showing a sudden flood of “AP Channel Change” events immediately after the APs are updated to firmware 6.7.31.

Here are the logs from 2 of my own Flex-HD’s (for anyone interested! ha)
Items in bold where updates started, then logs from after manually downgrading back to previous version.
```
System  WiFi  AP Channel Change  Upstairs AP moved to channel 36 from 149.  Today at 1:16:02 PM  
System  WiFi  AP Channel Change  Upstairs AP moved to channel 149 from 40.  Today at 1:15:52 PM  
**System  Devices  Device Updated  Upstairs AP has updated to 6.7.17.  Today at 1:12:59 PM **
**System  Devices  Device Updated  Downstairs AP has updated to 6.7.17.  Today at 1:09:01 PM ** 
System  WiFi  AP Channel Change  Upstairs AP moved to channel 36 from 40.  Today at 12:52:50 PM  
System  WiFi  AP Channel Change  Upstairs AP moved to channel 40 from 48.  Today at 12:51:53 PM  
System  WiFi  AP Channel Change  Downstairs AP moved to channel 48 from 161.  Today at 12:44:51 PM  
System  WiFi  AP Channel Change  Upstairs AP moved to channel 161 from 48.  Today at 12:42:24 PM  
System  WiFi  AP Channel Change  Upstairs AP moved to channel 48 from 161.  Today at 12:40:41 PM  
System  WiFi  AP Channel Change  Downstairs AP moved to channel 161 from 157.  Today at 12:39:46 PM  
System  WiFi  AP Channel Change  Upstairs AP moved to channel 161 from 157.  Today at 12:38:18 PM  
System  WiFi  AP Channel Change  Upstairs AP moved to channel 157 from 48.  Today at 12:32:55 PM  
System  WiFi  AP Channel Change  Upstairs AP moved to channel 40 from 161.  Today at 12:23:08 PM  
System  WiFi  AP Channel Change  Upstairs AP moved to channel 161 from 48.  Today at 11:52:03 AM  
System  WiFi  AP Channel Change  Upstairs AP moved to channel 48 from 161.  Today at 11:47:57 AM  
System  WiFi  AP Channel Change  Upstairs AP moved to channel 161 from 48.  Today at 11:40:36 AM  
System  WiFi  AP Channel Change  Upstairs AP moved to channel 161 from 48.  Today at 11:34:05 AM  
System  WiFi  AP Channel Change  Upstairs AP moved to channel 48 from 161.  Today at 11:31:58 AM  
System  WiFi  AP Channel Change  Upstairs AP moved to channel 161 from 40.  Today at 11:17:41 AM  
System  WiFi  AP Channel Change  Upstairs AP moved to channel 40 from 161.  Today at 11:13:43 AM  
System  WiFi  AP Channel Change  Upstairs AP moved to channel 161 from 44.  Today at 11:05:25 AM  
System  WiFi  AP Channel Change  Upstairs AP moved to channel 161 from 40.  Today at 10:30:18 AM  
System  WiFi  AP Channel Change  Upstairs AP moved to channel 40 from 161.  Today at 10:26:34 AM  
System  Devices  Multiple Device Reconnections  USW-Enterprise-8-PoE has reconnected multiple times in the past 24 hours.  Today at 10:20:32 AM  
System  WiFi  AP Channel Change  Upstairs AP moved to channel 161 from 48.  Today at 9:41:46 AM  
System  WiFi  AP Channel Change  Upstairs AP moved to channel 48 from 161.  Today at 9:37:16 AM  
System  WiFi  AP Channel Change  Upstairs AP moved to channel 161 from 48.  Today at 9:36:09 AM  
System  WiFi  AP Channel Change  Upstairs AP moved to channel 48 from 161.  Today at 9:34:06 AM  
System  WiFi  AP Channel Change  Upstairs AP moved to channel 161 from 40.  Today at 9:32:26 AM  
System  WiFi  AP Channel Change  Upstairs AP moved to channel 40 from 161.  Today at 9:30:05 AM  
System  Devices  Multiple Device Reconnections  Downstairs AP has reconnected multiple times in the past 24 hours.  Today at 7:29:35 AM  
System  Devices  Multiple Device Reconnections  Upstairs AP has reconnected multiple times in the past 24 hours.  Today at 5:31:23 AM  
System  WiFi  AP Channel Change  Upstairs AP moved to channel 161 from 40.  Today at 4:27:04 AM  
System  WiFi  AP Channel Change  Upstairs AP moved to channel 40 from 161.  Today at 4:23:30 AM  
System  WiFi  AP Channel Change  Upstairs AP moved to channel 161 from 44.  Today at 3:56:33 AM  
System  WiFi  AP Channel Change  Upstairs AP moved to channel 44 from 161.  Today at 3:53:32 AM  
System  Devices  Device Updated  Upstairs AP has updated to 6.7.31.  Today at 3:11:04 AM  
System  Devices  Multiple Devices Offline  Multiple devices are offline.  Today at 3:09:05 AM  
System  Devices  Device Updated  Downstairs AP has updated to 6.7.31.  Today at 3:04:37 AM  
```

The Current Solution: Downgrade to a Stable Firmware Version

Until Ubiquiti releases a patch, the most effective solution, albeit a temp fix, is to manually downgrade the firmware on the affected Access Points to a known stable version, a known working version is: 6.7.17, which I used for my UAP-Flex-HD
(this should be the same firmware as for the Unifi: U6-LR, U6-Lite, U6+, UAP-nanoHD, FlexHD, BeaconHD & the IW-HD) and has been confirmed to resolve the issue, for now.
You should do a search on the official firmware downloads site here first to confirm firmware for your own device.

You can perform this downgrade via the UniFi Network Controller’s web interface:

Step-by-Step Downgrade Instructions:

Method 1: Downgrade via the UniFi Web Interface (Recommended)

  1. Navigate to the Devices section in your UniFi Network Controller.
  2. Click on the problematic Access Point to open its properties panel.
  3. Go to the Settings tab.
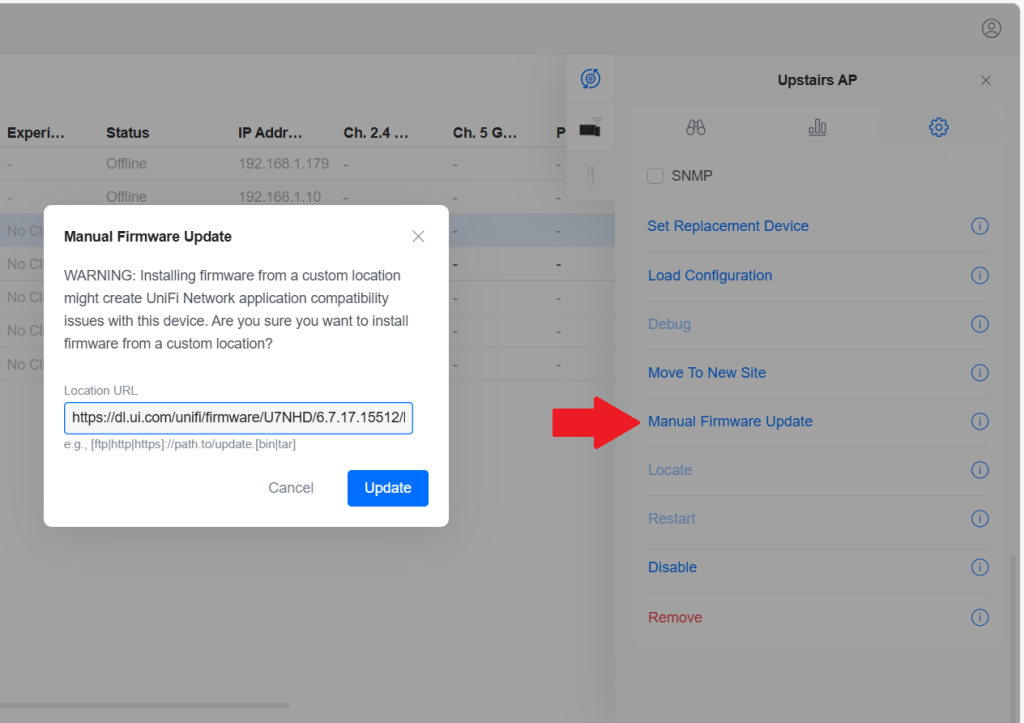
  4. Scroll down to the Manage section and find Manual Firmware Update.
  5. Paste the full direct download URL ending with ‘.bin’ into the ‘Location URL’ field.
    in my case for downgrading one firmware version back from the 6.7.31 to 6.7.17 I used: https://dl.ui.com/unifi/firmware/U7NHD/6.7.17.15512/BZ.mt7621_6.7.17+15512.250418.0425.bin
  6. Click the “Update” button. The AP will download and apply the older firmware, then reboot.

Method 2: Downgrade via SSH (Advanced)

  1. Connect to the AP via SSH either via the debug console in the web UI or with an SSH client.
  2. Run the direct upgrade command. Once logged in, run this command:
    upgrade https://dl.ui.com/unifi/firmware/U7NHD/6.7.17.15512/BZ.mt7621_6.7.17+15512.250418.0425.bin
  3. Do not close the terminal. Wait for the AP to download the firmware and begin the flashing process. Your connection will be terminated when the device reboots. Monitor its status in the UniFi Controller.
If you do not know your SSH login details,
Device Updates and Settings

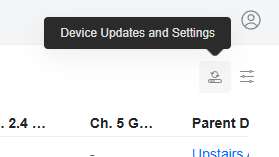
You can find these in the web UI under: Device tab –> the tiny Device Updates and Settings button –> Device Settings –> ‘Device SSH Authentication’
or if you are using the AP standalone without the Unifi Network controller, your AP settings may just be the default UI SSH user/pass

After the process is complete, the Access Point should reconnect to the network with its wireless mesh links restored and channel settings properly honoured. I would highly recommended to disable automatic updates for these devices until a new, fixed firmware version is released.

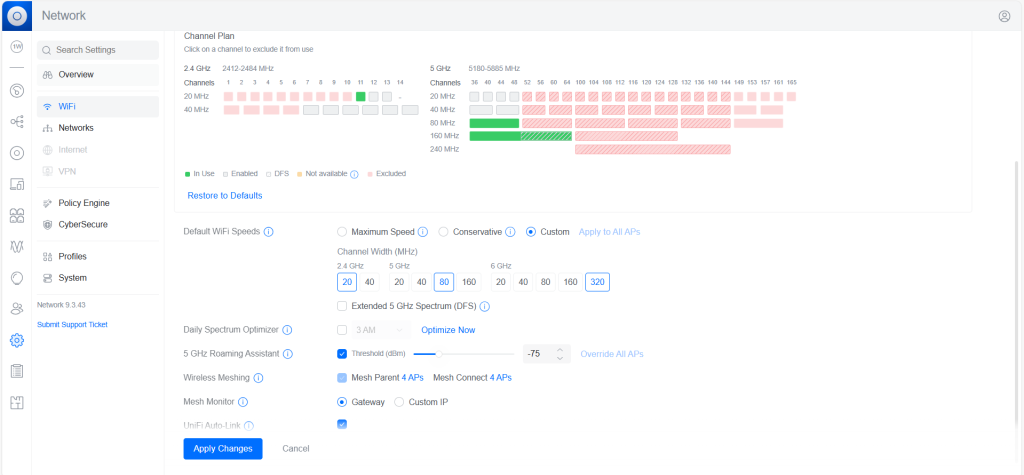
Important Note on DFS Channels: It’s Also worth noting that none of the ‘restricted’ channels set in channel plan or settings from the ‘WiFi Management’ page are being honoured by WiFi AP’s in the 6.7.31 update, so if you don’t downgrade you may face DFS Radar scanning issues, especially here in the UK.

Misbehaving channels

Below was my test plan before I worked out I should just downgrade firmware.

I restricted pretty much every channel I could to dictate a set enforcement for.

I knew that settings dictated on the individual AP’s settings pages were not being honoured, so went an alternative route, to see if creating settings in the WiFi Channel Plan forms would work instead of doing it on individual AP’s.
However, not 10 minutes later – my ‘Upstairs AP’ had taken itself off for a wander into the what should have been restricted channel: 161

Conclusion: Maybe wait this update out a few days until UI find a fix. Else – hopefully you have googled some of your issues, and this wee post here has, for now helped you find my above recommended fix with some step by step instructions on how to downgrade Unifi AP firmware nice and easy.

Secure DNS Queries: How to enable Encrypted DNS; DoH (DNS over HTTPS) or DoT (DNS over TLS) in Windows 11 [SOLVED]

Step-by-Step: Activating DoH & DoT for Secure Browsing on Windows 11 & Windows Server 2022+

In today’s digital age, safeguarding your online privacy is more crucial than ever. While many of us are diligent about using HTTPS for secure browsing, a critical piece of the privacy puzzle often remains unaddressed: DNS queries. Every time you visit a website, your device sends a DNS query to translate the human-readable domain name (like www.example.com) into an IP address. Traditionally, these queries are sent in plaintext, leaving your browsing habits exposed. This post will guide you through enabling DNS over HTTPS (DoH) or DNS over TLS (DoT) in Windows 11, effectively cloaking this last piece of your digital footprint.

The Final Frontier of Online Privacy: Encrypting Your Digital Footprints

You might be familiar with the padlock icon in your browser, indicating an HTTPS connection. This encrypts the content of the websites you visit, protecting it from prying eyes. However, the DNS requests made to reach those websites have historically been sent unencrypted. This means that anyone monitoring your network traffic – whether it’s your Internet Service Provider (ISP), an administrator on a public Wi-Fi network (like at an airport or café), or a malicious actor performing a Man-in-the-Middle (MitM) attack – could see which websites you’re attempting to access.

By encrypting your DNS queries with DoH or DoT, you overcome this significant privacy hurdle. When combined with consistent HTTPS use for web browsing (many modern browsers can enforce this, or extensions can help), your web activity gains a level of privacy comparable to using a VPN. Your ISP can no longer easily snoop on your DNS requests to profile your interests or sell that data. On unsecured public Wi-Fi, your DNS lookups are shielded from eavesdroppers.

It’s important to note a caveat: While DoH/DoT and HTTPS significantly boost your web browsing privacy, they don’t cover all internet traffic. Software outside your browser, such as some email clients still using unencrypted SMTP (port 25), might transmit data insecurely. In such cases, a comprehensive VPN service (like NordVPN, Mullvad, or Private Internet Access) still offers broader protection by encrypting all traffic from your device.

What are DNS over HTTPS (DoH) and DNS over TLS (DoT)?

Before we dive into the “how-to,” let’s quickly understand these technologies:

  • DNS (Domain Name System): Think of it as the internet’s phonebook. It translates website names (e.g., google.com) into numerical IP addresses (e.g., 172.217.160.142) that computers use to connect to each other.
  • DNS over HTTPS (DoH): This method sends DNS queries and receives DNS responses over an encrypted HTTPS connection – the same protocol used to secure websites. Windows 11 often refers to this feature simply as “DNS encryption.”
  • DNS over TLS (DoT): This method uses a dedicated encrypted channel via Transport Layer Security (TLS) to secure DNS traffic. While DoT is a robust standard, Windows 11’s built-in GUI configuration primarily focuses on DoH. This guide will therefore concentrate on enabling DoH, which is readily accessible through Windows 11 settings.

Why Enable Encrypted DNS in Windows 11?

The benefits are clear:

  • Enhanced Privacy: Prevents ISPs, network administrators, and snoopers from seeing the websites you query.
  • Increased Security: Protects against DNS spoofing (where an attacker redirects you to a fake website) and MitM attacks on your DNS traffic.
  • Safer Public Wi-Fi: Adds a crucial layer of security when using potentially untrusted networks.

Prerequisites for Enabling DoH in Windows 11

Ensure your Windows 11 is up to date. For this guide, we will focus on using well-known DNS resolvers that are typically pre-configured or easily recognized by Windows 11 for DoH, meaning the “Preferred DNS encryption” option should become available automatically once their IP addresses are entered. These include:

  • Quad9: Primary 9.9.9.9, Alternate 149.112.112.112
  • Cloudflare: Primary 1.1.1.1, Alternate 1.0.0.1
  • Google: Primary 8.8.8.8, Alternate 8.8.4.4

If you were to use a custom DoH server not on Microsoft’s auto-discovery list, you might need to add it via PowerShell first using a command like Add-DnsClientDohServerAddress. However, for the popular services listed above, this extra step is usually not required.

How to Enable DNS over HTTPS (DoH) in Windows 11 (Using Pre-configured Servers)

Follow these steps to configure DoH through the Windows 11 Settings interface:

  1. Open Windows Settings: Click the Windows Start button and select “Settings” (the gear icon).
  2. Navigate to Network & Internet: In the Settings window, select “Network & Internet” from the left-hand sidebar.
  3. Select Your Network Interface: Choose your active internet connection. This could be “Ethernet” if you’re using a wired connection, or “Wi-Fi” if you’re connected wirelessly. Click on it.
  4. Edit DNS Server Assignment: Scroll down to the “DNS server assignment” section and click the “Edit” button.
Screenshot of Ethernet, Wi-Fi properties page highlighting the connection
  1. Configure DNS Settings: In the “Edit DNS settings” or “Edit IP settings” dialog:
  2. Change the setting from “Automatic (DHCP)” to “Manual.”
  3. Turn on the toggle for IPv4 (and IPv6 if you use it and your chosen DNS provider supports it over IPv6 for DoH).
  4. In the “Preferred DNS” field, enter the primary IP address of your chosen DoH server (e.g., 1.1.1.1 for Cloudflare, 8.8.8.8 for Google, or 9.9.9.9 for Quad9).
  5. In the “Alternate DNS” field, enter the secondary IP address for your chosen provider (e.g., 1.0.0.1 for Cloudflare, 8.8.4.4 for Google, or 149.112.112.112 for Quad9). This provides a fallback if the preferred server is unreachable.
  6. Under “Preferred DNS encryption,” the dropdown menu should now be enabled. You can choose:
    • Encrypted only (DNS over HTTPS): This is the most secure option. All DNS queries will be sent over DoH. If the server cannot handle DoH or there’s a configuration issue, DNS resolution might fail.
    • Encrypted preferred, unencrypted allowed: Windows will attempt to use DoH first. If it fails, it will fall back to traditional unencrypted DNS. This offers better compatibility but you won’t be notified if it falls back to unencrypted.
    • (You might also see “Unencrypted only,” which is the default state you are changing from.)
Windows 11 Edit DNS settings dialog with IPv4 set to Manual, Preferred DNS server IP entered, and Preferred DNS encryption set to 'Encrypted only (DNS over HTTPS)'.
  1. Save Your Settings: Click the “Save” button. The changes should apply immediately.

Verifying Your Encrypted DNS Setup

To ensure DoH is working correctly, you can visit a DNS leak test website or a service-specific test page. For example, if you configured Cloudflare’s DNS:

  • Visit https://one.one.one.one/help/ (formerly 1.1.1.1/help). It should indicate that you are connected to Cloudflare DNS and if “DNS over HTTPS (DoH)” is active.

Other general DNS leak test sites can also show you which DNS servers you are using and often the protocol.

A Note on PowerShell Configuration (For Servers or insider Win11 builds)

As mentioned, Windows 11 aims to auto-configure DoH for known servers once you input their IPs in the GUI. However, if you were using a less common DoH provider, or if the “Preferred DNS encryption” options didn’t appear as expected, you might need to add the DoH server’s details using PowerShell. This is done with the Add-DnsClientDohServerAddress cmdlet.

For example, if your DNS server IP was 1.2.3.4 with a DoH template of https://example.com/doh/dns-query, the command would be:

Add-DnsClientDohServerAddress -ServerAddress '1.2.3.4' -DohTemplate 'https://example.com/doh/dns-query' -AllowFallbackToUdp $False -AutoUpgrade $True

You would run this in PowerShell as an administrator. Again, for the popular providers like Cloudflare, Google, and Quad9, this manual addition via PowerShell is generally not necessary for DoH to work via the GUI settings.

Conclusion: Take Control of Your DNS Privacy

Enabling DNS over HTTPS in Windows 11 is a straightforward process that significantly enhances your online privacy and security. By encrypting your DNS queries, you shield your browsing habits from ISPs, network eavesdroppers, and certain types of cyberattacks. It’s a small change with a big impact on your digital footprint.

We encourage you to follow these steps and take control of your DNS privacy. If you found this guide helpful, please share it with others 🙂

Further reading and sources:

[Solved] Default username and password for Unifi Gateway Pro (UXG-Pro)

Default passwords for Unifi kit

Whilst most AP’s and Unifi devices can be ssh’d into using ubnt/ubnt there are a few exceptions to this rule, for example the UXG-Pro is root/ubnt.
Prior to setup/adoption, all devices have a set of default credentials below is what they are as of 06/2024. 

  • UniFi Consoles –  root / ui (root / ubnt on older devices)
  • UniFi Gateways – root / ui (root / ubnt on older devices)
  • UniFi Devices – ui / ui (ubnt / ubnt on older devices)

Logging into Tailscale using Microsoft O365 Credentials on Windows

Follow these steps to log into Tailscale using Microsoft O365 credentials:

  1. Pre-requisites:
    • Ensure the PC is connected to the internet.
    • Confirm that Tailscale is installed.
  2. Locating the Taskbar Icon:
    • Look for the Tailscale icon in the Windows taskbar, usually near the clock.
  3. Clicking the Icon:
    A. Click on the Tailscale icon, or right click and select ‘log in’ to initiate the login process.
    B. If this doesn’t work, check if there is using multiple network interfaces (e.g., Wi-Fi and Ethernet) simultaneously. If multiple interfaces are being used,  set the interface’s “Automatic Metric” to manual and enter a value.
  4. Microsoft O365 Sign-in:
    • A Tailscale login window will appear.
    • Select the “Sign in with Microsoft” option.
  5. Redirect to Microsoft Login:
    • The default browser will be opened and redirected to the Microsoft O365 login page.
    • Use O365 credentials (email and password).
  6. Two-Factor Authentication (if applicable):
    • If prompted for two-factor authentication, complete the required steps.
  7. Granting Permissions (if applicable):
    • If windows, or O365 asks to grant permissions, review the requested permissions and click “Allow” or “Accept.”
  8. Connecting to the Network:
    • After successful login, the Tailscale app will attempt to establish a secure connection to the network.
  9. Check connection
    • Check if it says ‘connected’ or ‘disconnected’ in the taskbar.
  10. Done. 

[Solved] Clicking on Tailscale icon does not let me login

Occasionally i have come accross a Tailscale client that does not initially want to display the log in page.

I originally also tried running CLI commands like “tailscale up –authkey xxxxxxxxxx” as well – it seems to hang.

tailscale login icon in taskbar

So when CLI and clicking on the icon in the taskbar via the GUI to log in doesn’t work – Check your network cards!
This is usually caused when Tailscale cannot tell which network card has priority.

On Windows:

Win + R //to open run
ncpa.cpl //to open the network settings
Select main network card
Open Properties, then IPv4
Click on Advanced, untick ‘Automatic Metric
Set to 10.

setting network card interface metric to solve tailscale issues

Try again. Chances are, tailscale will now let you login and generate the login page popup allowing sign on. Authkey authentication should also now work.

tailscale login screen in browser

Fibre: Comparison table of the three main types of fibre multiplexing

Below is a comparison table of the three main types of fibre multiplexing: wavelength division multiplexing (WDM), frequency division multiplexing (FDM), and time division multiplexing (TDM). The table rates each method on a scale of 1 to 10 in terms of capacity, transmission rates, complexity, and susceptibility to interference.

Method Capacity (1-10) Transmission Rates (1-10) Complexity (1-10) Interference (1-10)
WDM 10 10 8 2
FDM 8 8 6 6
TDM 6 6 2 8

Note that these ratings are subjective and may vary depending on the specific application and implementation of each method. However, this table should give you a general idea of the relative strengths and weaknesses of each method of fibre multiplexing.

Fibre Multiplexing: An Overview of Frequency Division Multiplexing (FDM)

Fibre Multiplexing: An Overview of Frequency Division Multiplexing (FDM)

Fibre multiplexing is a technique used to transmit multiple signals over a single fibre optic cable, allowing for efficient use of bandwidth and high transmission rates. One popular method of fibre multiplexing is frequency division multiplexing (FDM).

In this article, we’ll take a closer look at FDM and its key features, advantages, and disadvantages.

What is Frequency Division Multiplexing (FDM)?

Frequency division multiplexing (FDM) is a method of transmitting multiple signals over a single fibre optic cable by using different frequency bands for each signal. This allows for a higher capacity and faster transmission rates, as multiple signals can be transmitted simultaneously over the same fibre optic cable.

FDM is commonly used in telecommunications and other applications where a large amount of data needs to be transmitted over long distances. It is also used in local area networks (LANs) and other short-distance applications.

Advantages of FDM

There are several advantages to using FDM as a method of fibre multiplexing:

  • High capacity: FDM allows for a higher capacity than other methods of fibre multiplexing, as multiple signals can be transmitted simultaneously over the same fibre optic cable.
  • Fast transmission rates: FDM allows for fast transmission rates, making it suitable for high-speed data transmission over long distances.
  • Efficient use of bandwidth: FDM allows for efficient use of bandwidth, as multiple signals can be transmitted simultaneously over the same fibre optic cable.

Disadvantages of FDM

There are also some disadvantages to using FDM as a method of fibre multiplexing:

  • Complexity: FDM systems can be more complex to set up and manage than other methods of fibre multiplexing.
  • Interference: FDM systems are susceptible to interference from other signals in the same frequency band, which can degrade the quality of the transmitted signal.

Overall, FDM is a useful method of fibre multiplexing that can provide high capacity, fast transmission rates, and efficient use of bandwidth in certain situations. However, it’s important to carefully consider the potential complexity and interference issues of FDM systems when deciding which method of fibre multiplexing is right for you.

Fibre Multiplexing: An Overview of Wavelength Division Multiplexing (WDM)

Fibre Multiplexing: An Overview of Wavelength Division Multiplexing (WDM)

Fibre multiplexing is a technique used to transmit multiple signals over a single fibre optic cable, allowing for efficient use of bandwidth and high transmission rates. One popular method of fibre multiplexing is wavelength division multiplexing (WDM).

In this article, we’ll take a closer look at WDM and its key features, benefits, and disadvantages.

What is Wavelength Division Multiplexing (WDM)?

Wavelength division multiplexing (WDM) is a method of transmitting multiple signals over a single fibre optic cable by using different wavelengths of light for each signal. This allows for a higher capacity and faster transmission rates, as multiple signals can be transmitted simultaneously over the same fibre optic cable.

WDM is typically used in long-distance telecommunications, as it allows for high-speed data transmission over long distances. It is also commonly used in local area networks (LANs) and other short-distance applications.

Advantages of WDM

There are several advantages to using WDM as a method of fibre multiplexing:

  • High capacity: WDM allows for a higher capacity than other methods of fibre multiplexing, as multiple signals can be transmitted simultaneously over the same fibre optic cable.
  • Fast transmission rates: WDM allows for fast transmission rates, making it suitable for high-speed data transmission over long distances.
  • Efficient use of bandwidth: WDM allows for efficient use of bandwidth, as multiple signals can be transmitted simultaneously over the same fibre optic cable.

Disadvantages of WDM

There are also some disadvantages to using WDM as a method of fibre multiplexing:

  • Cost: WDM systems can be more expensive to install and maintain than other methods of fibre multiplexing.
  • Complexity: WDM systems can be more complex to set up and manage than other methods of fibre multiplexing.

Overall, WDM is a useful method of fibre multiplexing that can provide high capacity, fast transmission rates, and efficient use of bandwidth in certain situations.

Fibre Multiplexing: An Overview of Time Division Multiplexing (TDM)

Fibre Multiplexing: An Overview of Time Division Multiplexing (TDM)

Fibre multiplexing is a technique used to transmit multiple signals over a single fibre optic cable, allowing for efficient use of bandwidth and high transmission rates. There are several different methods of fibre multiplexing, including time division multiplexing (TDM).

In this article, we’ll take a closer look at TDM and its key features and benefits.

What is Time Division Multiplexing (TDM)?

Time division multiplexing (TDM) is a method of transmitting multiple signals over a single fibre optic cable by assigning each signal to a specific time slot. This allows for efficient use of bandwidth, as the cable is used effectively and there is less risk of congestion.

However, TDM also has some limitations. One major limitation is that the transmission rate of each signal is limited by the time slot assigned to it. This means that if a signal requires a larger time slot, it may not be able to be transmitted at the same rate as other signals.

Overall, TDM is a useful method of fibre multiplexing that can provide efficient use of bandwidth and high transmission rates in certain situations. It’s important to carefully consider your specific needs and requirements when deciding which method of fibre multiplexing is right for you.

Fibre: Selecting Between Multimode and Singlemode Cables

Fibre: Selecting Between Multimode and Singlemode Cables

When it comes to transmitting data over long distances, fibre optic cables are an increasingly popular choice because they are able to provide fast, flexible connectivity. These cables have a core that serves as a “light guide,” allowing light (or data) to be transmitted from one end of the cable to the other.

There are two main types of fibre optic cables: singlemode and multimode. Understanding the differences between these two types of cables can help you choose the right one for your specific needs.

Multimode Cables

Multimode cables are designed to transmit multiple modes of light at the same time. These cables have a larger core diameter, usually between 50 and 100 µm, and are designed for shorter distances. They are often used in local area networks (LANs) and other short-distance applications.

Here are three common use cases for multimode cables:

  1. LANs: Multimode cables are often used in local area networks (LANs) because they are able to transmit data over short distances at high speeds.
  2. Campus environments: Multimode cables are well-suited for use in campus environments, where data needs to be transmitted between buildings or within a single building.
  3. Short distance telecommunications: If you need to transmit data over a short distance, such as between two rooms in a building, multimode cables may be a good choice.

Singlemode Cables

Singlemode cables are designed to transmit a single mode of light at a time. These cables have a small core diameter, usually between 8.3 and 10.5 µm, and are designed for long distances. They can transmit data at high speeds, making them a popular choice for telecommunications over long distances.

Here are three common use cases for
singlemode cables:

  1. Long distance telecommunications: If you need to transmit data over a long distance, such as between a local phone exchange and an end user, singlemode cables are the better choice. These cables can transmit data at high speeds over long distances and are designed specifically for this purpose.
  2. High-speed data transmission: If you need to transmit data at high speeds, singlemode cables are the better choice. These cables are designed for high-speed data transmission and are capable of transmitting data at high rates over long distances.
  3. WANs: Wide area networks (WANs) often require the transmission of data over long distances. Singlemode cables are well-suited for this purpose because they are able to transmit data at high speeds over long distances.

Conclusion

When choosing between singlemode and multimode cables, it’s important to consider the distance you need to transmit data, the data rate you require, and the wavelength of light that is being used. By understanding these differences, you can choose the right type of fibre optic cable for your specific needs.

In general, singlemode cables are the better choice for long distance telecommunications, while multimode cables are better suited for short distance applications such as local area networks (LANs). Ultimately, the right choice for you will depend on your specific needs and requirements.