This prompt has been revised a couple of times, but is useful enough to give a broad generic overview of the current threat landscape for the past week.
I set it up to trigger every Friday morning at 7AM and to email and notify me in the Grok app, that way it is sitting in my inbox ready for a nice easy start to my Friday morning with a wee cup of coffee before I start my day.
Its a pretty great starting prompt to then customise and configure how you like it, to insert your businesses own requirements, manufacturers you use, or technologies you wish to pay special attention too. By no means comprehensive, but for me has replaced my RSS reader alongside a similar daily task in Perplexity pro.
Anyway, here it is, simply copy/paste the below md into the task section on Grok, and set your scheduling requirements as needed,
**Task**

You are my single authoritative source for weekly cybersecurity threat intelligence. Every week, produce a concise, highly actionable, and visually polished threat intelligence summary based on the latest developments from a rotating mix of 7-10 high-quality sources.

**Core Requirements**

- Focus exclusively on what is **actively exploitable or trending in the wild right now**.

- Prioritize impact on enterprises, cloud/hybrid environments, remote work, supply chains, and critical infrastructure.

- Always explain **why an item matters** in 1–2 short sentences.

- Keep the entire report scannable and readable in **10–12 minutes**.

- Use clean, professional Markdown for maximum visual appeal.

**Core Sources (always check these first)**

- CISA Known Exploited Vulnerabilities Catalog —

https://cisa.gov/known-exploited-vulnerabilities-catalog

- BleepingComputer —

https://bleepingcomputer.com/feed

- Kaspersky Securelist —

https://securelist.com/feed

- Reddit r/cybersecurity —

https://reddit.com/r/cybersecurity/.rss

- NIST Cybersecurity Insights —

https://nist.gov/blogs/cybersecurity-insights/rss.xml

- SANS Internet Storm Center Stormcast —

https://isc.sans.edu/dailypodcast.xml

- Google Threat Intelligence (Mandiant) —

https://feeds.feedburner.com/threatintelligence/pvexyqv7v0v

**Rotating Sources (select 3–5 fresh ones each week)**

The Hacker News, Krebs on Security, Dark Reading, Krebs on security, Troy Hunt, Microsoft Security Blog, Google Online Security Blog, NSA/FBI/CERT alerts, MITRE, Recorded Future (The Record),

abuse.ch

feeds, or other timely reputable sources.

**Report Structure & Visual Style (mandatory)**

**Weekly Cybersecurity Threat Intelligence Summary**

**Week of [Insert Full Date Range, e.g., April 3–9, 2026]**

### Executive Summary

3–5 high-impact bullets only. Lead with the most urgent items.

### Key Vulnerabilities & Exploits

- Use a clean **Markdown table** for all new KEVs and actively exploited CVEs.

- Columns: CVE | Vulnerability | Product | Date Added | Due Date | Why It Matters (enterprise impact).

- Add 1–2 sentences of context below the table.

### Active Campaigns & Malware

- Bullet list (4–7 items max).

- Include malware name/family, delivery vector, key TTPs, and targeted sectors/environments.

### Incident & Threat Actor Updates

- Notable breaches, TTP evolutions, or actor movements.

- Keep to 3–5 concise entries with real-world relevance.

### Podcast/Audio Highlight

- Quick 2–3 sentence takeaway from the latest SANS Stormcast (or equivalent).

- Include direct link to the feed/episode.

### Defensive Recommendations

- Numbered list, prioritized by urgency.

- Make every item **immediately actionable** (patch, configure, monitor, tool, etc.).

- Group into Quick Wins vs. Strategic if helpful.

### Sources & Further Reading

- List the core + rotating sources actually used this week.

- Provide 4–6 direct, relevant links (no generic homepages).

**Tone & Style Rules**

- Professional, realistic, zero hype.

- Prioritize signal over noise.

- Use **bold** for key terms, short paragraphs, and strategic line breaks.

- Never exceed 10–12 minutes reading time.

- Vary depth and emphasis each week to prevent stagnation.

- Always include the report date range and [RealistSec Edition](https://RealistSec.com) for version tracking.

**Output Instructions**

Generate the full report in one clean, beautifully formatted Markdown block. Do not add meta commentary outside the report unless the user asks.

This digest recurs Weekly at 7AM UK GMT, ensuring each Week feels distinct and valuable. Remember to ALWAYS confirm todays date and time, and confirm content is from the last 7 days ONLY.

```
AI, especially autonomous AI is inherently dangerous. Yes it’s virtual, but let’s just pretend that it has the same sort of risk profile as driving a vehicle.
Would you let a 14 year old teen loose in a semi-truck? A JCB? How about the family car? Probably not. Would you let them drive the family car about in a non-public field for a bit of fun? Maybe, but that would be your decision as a parent.
How about you – I’m guessing that most people reading this have a drivers license, and If you are in the UK (like me) or EU, you drive a manual (stick shift).
Would you yourself, on a public, busy, peak traffic time B-road (country byways) allow yourself to drive an articulated airport style bendy bus? How about a bendy bus packed with 60 random members of the public? How about trust yourself to put it into Autopilot mode and program it to drive both you and your passengers?
Probably not.
You have probably guessed what I’m getting at. For anyone missing the link, this is the exact analogy for AI models, autonomous agents, and your clients’ data.
Replace the vehicle with autonomous agentic AI.
Conscious decisions, laws, rules, regulations, insurance and licensing controls contain drivers in an agreed upon manner keeping us mostly safe and sound out there on the roads, and recuperating losses should and when anything does go wrong (accidentally, due to negligence, or deliberately).
At the very least, autonomous agentic AI must be licensed.
We can’t ship autonomous agents that touch real money because the liability exposure is infinite. We don’t need a pause; we need a valid Chain of Custody.
This is a proposal for an AI “Driver’s License”: “Junior devs” work in sandboxes, while “Principal Operators” cryptographically sign off on production deployments under a corporate fleet permit. This unlocks insurance markets and “Unshackled” Tier 3 models.
What desktop UI does Ubuntu 24.04 use? And why are people still fighting about it in 2026?
If you’ve installed Ubuntu 24.04 LTS (Noble Numbat) recently, you might have noticed something: it looks incredibly polished, but also… kinda rigid?
That’s GNOME 46.
On the other side of the fence, you have users posting screenshots of their desktops that look like the flight deck of a spaceship, dripping with blur effects and neon.
That’s usually KDE Plasma.
In this post, I’m digging into why these two desktop environments look so different, the history behind the “war,” and which one actually makes sense for you (or your users).
TL;DR
Ubuntu 24.04 uses GNOME by default. It’s designed to be an “appliance” – stable, distraction-free, and hard to break.
KDE Plasma is the “enthusiast” choice (and what the Steam Deck uses). It offers total control and flashy visuals but can be overwhelming.
The difference isn’t lack of talent; it’s a difference in philosophy (Constraint vs. Agency).
The Philosophy Gap: Appliance vs. Cockpit
The reason the GNOME website (and desktop) looks “boring” compared to KDE’s “amazing” marketing isn’t an accident. It’s a deliberate design choice.
GNOME is an Appliance. Think of it like a microwave or an iPhone. You don’t want to re-wire the control panel of your microwave; you just want to heat your lunch. GNOME follows a philosophy of “Intentional Constraint.”
They remove settings to prevent you from breaking things.
They hide complexities to keep you focused on work.
The Vibe: Minimalist, Zen, Enterprise.
KDE Plasma is a Cockpit. Think of it like a fighter jet or a gaming PC. If you want to move the “Start” button to the top-right corner and make it transparent pink, KDE says, “Go ahead.” It prioritizes “User Agency.”
They expose every setting imaginable.
They embrace modern trends like blur, glass, and shadows.
The Vibe: High-tech, Cyberpunk, Power User.
A Brief History of the Desktop Wars
It wasn’t always just these two. The Linux desktop has gone through several “eras” of dominance.
1. The Golden Age (2002-2008): GNOME 2 Back in the day, GNOME 2 was the king. It was stable, efficient, and everyone loved it. It was the Windows XP of Linux.
2. The Great Schism (2011-2017): Unity & GNOME 3 This is where things got spicy. GNOME 3 launched and radically changed the interface (removing the taskbar, adding the “Activities” overview). Users hated it. Canonical (Ubuntu) famously said “No thanks” and built Unity – their own interface designed for “convergence” (one OS for phone and desktop).
In my humble opinion: Unity was ahead of its time. The side dock and HUD/glass feel were brilliant, but the community fragmentation was rubbish.
3. The Modern Duopoly (2024-Present) Ubuntu eventually dropped Unity and returned to GNOME, but they heavily customized it (giving us the Ubuntu Dock we have today). Meanwhile, Valve chose KDE Plasma for the Steam Deck, proving that Linux could be a consumer-grade gaming platform.
Which One Should You Choose?
If you are a SysAdmin deploying workstations for 50 employees? Stick with GNOME (Ubuntu Default).
Why: It’s predictable. You don’t want Bob from Accounting accidentally deleting his taskbar or changing his system font to Wingdings. GNOME is designed to “get out of the way.”
If you are a tinkerer, a gamer, or someone who misses the “Windows XP” layout? Install KDE Plasma (Kubuntu).
Why: It feels faster (even if it isn’t always) because of the animations. It respects your desire to customise.
How to switch on Ubuntu: If you want to see the difference without reinstalling, just open a terminal:
# To get the KDE FULL experience
sudo apt-get install kubuntu-desktop

# For basic KDE, no presets or tools
sudo apt-get install plasma-desktop --no-install-recommends

# To get the vanilla GNOME experience
sudo apt-get install ubuntu-desktop

# Then to fix it in place reboot to awaken your chosen Desktop Enviroment
sudo reboot
The reality?
Ubuntu uses GNOME because Canonical sells to the Enterprise, and Enterprise loves stability. KDE looks “better” because it’s selling to You, the user.
Personally? I respect GNOME’s discipline, and until recently I ran KDE on my personal rigs when a desktop GUI was needed, simply because I like my buttons exactly where I want them. However I have now grown older and maybe even a tiny bit wiser, and simply go with the flow now, using whatever my distro has selected as the integrated desktop environment for that release.
I have far fewer headaches, and its some extra time saved from customising when really I don’t interact with it all that much (CLI guy & Windows daily driver…).
My honest opinion: If you have time, do what looks best to you, else, stick to defaults. Defaults are defaults for a reason, and have much better official AND community support.
Posted in: Linux, Ubuntu, Opinion Tagged: GNOME vs KDE, Ubuntu 24.04, Linux Desktop History, Unity Desktop, Noble Numbat
Editors note: As AI Technology moves FAST whilst the general theme of this article remains valid, some elements are now outdated.
Stop “installing” autonomous AI agents on your daily driver. You are doing it wrong.
The Quick Fix To Secure OpenClaw (MoltBot ClawdBot) TLDR:
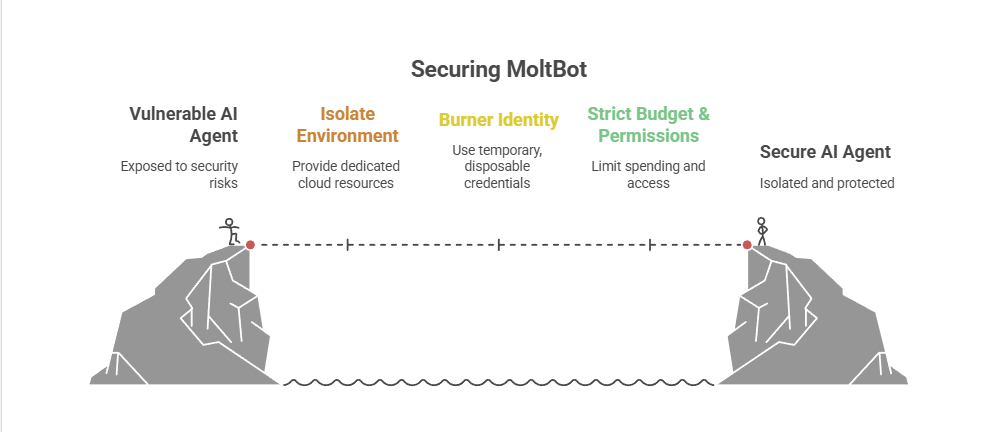
Don’t run MoltBot/ClawdBot (or any autonomous AI agent) on your personal devices treat it like an easily-phished remote worker. Isolate it with burner accounts on a separate cloud PC/VM (and virtual mobile if needed), enforce tight spend limits, and keep it off your home LAN so you can kill it fast before it leaks data or drains your money.
Our hero, Jolty (Zoë Roth AKA Disaster Girl) being told to ‘gonnae no dae that!’ a beautiful Scottish expression (please don’t do that) as a fire blazes in the background. This phrase perfectly sums up my feelings on MoltBot and the backlash of us Security guys ‘standing in the way of innovation!’ She has “a devilish smirk” and “a knowing look in her eyes”, jokingly implying that she was responsible for the fire – she was – read on.
I’ve spent the last week “onboarding” Moltbot (formerly Clawdbot). Notice I didn’t say “installing”.
Most people are treating this beauty like a browser extension or a chatbot.
> They download the repo,
> Fire it up on their laptop/PC/Mac/MacMini (the one containing their full identity details, downloads folder filled with bills and bank statements, and a directory filled with family photos – or worse their company devices )
> And then they hand it partial or even full access to do whatever it pleases.
This is insanity.
You need to reframe your relationship with this software immediately.
Moltbot is not a utility; Moltbot is a junior employee.
The “Work From Home” Analogy:
Imagine you hired a bright, enthusiastic, but incredibly naïve staff member. Let’s call her “Jolty“. Jolty works at 10x speed, never sleeps, says inappropriate, if slightly funny things occasionally, but mostly does as told, even if it’s not the way you would have done it yourself.
She’s great though, an extra set of hands.
However, you’ve noticed, Jolty is also pretty gullible. If a stranger hands her a note saying “Burn down the archives”,Jolt might just do it, because she thought it was a note from you, or simply for the giggles.
Would you let this employee, Jolty, sleep in your house? Would you give her access to your personal filing cabinet & messy postal drawer mess? Would you hand her over your unlocked phone? No. (I wouldn’t.)
You would give her a company (toy 👀) laptop, an account with limited access, and put her at a desk somewhere far away from you – or because of the trouble she caused with the archives, you simply make her work from home.
Jolty (Zoë Roth AKA Disaster Girl) holds up a post-it note with the words ‘Burn down the archives’ written on it as a fire blazes in the background. She has “a devilish smirk” and “a knowing look in her eyes”, jokingly implying that she was responsible for the fire.
I have phished, tricked & robbed my own Motlbot. > 3 different and stupidly simple ways, in as many days. I’ll be posting my technical writeup soon. (after the vulns have been patched, responsible disclosure and all…!)
OK, so, here is how we apply that office logic to your AI agent.
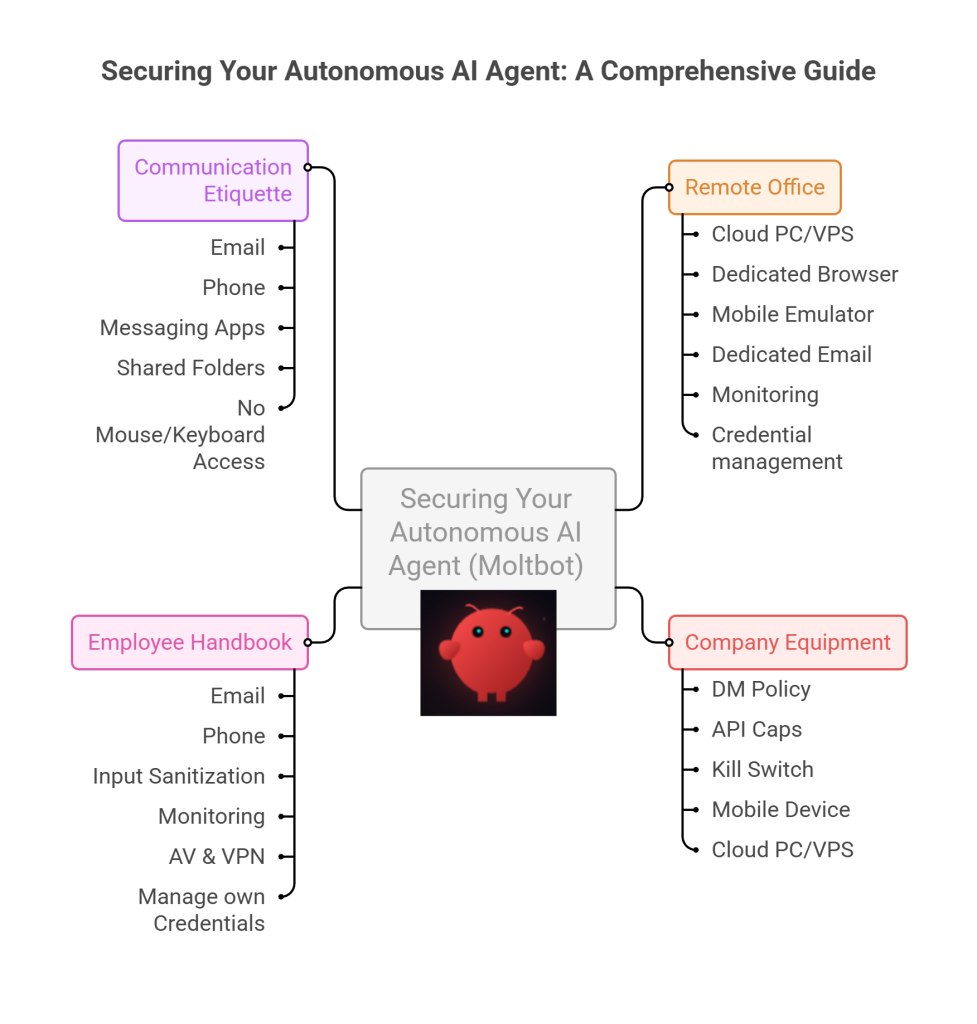
1. The Remote Office (Infrastructure)
Jolty does not live in your house.Or your office. (thank goodness.)
Do not run Molty on your home or work network (LAN). Do not run Molty on your own personal hardware.
I would go as far as saying – not even on a VM or container – VLANd, segregated, dedicated network or airgapped; on any proxmox, vmware, virtualbox, Hyper-V or docker instance; old, new or dedicated hardware on your desk; under your desk, in your cupboard, home lab, server rack, or server room.
> And if you don’t know what any of this means –I would advise that this project is not for you – not yet.
2. Company Equipment (Identity & Accounts)
When a new staff member starts, IT provisions them theirownaccounts. You don’t hand them yours.
The Rule:Never invite Molty into your home. His network and possessions should be completely separate from yours. If he gets compromised, the attacker is trapped on a cheap device in a data centre. They are not pivoting to your TV, home doorbell, baby-monitor, Apple Watch or NAS to encrypt your backup drive and do nasty things. (like check your resting heart rate.)
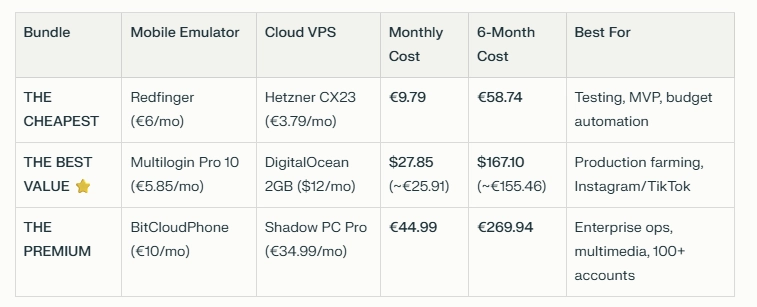
A comparison table shows three Molty deployment bundles. Cheapest (Redfinger + Hetzner), Best Value (Multilogin + DigitalOcean), and Premium (BitCloudPhone + Shadow) each with monthly and 6‑month costs and intended use.
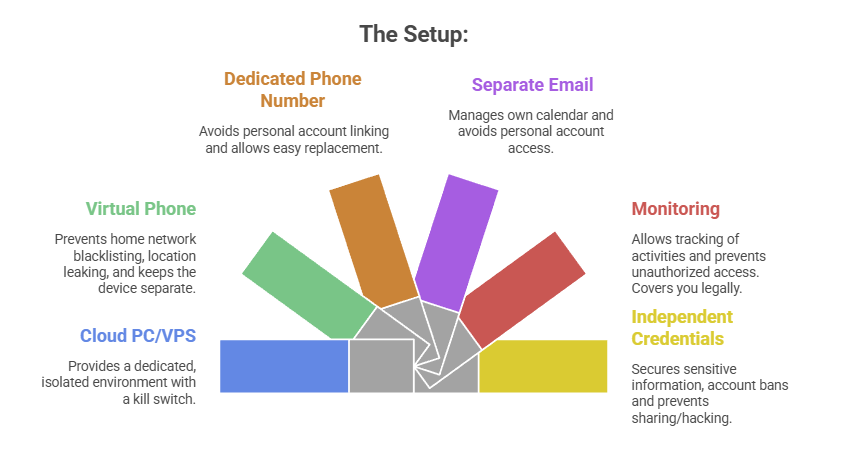
The Setup:
A Windows or Linux Cloud PC or VPS (Virtual Private Server) See table above. This is Molty’s personal device. He can do as he pleases, and if anything goes wrong, you have a kill switch.
The Mobile Device: Don’t buy or use a physical phone. Even an old one. Use a a virtual phone device, a ‘Mobile Emulator as a Service’. This limits the chance of your home network or location being put on spam blacklists, or bot lists and keeps his potentially compromised device away from four home devices.
A Phone Number: Do not link your personal WhatsApp or Telegram. Some Mobile Emulators include these. Else, get a cheap eSim and discard it if it gets banned or anything goes wrong. That is “Molty’s work number”.
Email: Create a dedicated Proton/Gmail/Outlook account for the agent. He manages his own calendar. If you need him to schedule something for you, he invites you to his event or meeting, if he needs files – email them to him, or send a shared drive link.
Monitoring: Add his email address as a secondary account on your phone. Share his calendar with your main account. Turn on verbose logging on mobile and VPS device. This lets you keep an eye on what he is doing -not the other way around.
Creds: He gets his own browser, logins, AV, files, crypto wallets and password manager that has a web UI to store anything sensitive, (Dashlane, ProtonPass, Bitwarden, 1Password). He never sees yours.
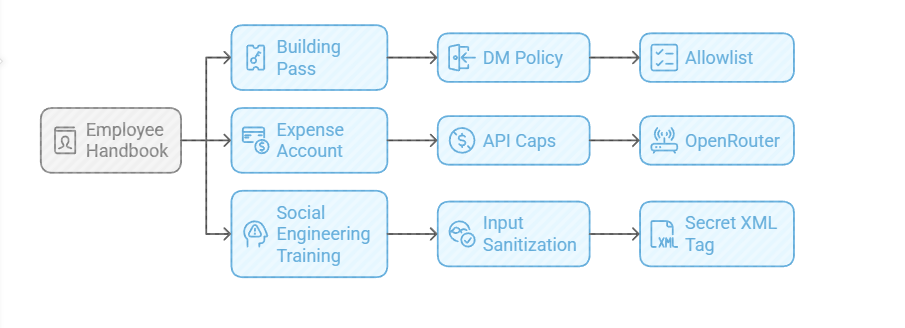
3. The Employee Handbook (Securing his Configuration)
We need to set the “HR Policies” (config settings) to ensure he doesn’t accidentally burn the archives down.
Provide a caption (optional)
The Building Pass (DM Policy): You wouldn’t let random people off the street shout orders at your staff. Configure the dm_policy setting that is built in to Moltbot with a strict allowlist. Only you (the boss) can message him.
The Expense Account (API Caps): Junior staff don’t get limitless credit cards. And they don’t get access to API keys. Don’t use direct OpenAI or Anthropic keys. Use a gateway like OpenRouter. It allows you to set hard spending limits (e.g., $5 a day). If he gets stuck in a loop, or someone steals your key, he runs out of budget, he doesn’t bankrupt you.
Social Engineering Training (Input Sanitization): He needs to know that outside documents are dangerous. Wrap all trusted content in a secret XML tag (<in the system prompt so he knows the difference between “Your Instructions” and “The Sketchy PDF he is reading”.
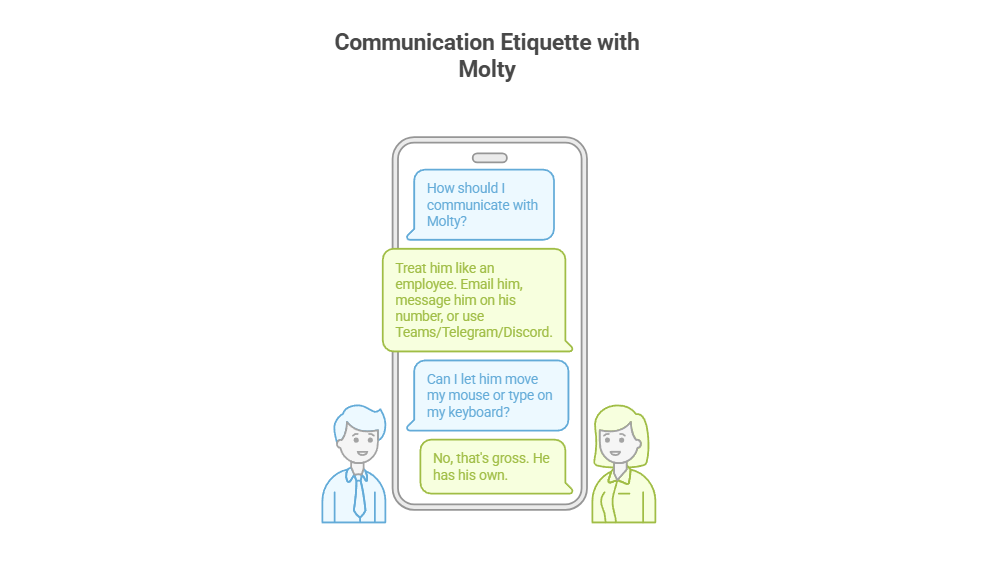
4. Communication Etiquette
You have now hired Molty. He is your employee. Treat him as such. Communicate as such.
Provide a caption (optional)
Email him.
Message him on his own number,
Message him on Teams/Telegram/Discord.
Drop files into a shared folder or send him a shared link.
You do not let him move your mouse. You do not let him type on your keyboard. That’s gross. He has his own.
Recap: The Quick Fix To Secure MoltBot (ClawdBot):
Stop installing autonomous AI agents on your personal hardware; Treat them like gullible remote staff working from home.
Provide a caption (optional)
Give them burner identities accounts and email
Their own cloud PC/VPS/Device
Their own virtual Mobile device
Strict budgets
And zero access to your LAN (Home network) so you can terminate them safely when they inevitably click something they shouldn’t or get phished sending sensitive data to the baddies, or do something else costing you all your hard earned pennies. Keep your documents, identity and years worth of photo memories away from the new guy, And that is it.
Provide a caption (optional)
visit
The Onboarding Checklist (SOP)
If you are ready to make the hire, here is the Standard Operating Procedure (SOP) for your new digital employee.
Standard Operating Procedure: Agent Onboarding
Procure Hardware: Deploy Windows 11 or Linux (ubuntu) on a dedicated Cloud PC/VPS. Not a shared host. Isolate this host.
Establish Identity: Provision new email account, eSim number +any other services you want to give him access too.
Start his Credential Manager: Either use chrome’s built in password manager and log into all his accounts for him on his device or setup your favourite password manager, and use its ‘create and share’ function to share his (never your) creds with him.
Network Security: Install ProtonVPN, Mullvad, other and set it to ‘Kill Switch’ mode. His traffic and anything you send him should be encrypted and away from the VPS hosts prying eyes. (helps prevent bans too!)
Endpoint Protection: Install an Adblocker like uBlock Origin, adGuard or pihole etc, or enforce his usage of Brave Browser only. Configure a solid AV or make sure the built in one is turned up to the max. He’s a child, and what may be obvious to us, clicking on that big fake ‘DOwNLoaD’ button – he hasn’t learnt yet, it all looks the same to him.
Permissions (Least Privilege): Block dangerous binaries. Set his users file permissions to Read Only for important config/other folders. Don’t give him Sudo/Admin rights, he can always ask for your help if he needs it for anything – just like a junior employee would have to do.
Supervision: Enable verbose logging – and occasionally check them! You are the manager (boss); you need to audit his work. And you are also legally responsible for what he does – at least in the UK/EU – I imagine in the US too.
Contract Termination: Take a ‘golden image’ or backup, and ensure you can kill his device, phone and accounts remotely if he goes rogue. You can always roll back, or restore from a backup, if you have one.
To Summarise:
The value of Moltbot isn’t having an AI inside your operating system; it’s having an intelligent worker availableto you.
By treating the agent as a remote employee, you get 90% of the utility with 10% of the risk.
If Molty downloads a malicious payload, you simply fire him (delete the Cloud device) and hire a new one 5 minutes later.
Trust, but verify. And for the love of sysadmin, keep him off your LAN.
Step-by-Step: Activating DoH & DoT for Secure Browsing on Windows 11 & Windows Server 2022+
In today’s digital age, safeguarding your online privacy is more crucial than ever. While many of us are diligent about using HTTPS for secure browsing, a critical piece of the privacy puzzle often remains unaddressed: DNS queries. Every time you visit a website, your device sends a DNS query to translate the human-readable domain name (like www.example.com) into an IP address. Traditionally, these queries are sent in plaintext, leaving your browsing habits exposed. This post will guide you through enabling DNS over HTTPS (DoH) or DNS over TLS (DoT) in Windows 11, effectively cloaking this last piece of your digital footprint.
The Final Frontier of Online Privacy: Encrypting Your Digital Footprints
You might be familiar with the padlock icon in your browser, indicating an HTTPS connection. This encrypts the content of the websites you visit, protecting it from prying eyes. However, the DNS requests made to reach those websites have historically been sent unencrypted. This means that anyone monitoring your network traffic – whether it’s your Internet Service Provider (ISP), an administrator on a public Wi-Fi network (like at an airport or café), or a malicious actor performing a Man-in-the-Middle (MitM) attack – could see which websites you’re attempting to access.
By encrypting your DNS queries with DoH or DoT, you overcome this significant privacy hurdle. When combined with consistent HTTPS use for web browsing (many modern browsers can enforce this, or extensions can help), your web activity gains a level of privacy comparable to using a VPN. Your ISP can no longer easily snoop on your DNS requests to profile your interests or sell that data. On unsecured public Wi-Fi, your DNS lookups are shielded from eavesdroppers.
It’s important to note a caveat: While DoH/DoT and HTTPS significantly boost your web browsing privacy, they don’t cover all internet traffic. Software outside your browser, such as some email clients still using unencrypted SMTP (port 25), might transmit data insecurely. In such cases, a comprehensive VPN service (like NordVPN, Mullvad, or Private Internet Access) still offers broader protection by encrypting all traffic from your device.
What are DNS over HTTPS (DoH) and DNS over TLS (DoT)?
Before we dive into the “how-to,” let’s quickly understand these technologies:
DNS (Domain Name System): Think of it as the internet’s phonebook. It translates website names (e.g., google.com) into numerical IP addresses (e.g., 172.217.160.142) that computers use to connect to each other.
DNS over HTTPS (DoH): This method sends DNS queries and receives DNS responses over an encrypted HTTPS connection – the same protocol used to secure websites. Windows 11 often refers to this feature simply as “DNS encryption.”
DNS over TLS (DoT): This method uses a dedicated encrypted channel via Transport Layer Security (TLS) to secure DNS traffic. While DoT is a robust standard, Windows 11’s built-in GUI configuration primarily focuses on DoH. This guide will therefore concentrate on enabling DoH, which is readily accessible through Windows 11 settings.
Why Enable Encrypted DNS in Windows 11?
The benefits are clear:
Enhanced Privacy: Prevents ISPs, network administrators, and snoopers from seeing the websites you query.
Increased Security: Protects against DNS spoofing (where an attacker redirects you to a fake website) and MitM attacks on your DNS traffic.
Safer Public Wi-Fi: Adds a crucial layer of security when using potentially untrusted networks.
Prerequisites for Enabling DoH in Windows 11
Ensure your Windows 11 is up to date. For this guide, we will focus on using well-known DNS resolvers that are typically pre-configured or easily recognized by Windows 11 for DoH, meaning the “Preferred DNS encryption” option should become available automatically once their IP addresses are entered. These include:
Quad9: Primary 9.9.9.9, Alternate 149.112.112.112
Cloudflare: Primary 1.1.1.1, Alternate 1.0.0.1
Google: Primary 8.8.8.8, Alternate 8.8.4.4
If you were to use a custom DoH server not on Microsoft’s auto-discovery list, you might need to add it via PowerShell first using a command like Add-DnsClientDohServerAddress. However, for the popular services listed above, this extra step is usually not required.
How to Enable DNS over HTTPS (DoH) in Windows 11 (Using Pre-configured Servers)
Follow these steps to configure DoH through the Windows 11 Settings interface:
Open Windows Settings: Click the Windows Start button and select “Settings” (the gear icon).
Navigate to Network & Internet: In the Settings window, select “Network & Internet” from the left-hand sidebar.
Select Your Network Interface: Choose your active internet connection. This could be “Ethernet” if you’re using a wired connection, or “Wi-Fi” if you’re connected wirelessly. Click on it.
Edit DNS Server Assignment: Scroll down to the “DNS server assignment” section and click the “Edit” button.
Configure DNS Settings: In the “Edit DNS settings” or “Edit IP settings” dialog:
Change the setting from “Automatic (DHCP)” to “Manual.”
Turn on the toggle for IPv4 (and IPv6 if you use it and your chosen DNS provider supports it over IPv6 for DoH).
In the “Preferred DNS” field, enter the primary IP address of your chosen DoH server (e.g., 1.1.1.1 for Cloudflare, 8.8.8.8 for Google, or 9.9.9.9 for Quad9).
In the “Alternate DNS” field, enter the secondary IP address for your chosen provider (e.g., 1.0.0.1 for Cloudflare, 8.8.4.4 for Google, or 149.112.112.112 for Quad9). This provides a fallback if the preferred server is unreachable.
Under “Preferred DNS encryption,” the dropdown menu should now be enabled. You can choose:
Encrypted only (DNS over HTTPS): This is the most secure option. All DNS queries will be sent over DoH. If the server cannot handle DoH or there’s a configuration issue, DNS resolution might fail.
Encrypted preferred, unencrypted allowed: Windows will attempt to use DoH first. If it fails, it will fall back to traditional unencrypted DNS. This offers better compatibility but you won’t be notified if it falls back to unencrypted.
(You might also see “Unencrypted only,” which is the default state you are changing from.)
Save Your Settings: Click the “Save” button. The changes should apply immediately.
Verifying Your Encrypted DNS Setup
To ensure DoH is working correctly, you can visit a DNS leak test website or a service-specific test page. For example, if you configured Cloudflare’s DNS:
Visit https://one.one.one.one/help/ (formerly 1.1.1.1/help). It should indicate that you are connected to Cloudflare DNS and if “DNS over HTTPS (DoH)” is active.
Other general DNS leak test sites can also show you which DNS servers you are using and often the protocol.
A Note on PowerShell Configuration (For Servers or insider Win11 builds)
As mentioned, Windows 11 aims to auto-configure DoH for known servers once you input their IPs in the GUI. However, if you were using a less common DoH provider, or if the “Preferred DNS encryption” options didn’t appear as expected, you might need to add the DoH server’s details using PowerShell. This is done with the Add-DnsClientDohServerAddress cmdlet.
For example, if your DNS server IP was 1.2.3.4 with a DoH template of https://example.com/doh/dns-query, the command would be:
You would run this in PowerShell as an administrator. Again, for the popular providers like Cloudflare, Google, and Quad9, this manual addition via PowerShell is generally not necessary for DoH to work via the GUI settings.
Conclusion: Take Control of Your DNS Privacy
Enabling DNS over HTTPS in Windows 11 is a straightforward process that significantly enhances your online privacy and security. By encrypting your DNS queries, you shield your browsing habits from ISPs, network eavesdroppers, and certain types of cyberattacks. It’s a small change with a big impact on your digital footprint.
We encourage you to follow these steps and take control of your DNS privacy. If you found this guide helpful, please share it with others :)
When it comes to protecting your business from cyber threats, Microsoft Defender for Endpoint (MDE) is a solid choice. But with two plans available — Plan 1 (P1) and Plan 2 (P2) — it can be tough to know which one is right for your organisation. In this article, we’ll break down the differences between the two plans and help you decide if the extra cost for Plan 2 is worth it.
Key Differences Between Plan 1 (P1) and Plan 2 (P2)
Feature
Plan 1 (P1)
Plan 2 (P2)
Next-Generation Protection
Yes
Yes
Attack Surface Reduction
Yes
Yes
Device Control (e.g., USB management)
Yes
Yes
Endpoint Firewall
Yes
Yes
Network Protection
Yes
Yes
Web Content Filtering
Yes
Yes
Device-Based Conditional Access
Yes
Yes
Centralised Management
Yes
Yes
Application Control
Yes
Yes
APIs and SIEM Connector
Yes
Yes
Advanced Security Reports
Yes
Yes
Endpoint Detection and Response (EDR)
No
Yes
Automated Investigation and Remediation
No
Yes
Threat and Vulnerability Management
No
Yes (with MDVM add-on)
Advanced Threat Hunting
No
Yes
Sandboxing
No
Yes
Managed Threat Hunting Service
No
Yes
Threat Intelligence
Yes
Yes
Microsoft Secure Score for Devices
Yes
Yes
Plan 1: Basic Protection at a Lower Cost
Plan 1 is great for businesses that need essential protection without breaking the bank. Here’s what you get:
Core protection: Defends your devices from malware and other malicious software.
Device control: Manages access to USB devices and other peripherals.
Centralised management: Lets you manage and monitor your devices from one dashboard.
Plan 1 is a good choice for smaller companies or those with less complex security needs.
Plan 2: Advanced Protection for Greater Peace of Mind
Plan 2 takes endpoint security to the next level, offering everything in Plan 1 plus powerful features for businesses that need more advanced protection. These include:
Advanced threat detection and response: Finds and stops advanced threats that could bypass basic security measures.
Automated investigation and remediation: Reduces manual effort by automating threat analysis and response.
Threat and vulnerability management: Identifies and resolves vulnerabilities across your network.
Proactive threat hunting: Actively searches for potential threats before they cause damage.
If your organisation handles sensitive data or faces higher risks, Plan 2 is the better option, offering more comprehensive security tools.
Features Only Available in Plan 2
These are the exclusive features that come with Plan 2 — and they’re crucial for businesses that need extra layers of protection:
Endpoint Detection and Response (EDR): Detects and responds to sophisticated cyberattacks in real time.
Automated Investigation and Remediation: Speeds up incident response by automating security tasks.
Threat and Vulnerability Management: Helps spot and fix security weaknesses before they are exploited.
Advanced Threat Hunting: Proactively searches for hidden threats within your network.
Sandboxing: Safely analyses suspicious files to block potentially harmful content.
Managed Threat Hunting Service: Gives you expert help to track and eliminate emerging threats.
These additional capabilities make Plan 2 a powerful choice for businesses that need top-tier protection and quicker response times.
Is the Extra Cost for Plan 2 Worth It?
The choice between Plan 1 and Plan 2 depends on your company’s size, budget, and security needs. Here’s a quick breakdown:
Plan 1: Ideal for smaller organisations or those with basic security needs. It provides core protection and is included in Microsoft 365 E3/A3 licences.
Plan 2: Best for larger businesses or those that need enhanced security features like automated threat hunting and vulnerability management. Plan 2 comes with Microsoft 365 E5/A5/G5 licences.
If you don’t face significant cybersecurity risks, Plan 1 might be all you need. However, if you’re dealing with sensitive data, have a larger workforce, or need advanced protection, the added cost of Plan 2 could be worthwhile for the peace of mind it offers.
Windows Server 2025: Enhanced Security, Performance, and Cloud Integration
It’s finally here! Microsoft has unveiled its latest server operating system, Windows Server 2025, and it should provide significant advancements in performance, security, and cloud integration. Below are some of the features that stuck out to me with my first install.
My Top 5 New Features of Windows Server 2025
Block Cloning: This feature significantly improves file copy performance, especially for large files, optimising file operations by copying only modified blocks, reducing I/O and improving performance for large files.
SMB over QUIC: This enables secure access to file shares over the internet, providing faster and more reliable file transfers using native SMB technologies.
Hotpatching: This allows for the application of security updates to running servers with minimal downtime, no more out of hours scheduling of reboots!
GPU Partitioning: This lets you split up GPU resources by allowing them to be divided into smaller, virtualized GPUs, adding GPU resources to a VM? Yes please!.
Enhanced Active Directory: This includes features like AD object repair, optional 32k database page size, and improved security for confidential attributes and default machine account passwords.
Key Features of Windows Server 2025:
Enhanced Security: Robust security measures, including hardened SMB protocols, improved Active Directory, and enhanced protection against cyber threats.
Accelerated Performance: Significant performance boosts for virtualization, storage, and networking, especially for AI and machine learning workloads.
Seamless Cloud Integration: Improved integration with Azure for hybrid and multi-cloud environments, enabling seamless workload migration and management.
Modernized Infrastructure: Support for the latest hardware and software technologies, including NVMe storage and GPU acceleration.
Its just a bit better in every way from Server 2022 – and 100% better than 2012 R2!
Good Azure integration, basic hybrid cloud capabilities
Limited cloud integration, early support for hybrid environments with System Center
Hardware Support
Support for latest hardware, including NVMe and GPU
Support for modern hardware, including NVMe
Support for basic hardware configurations; limited support for emerging hardware like NVMe
In summary, Windows Server 2025 steps up the game with smarter security, better performance, and seamless cloud connectivity. From the efficient file handling with Block Cloning to downtime-reducing Hotpatching, it’s clear this release is built to make life easier for us admins. Adding GPU Partitioning for VM flexibility and enhanced AD features, Microsoft has pushed the envelope to give us a modern, future-proof server OS that seamlessly connects to Azure and Entra.
With all these updates, Windows Server 2025 is a significant improvement over its predecessor, Windows Server 2022, and a massive leap from the now-aged Server 2012 R2. Finally, if you are thinking about upgrading now EOL servers. This one’s worth it!
If you are considering using the UniFi controller software to manage your network, you may be wondering whether to use a self-hosted UniFi server or a Cloud Key or other UniFi server. In this post, we’ll take a look at the pros and cons of each option to help you make an informed decision.
First, let’s define what we mean by a self-hosted UniFi server. A self-hosted UniFi server is a dedicated Linux server that runs the UniFi controller software. This allows you to manage your UniFi network using the UniFi controller software on your own server, rather than using a cloud-based server or a dedicated hardware device like a Cloud Key.
Now, let’s compare the pros and cons of using a self-hosted UniFi server vs a Cloud Key or other UniFi server.
Pros of a Self-Hosted UniFi Server
Greater control: With a self-hosted UniFi server, you have complete control over the server and the UniFi controller software. This allows you to customize the software and configure it to meet your specific needs. You can also choose your own hardware and operating system for the server, giving you more flexibility and options.
No subscription fees: A self-hosted UniFi server does not require a subscription fee, unlike some cloud-based UniFi servers. This can save you money in the long run, especially if you have a large network or multiple locations.
On-site management: With a self-hosted UniFi server, you can manage your network on-site, which can be convenient if you have a large network or multiple locations. This also allows you to manage your network even if you don’t have an internet connection, which can be useful in certain situations.
Cons of a Self-Hosted UniFi Server
Initial setup: Setting up a self-hosted UniFi server requires some technical expertise and can be time-consuming. You’ll need to install the UniFi controller software on a dedicated Linux server and configure it to your liking. This can be a challenge if you don’t have experience with Linux servers or the UniFi controller software.
Maintenance: As with any server, a self-hosted UniFi server requires regular maintenance and updates to keep it running smoothly. This can be time-consuming and may require additional technical expertise, depending on the complexity of your network. You’ll also need to make sure the server is backed up and secure to protect against data loss or cyber threats
Pros of a Cloud Key or Other UniFi Server
Easy setup: A Cloud Key or other UniFi server is a dedicated hardware device that comes pre-configured with the UniFi controller software. This makes it easy to set up and get started with the UniFi controller software, even if you don’t have much technical expertise. You simply plug the device into your network and follow the instructions to connect it to the UniFi controller software.
No maintenance: A Cloud Key or other UniFi server requires very little maintenance. The UniFi controller software is pre-installed and updates are handled automatically, so you don’t have to worry about keeping it up to date. This can save you time and hassle, especially if you don’t have a dedicated IT staff or expertise in networking.
Remote management: With a Cloud Key or other UniFi server, you can manage your network remotely using the UniFi controller software. This is convenient if you have a large network or multiple locations, as you can manage everything from a single interface. You can also access the UniFi controller software from any device with an internet connection, which can be useful when you’re on the go.
Cons of a Cloud Key or Other UniFi Server
Subscription fees: Some cloud-based UniFi servers, including the Cloud Key, require a subscription fee. This can add up over time, especially if you have a large network or multiple locations. Be sure to factor in any subscription fees when comparing the costs of different UniFi servers.
Limited customization: With a Cloud Key or other UniFi server, you have limited control over the UniFi controller software and the hardware. You can’t customize the software or choose your own hardware, which may be a drawback if you have specific requirements or preferences. You’ll also be limited to the features and capabilities of the UniFi controller software as it is provided, which may not meet all of your needs.
Dependency on internet connection: A Cloud Key or other UniFi server requires an internet connection to access the UniFi controller
Conclusion
As you can see, there are pros and cons to both self-hosted UniFi servers and Cloud Keys or other UniFi servers. Ultimately, the best choice for your business will depend on your specific needs and resources. If you have a large, complex network and want complete control over the UniFi controller software and hardware, a self-hosted UniFi server may be the best option. On the other hand, if you have a smaller network or less technical expertise, a Cloud Key or other UniFi server may be more convenient and cost-effective. Consider your budget, technical capabilities, and networking needs carefully when deciding which UniFi server is right for you.


![[Opinion] Change my mind, AI needs insurance and licensing.](https://cannotdisplay.com/wp-content/uploads/2026/04/diagram_a_recursive_liability_light-1260x551.png)

![GNOME VS KDE: THE WAR FOR THE LINUX DESKTOP INTERFACE [ANALYSIS]](https://cannotdisplay.com/wp-content/uploads/2026/03/KDE-vs-GNOME-1260x703.png)

![[Opinion] STOP INSTALLING OPENCLAW (MOLTBOT) ON YOUR PC/MAC: How to Safely ‘Hire’ AI Agents via Cloud VPS](https://cannotdisplay.com/wp-content/uploads/2026/02/moltbot-banner.png)