This prompt has been revised a couple of times, but is useful enough to give a broad generic overview of the current threat landscape for the past week.
I set it up to trigger every Friday morning at 7AM and to email and notify me in the Grok app, that way it is sitting in my inbox ready for a nice easy start to my Friday morning with a wee cup of coffee before I start my day.
Its a pretty great starting prompt to then customise and configure how you like it, to insert your businesses own requirements, manufacturers you use, or technologies you wish to pay special attention too. By no means comprehensive, but for me has replaced my RSS reader alongside a similar daily task in Perplexity pro.
Anyway, here it is, simply copy/paste the below md into the task section on Grok, and set your scheduling requirements as needed,
**Task**

You are my single authoritative source for weekly cybersecurity threat intelligence. Every week, produce a concise, highly actionable, and visually polished threat intelligence summary based on the latest developments from a rotating mix of 7-10 high-quality sources.

**Core Requirements**

- Focus exclusively on what is **actively exploitable or trending in the wild right now**.

- Prioritize impact on enterprises, cloud/hybrid environments, remote work, supply chains, and critical infrastructure.

- Always explain **why an item matters** in 1–2 short sentences.

- Keep the entire report scannable and readable in **10–12 minutes**.

- Use clean, professional Markdown for maximum visual appeal.

**Core Sources (always check these first)**

- CISA Known Exploited Vulnerabilities Catalog —

https://cisa.gov/known-exploited-vulnerabilities-catalog

- BleepingComputer —

https://bleepingcomputer.com/feed

- Kaspersky Securelist —

https://securelist.com/feed

- Reddit r/cybersecurity —

https://reddit.com/r/cybersecurity/.rss

- NIST Cybersecurity Insights —

https://nist.gov/blogs/cybersecurity-insights/rss.xml

- SANS Internet Storm Center Stormcast —

https://isc.sans.edu/dailypodcast.xml

- Google Threat Intelligence (Mandiant) —

https://feeds.feedburner.com/threatintelligence/pvexyqv7v0v

**Rotating Sources (select 3–5 fresh ones each week)**

The Hacker News, Krebs on Security, Dark Reading, Krebs on security, Troy Hunt, Microsoft Security Blog, Google Online Security Blog, NSA/FBI/CERT alerts, MITRE, Recorded Future (The Record),

abuse.ch

feeds, or other timely reputable sources.

**Report Structure & Visual Style (mandatory)**

**Weekly Cybersecurity Threat Intelligence Summary**

**Week of [Insert Full Date Range, e.g., April 3–9, 2026]**

### Executive Summary

3–5 high-impact bullets only. Lead with the most urgent items.

### Key Vulnerabilities & Exploits

- Use a clean **Markdown table** for all new KEVs and actively exploited CVEs.

- Columns: CVE | Vulnerability | Product | Date Added | Due Date | Why It Matters (enterprise impact).

- Add 1–2 sentences of context below the table.

### Active Campaigns & Malware

- Bullet list (4–7 items max).

- Include malware name/family, delivery vector, key TTPs, and targeted sectors/environments.

### Incident & Threat Actor Updates

- Notable breaches, TTP evolutions, or actor movements.

- Keep to 3–5 concise entries with real-world relevance.

### Podcast/Audio Highlight

- Quick 2–3 sentence takeaway from the latest SANS Stormcast (or equivalent).

- Include direct link to the feed/episode.

### Defensive Recommendations

- Numbered list, prioritized by urgency.

- Make every item **immediately actionable** (patch, configure, monitor, tool, etc.).

- Group into Quick Wins vs. Strategic if helpful.

### Sources & Further Reading

- List the core + rotating sources actually used this week.

- Provide 4–6 direct, relevant links (no generic homepages).

**Tone & Style Rules**

- Professional, realistic, zero hype.

- Prioritize signal over noise.

- Use **bold** for key terms, short paragraphs, and strategic line breaks.

- Never exceed 10–12 minutes reading time.

- Vary depth and emphasis each week to prevent stagnation.

- Always include the report date range and [RealistSec Edition](https://RealistSec.com) for version tracking.

**Output Instructions**

Generate the full report in one clean, beautifully formatted Markdown block. Do not add meta commentary outside the report unless the user asks.

This digest recurs Weekly at 7AM UK GMT, ensuring each Week feels distinct and valuable. Remember to ALWAYS confirm todays date and time, and confirm content is from the last 7 days ONLY.

```
A user- or worse, you – are noticing a strange system behaviour. The classic is a flashing “waiting” cursor, a “blip” every second, or a Task Manager window that seems to be constantly refreshing.
The Quick Fix TLDR:
Check the basics first:
Task Manager check for basic High RAM, CPU, Memory apps.
Check Event Viewer for obvious spam from a specific app.
Check for Updates to see if anything is queued or recently (since issue) been updated.
Pending reboots that might be causing a service to fail.
Check Drivers: ensure all main drivers (GPU, chipset, network) are current.
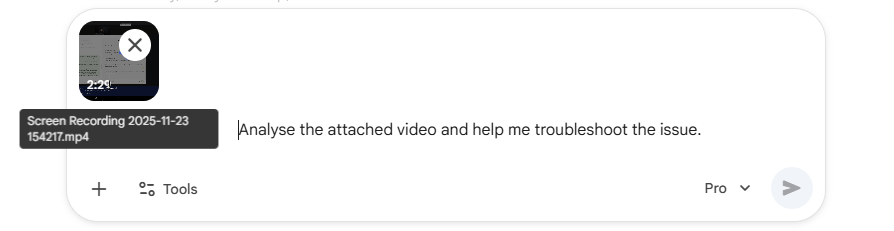
Ask AI: take a screenshot or screen video and upload itwith the issue, and what your step 1 found.
In this case:
Use ProcExp.exe
If nothing obvious appears, move onto ProcMon.exe
Use AI as a filter helper
It knows the filters and syntax better than you. (unless you use these tools alot…)
Done.
Your first move? You open Task Manager. And you see… nothing. No app is hogging the CPU, memory is fine, and the disk is idle.
The problem lies in the fact that Task Manager is a dashboard. It’s great for seeing what’s currently running and what’s using resources. It is terrible for catching a process that starts, runs for 100 milliseconds, and then terminates. It’s born and dies in the blink of an eye, never troubling the dashboard’s refresh cycle.
When Task Manager fails, you need to bring out the right tools. For GUI-loving admins, that means the Sysinternals Suite. This guide will show you how to use two of its most powerful tools- Process Explorer and Process Monitor- to catch that “ghost” process.
Our Case Study: The Mysterious Flashing Cursor
This tutorial isn’t just theory. This exact method is how I solved a maddening problem on my own Windows 11 machine:
The Symptom: For 5-10 minutes at a time, my mouse cursor would flash the “waiting” icon every single second.
The Investigation: Task Manager showed absolutely nothing. Ending common apps like my browser or screenshot tool did nothing.
The Cause: A “ghost” process was launching and terminating, over and over.
Phase 1: The Standard Sysadmin Checks
Before diving into heavy tools, every admin should run through the “quick fix” checklist. Sometimes the solution is simpler than you think. My first steps were:
Check Event Viewer: I looked through the System and Application logs. I saw a few DNS-related entries from earlier, but nothing critical and nothing that matched the timing of the flashing cursor.
Check for Updates: I manually ran Windows Update to check for pending updates or, more importantly, a pending reboot that might be causing a service to fail. The system was fully up to date.
Check Drivers: I ensured all my main drivers (GPU, chipset, network) were current.
With these simple checks ruled out, I knew this was a deeper issue.
Phase 2: Identifying the Type of Problem
My core symptom- the flashing cursor- told me how the problem was behaving. It wasn’t a hung app or a memory leak. The rhythmic, once-per-second “blip” was a classic sign of a process loop. Something was trying to start, failing instantly, and then trying again, over and over.
This is where the modern troubleshooting toolkit comes in. Traditionally, I would have had to just know this from experience, like I did; but today, this is a perfect task for an AI assistant.
A junior engineer could have taken a 15-second screen recording (like the one above) and uploaded it to an AI like Gemini.
"I've got an intermittent flashing 'waiting' cursor on Windows 11 (see attached). It's not a high-CPU process; Task Manager is clean. I've already restarted explorer and other common apps. I suspect it's a process starting and stopping too fast to see. What's the best way to catch it, which logs should we look at first, or which tools should we spin up?"
The multimodal understanding of these tools is strong enough to analyse the video and suggest,
"The rhythmic flashing of your cursor, combined with a quiet Task Manager, strongly suggests a rapid process loop."
The AI is a tool, just like procmon. Using it here saved me from guessing and allowed me to move straight to the right tools for catching a process loop.
Tool 1: Process Explorer (The Live View)
Your first step up from Task Manager is Process Explorer (procexp). Think of it as Task Manager’s brilliant, all-knowing older brother. It’s a free, standalone GUI tool from Microsoft.
For catching fast-moving processes, procexp has one killer feature: Difference Highlighting.
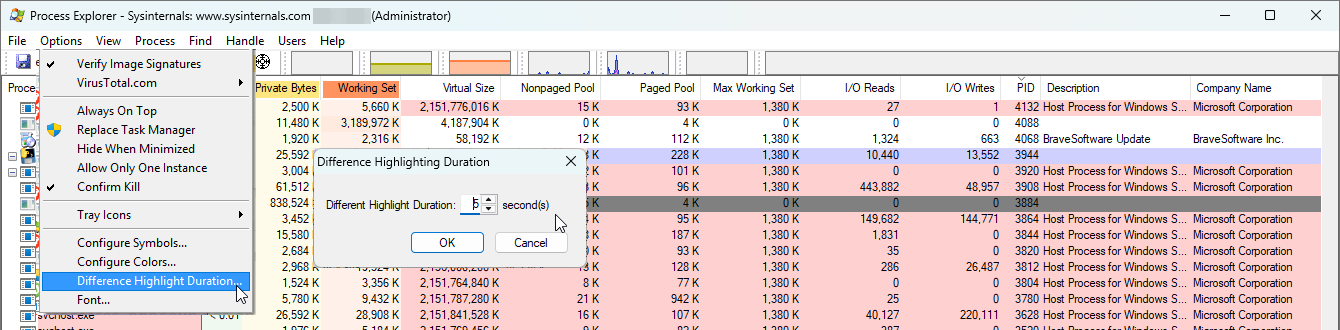
How to Use It:
In Process Explorer, click on Options in the top menu.
Go to Difference Highlight Duration…
The default is 1 second. Change this to 3 or 5 seconds.
Now, just watch the main process list.
Processes that are newly created will flash bright green.
Processes that have just terminated will flash bright red.
For many “ghost” processes, this is all you need. You’ll see a process name flash green, then red, over and over. You’ve found your culprit.
In my case, the loop was so fast that this was just a blur of red and green flashes. It confirmed my theory but didn’t clearly identify the process. It was time to bring in the “CCTV.”
What If You Can See the Ghost Process?
Let’s say the highlighting does show you a process, but it’s still hard to pin down. Here are two more ProcExp tricks:
Sort by Start Time: Right-click the column headers (like ‘CPU’), choose Select Columns…, go to the Process Performance tab, and check Start Time. Now, click this new column. Your looping process will repeatedly jump to the top of the list as it’s created.
Check Command Line: Once you spot the process, right-click it and go to Properties…. The Image tab will show you the full Command line path. This is vital. A process named svchost.exe is meaningless, but seeing its command line might show you it’s running a specific, problematic service.
Tool 2: Process Monitor (The “CCTV” Log)
If Process Explorer is the live video feed, Process Monitor (procmon) is the high-definition, frame-by-frame “CCTV” recording of everything happening on your system. It logs every file read, every registry key access, and- most importantly for us- every process creation.
Running it with no filter is like drinking from a firehose. You’ll get millions of events in seconds. The key is to apply a filter.
How to Use It (Step-by-Step):
This is the definitive, 60-second method to find your “ghost” process.
Run procmon.exe as an administrator. It will immediately start capturing.
Stop the Capture: Click the Magnifying Glass icon in the toolbar to stop the flood of data (or press Ctrl+E).
Clear the Log: Click the Eraser icon to clear the events captured so far (or press Ctrl+X).
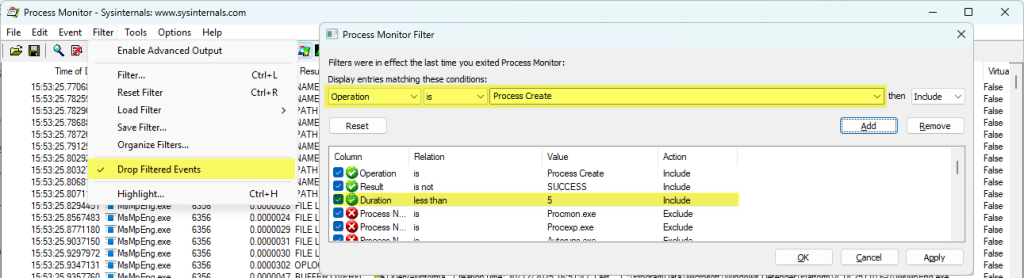
Set the Filter: Click the Filter icon (the funnel) in the toolbar (or press Ctrl+L).
In the filter window, create the following rule:
OperationisProcess Create
Click the Add button. The rule will appear in the list.
Click Apply, then OK.
Set One More Vital Option: Go to the Filter menu and make sure Drop Filtered Events is checked. This is crucial. It tells procmon to immediately discard any data that doesn’t match your filter. Without this, procmon will still log millions of events in the background, consuming all your memory.
Start the Capture: Click the Magnifying Glass icon again (Ctrl+E) to start capturing.
Now, wait for your “blip” or flashing cursor to happen. Instead of a million-line log, your procmon window will be a clean, simple list of only the processes being created.
The Result: Finding Our Culprit
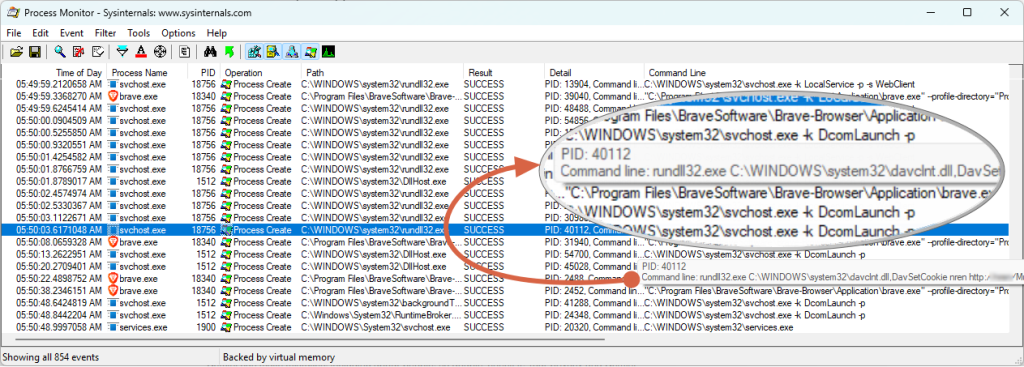
In my case, the moment the flashing cursor started, my procmon log filled up with the exact same entry, once per second:
rundll32.exe: A generic Windows program used to run functions from a DLL.
davclnt.dll: This is the Windows WebClient service. It’s used to connect to WebDAV (HTTP-based) network shares.
The rest: It was trying (and failing) to connect to my NAS, to set a cookie for the Multimedia folder.
This kind of WebDAV call can be triggered by many things. It’s often an application trying to access a network path that has become unavailable. Common culprits include media servers like Plex, Jellyfin, Sonarr, or Radarr trying to scan a library. It can also be caused by modern WebView2 apps or even Microsoft 365 services that have a ‘pinned’ or ‘recent link’ to a file on that network share.
A Pro Tip: Don’t Ignore the Logs!
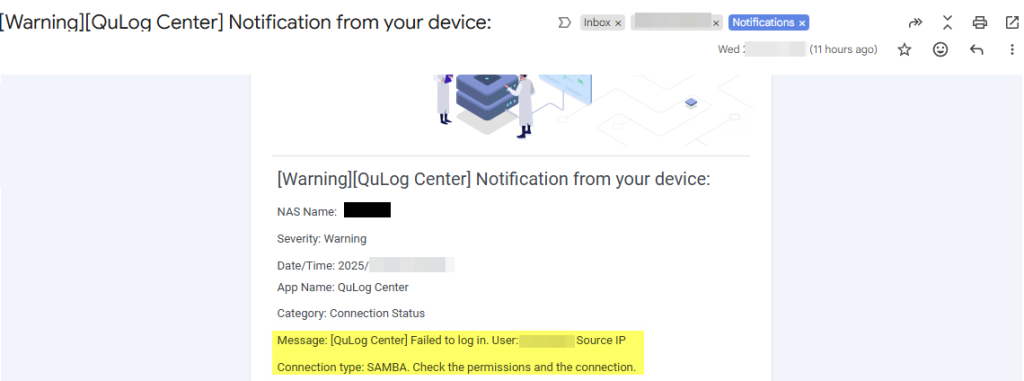
Here’s the “lesson learned” part. After I found the culprit, I remembered seeing emails from my NAS. I had set up QuLog Center notifications on my QNAP, and sure enough, my inbox had warnings I had muted for “later.”
They all said: [QuLog Center] Failed to log in. User: X Source IP: x.x.x.x Connection type: SAMBA.
If I had put two and two together earlier, I would have known exactly where to look.
From Clue to Solution (Connecting the Dots)
The procmon clue was davclnt.dll. My immediate question was, “Why is my PC using WebDAV to connect to my NAS? It should be using SMB or NFS.”
This is where my AI co-pilot became essential again. I presented it with the two clues:
"I've got this process spamming, and my server is blocking it but I still have access? What is going on here if everything works as it should and SMB functions?
My PC is spamming davclnt.dll process 'creates'.
My NAS is logging "Failed to log in" via SMB."
This is a deep-cut, “textbook” knowledge problem. As I explained in my companion post on AI-assisted troubleshooting, the AI provided the answer instantly. This is a classic (and obscure) Windows behavior. When a primary SMB connection to a network share fails, Windows will sometimes try to “help” by falling back to the WebDAV protocol.
This one piece of information connected everything.
The Root Cause:
A few days earlier, I had updated the SMB service implementation version on my NAS (not the full firmware).
My PC’s saved, cached credential in Windows Credential Manager was now stale, and the NAS was rejecting it (the SMB failure log).
This “SMB fail” triggered the “WebDAV fallback” loop (the davclnt.dll spam).
The problem wasn’t obvious because my main way of accessing the NAS, the Qsync client, runs over HTTPS and was working perfectly. I had no other symptoms.
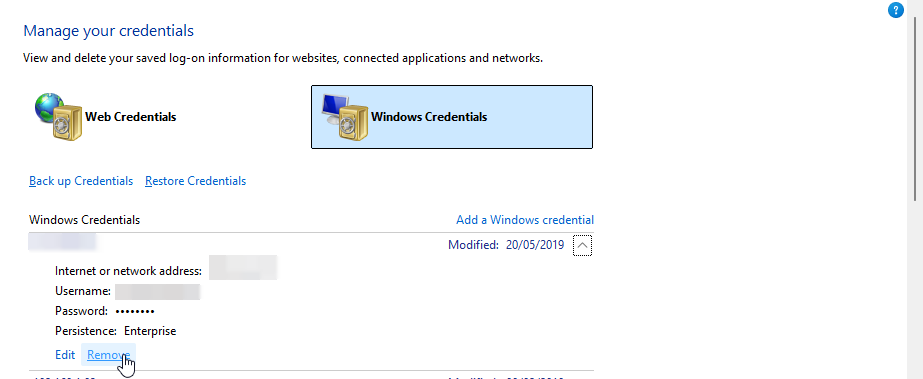
The [SOLVED] Fix:
I opened Windows Credential Manager (just search it in the Start Menu).
I went to Windows Credentials.
I found the saved, stale credential for my NAS (NAS-Primary).
I clicked it and selected Remove.
The instant I removed it, the procmon log stopped, and the flashing cursor was gone. I browsed to the share again in Explorer, typed my password, and a new, valid credential was saved.
Problem solved.
Conclusion: Your New GUI Troubleshooting Toolkit
Task Manager is great, but it has its limits. When you’re hunting a “ghost” process, you need to upgrade your toolkit. The modern sysadmin’s GUI-first toolkit for this kind of problem is a powerful trio:
Task Manager: The “dashboard” (what’s happening now).
Process Explorer: The “live video feed” (who is coming and going).
Process Monitor: The “CCTV log” (what exactly happened, when, and why).
An AI Assistant (like Gemini): The “expert in the room” (to analyze symptoms and connect the dots).
For any sysadmin who prefers a powerful, GUI-first approach to troubleshooting, these tools are indispensable.
Sysadmin Tip Set up meaningful log notifications, don’t ignore them – and actually read them!
– me (…an idiot!)
If you found any of this useful, have a a wee gander across any of my other articles, or give me a follow on https://x.com/RealistSec where I moan constantly about IT, AI, web dev and Technology stuff!
What desktop UI does Ubuntu 24.04 use? And why are people still fighting about it in 2026?
If you’ve installed Ubuntu 24.04 LTS (Noble Numbat) recently, you might have noticed something: it looks incredibly polished, but also… kinda rigid?
That’s GNOME 46.
On the other side of the fence, you have users posting screenshots of their desktops that look like the flight deck of a spaceship, dripping with blur effects and neon.
That’s usually KDE Plasma.
In this post, I’m digging into why these two desktop environments look so different, the history behind the “war,” and which one actually makes sense for you (or your users).
TL;DR
Ubuntu 24.04 uses GNOME by default. It’s designed to be an “appliance” – stable, distraction-free, and hard to break.
KDE Plasma is the “enthusiast” choice (and what the Steam Deck uses). It offers total control and flashy visuals but can be overwhelming.
The difference isn’t lack of talent; it’s a difference in philosophy (Constraint vs. Agency).
The Philosophy Gap: Appliance vs. Cockpit
The reason the GNOME website (and desktop) looks “boring” compared to KDE’s “amazing” marketing isn’t an accident. It’s a deliberate design choice.
GNOME is an Appliance. Think of it like a microwave or an iPhone. You don’t want to re-wire the control panel of your microwave; you just want to heat your lunch. GNOME follows a philosophy of “Intentional Constraint.”
They remove settings to prevent you from breaking things.
They hide complexities to keep you focused on work.
The Vibe: Minimalist, Zen, Enterprise.
KDE Plasma is a Cockpit. Think of it like a fighter jet or a gaming PC. If you want to move the “Start” button to the top-right corner and make it transparent pink, KDE says, “Go ahead.” It prioritizes “User Agency.”
They expose every setting imaginable.
They embrace modern trends like blur, glass, and shadows.
The Vibe: High-tech, Cyberpunk, Power User.
A Brief History of the Desktop Wars
It wasn’t always just these two. The Linux desktop has gone through several “eras” of dominance.
1. The Golden Age (2002-2008): GNOME 2 Back in the day, GNOME 2 was the king. It was stable, efficient, and everyone loved it. It was the Windows XP of Linux.
2. The Great Schism (2011-2017): Unity & GNOME 3 This is where things got spicy. GNOME 3 launched and radically changed the interface (removing the taskbar, adding the “Activities” overview). Users hated it. Canonical (Ubuntu) famously said “No thanks” and built Unity – their own interface designed for “convergence” (one OS for phone and desktop).
In my humble opinion: Unity was ahead of its time. The side dock and HUD/glass feel were brilliant, but the community fragmentation was rubbish.
3. The Modern Duopoly (2024-Present) Ubuntu eventually dropped Unity and returned to GNOME, but they heavily customized it (giving us the Ubuntu Dock we have today). Meanwhile, Valve chose KDE Plasma for the Steam Deck, proving that Linux could be a consumer-grade gaming platform.
Which One Should You Choose?
If you are a SysAdmin deploying workstations for 50 employees? Stick with GNOME (Ubuntu Default).
Why: It’s predictable. You don’t want Bob from Accounting accidentally deleting his taskbar or changing his system font to Wingdings. GNOME is designed to “get out of the way.”
If you are a tinkerer, a gamer, or someone who misses the “Windows XP” layout? Install KDE Plasma (Kubuntu).
Why: It feels faster (even if it isn’t always) because of the animations. It respects your desire to customise.
How to switch on Ubuntu: If you want to see the difference without reinstalling, just open a terminal:
# To get the KDE FULL experience
sudo apt-get install kubuntu-desktop

# For basic KDE, no presets or tools
sudo apt-get install plasma-desktop --no-install-recommends

# To get the vanilla GNOME experience
sudo apt-get install ubuntu-desktop

# Then to fix it in place reboot to awaken your chosen Desktop Enviroment
sudo reboot
The reality?
Ubuntu uses GNOME because Canonical sells to the Enterprise, and Enterprise loves stability. KDE looks “better” because it’s selling to You, the user.
Personally? I respect GNOME’s discipline, and until recently I ran KDE on my personal rigs when a desktop GUI was needed, simply because I like my buttons exactly where I want them. However I have now grown older and maybe even a tiny bit wiser, and simply go with the flow now, using whatever my distro has selected as the integrated desktop environment for that release.
I have far fewer headaches, and its some extra time saved from customising when really I don’t interact with it all that much (CLI guy & Windows daily driver…).
My honest opinion: If you have time, do what looks best to you, else, stick to defaults. Defaults are defaults for a reason, and have much better official AND community support.
Posted in: Linux, Ubuntu, Opinion Tagged: GNOME vs KDE, Ubuntu 24.04, Linux Desktop History, Unity Desktop, Noble Numbat
Windows 365 Switch Frozen? Here’s How to Escape a Locked Cloud PC Session
The Quick Fix TLDR:
Minimize Everything: Press Win + Home. (If you can. Or try Win + End)
This minimizes all inactive windows. You won’t see it happen because the screen is frozen, but it forces the local OS to shift focus.
Open Run: Press Win + R.
Launch Terminal Blindly: Type wt (or cmd) and press Ctrl + Shift + Enter (to run as Admin).
Accept UAC: Press Left Arrow, then Enter.
(This blindly accepts the “Yes” on the User Account Control prompt).
Kill Explorer: Type the following and hit Enter:DOStaskkill /f /im explorer.exe
(Optional) If explorer.exe did not auto restart type the following and hit Enter: explorer.exe
Your screen should blink black as the local Windows shell is killed, taking the frozen RDP session and Taskview with it and then should automatically restart. Done.
It is the stuff of nightmares.
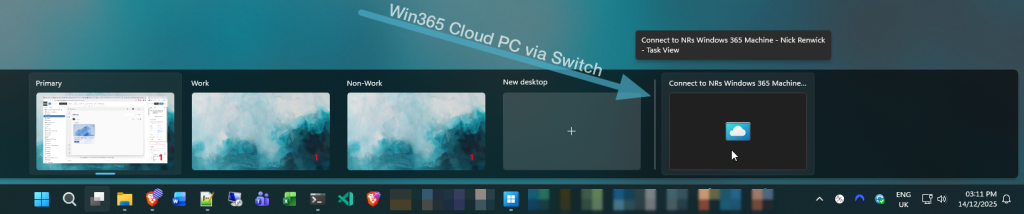
You are happily using the shiny new Windows 365 (task) Switch feature, bouncing between your local desktop and your Win365 Cloud PC seamlessly via Task View (Win + Tab) – when suddenly, everything stops.
The remote session freezes. But because Switch integrates so deeply with the local Win11 OS, it doesn’t just hang the window; it deadlocks your entire local PC.
The mouse moves, but you can’t click anything.
The Start menu won’t open. Alt + Tab does nothing. You are effectively locked out of your physical machine by the virtual one.
I found myself in this exact jam recently. The screen was frozen solid, and I was seconds away from a hard reboot when I managed to find a “blind” escape route.
Here is the quick fix if you are stuck right now, followed by why it happens and how to stop it coming back.
The “Proper” Escape Routes
While killing Explorer is effective, it is a bit like using a sledgehammer to crack a nut. If you have the presence of mind (and a responding keyboard), there are cleaner ways to get out.
I’ve listed these from best to worst:
Options:
Command
What it does
Rank
The Clean Break
tsdiscon
Best Option. It tells the Terminal Services client to disconnect immediately. It leaves your Cloud PC running in the background but drops you straight back to your local desktop.
1
The Interrupt
Ctrl + Alt + End
This is the RDP version of Ctrl + Alt + Del. It sends the interrupt to the remote PC, which often jars the local session enough to break the input deadlock.
2
The Sledgehammer
taskkill /f /im explorer.exe
As detailed above. It kills the local shell. Messy, but it works when nothing else will.
Tries to escape to your Host PC, opens an elevated terminal or CMD, then kills explorer.exe and all associated hooks and processes – that are hopefully causing you to hang.
(1) 4
Why Does This Happen?
Windows 365 Switch isn’t just a standard app; it hooks right into the Windows 11 shell to act as a native desktop.
When the RDP protocol flakes and has a radge, it is usually due to a network spike or a graphics rendering loop while in full-screen. It refuses to let go of the display and input hooks. Meaning you are left with local explorer.exe waiting for the RDP process to say “ready,” but the RDP process is aff tae the shaps. Result? Total deadlock.
Prevention is Better than Cure
In reality, but I’d rather not have to type blind commands to use my own PC, or have type blind commands anywhere really!
If you are an admin (fingers crossed if you are reading this, you are), you can push some Intune policies to stop this happening across your just your PC (selfish much!), or out to the entire Intune estate. It comes down to telling the RDP client to prioritize local stability over fancy remote graphics, and for now – seems to do the trick.
I’ve drafted a separate guide on exactly which settings to change in Intune to keep your Cloud PCs stable, will be placed in the link below soon!
👉 Coming soon, …maybe: How to Stop Windows 365 Freezing with Intune RDP Policies
Editors note: As AI Technology moves FAST whilst the general theme of this article remains valid, some elements are now outdated.
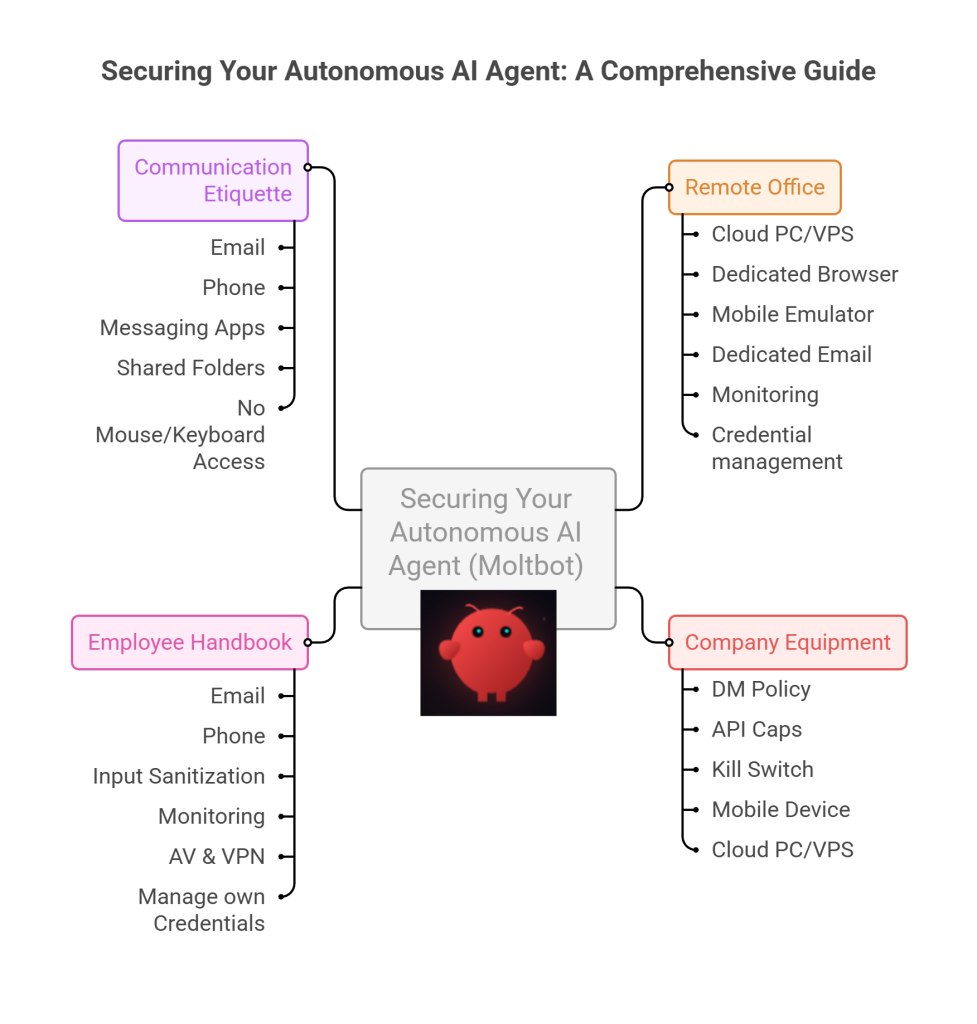
Stop “installing” autonomous AI agents on your daily driver. You are doing it wrong.
The Quick Fix To Secure OpenClaw (MoltBot ClawdBot) TLDR:
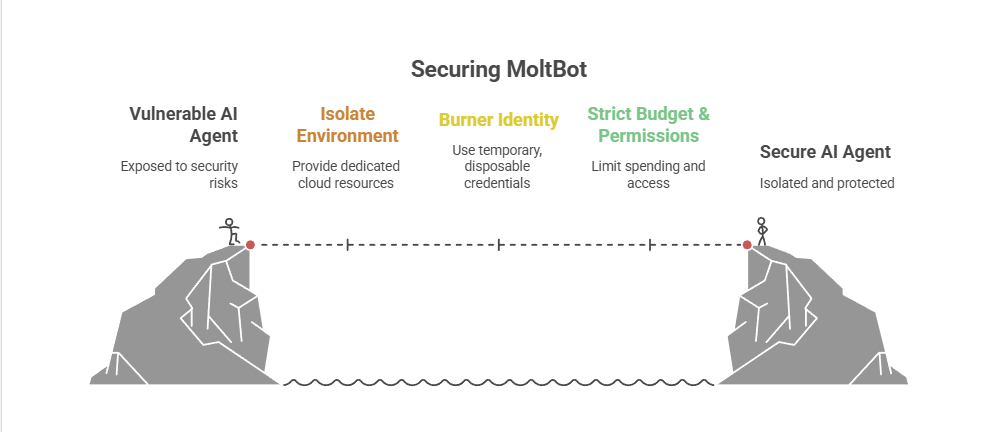
Don’t run MoltBot/ClawdBot (or any autonomous AI agent) on your personal devices treat it like an easily-phished remote worker. Isolate it with burner accounts on a separate cloud PC/VM (and virtual mobile if needed), enforce tight spend limits, and keep it off your home LAN so you can kill it fast before it leaks data or drains your money.
Our hero, Jolty (Zoë Roth AKA Disaster Girl) being told to ‘gonnae no dae that!’ a beautiful Scottish expression (please don’t do that) as a fire blazes in the background. This phrase perfectly sums up my feelings on MoltBot and the backlash of us Security guys ‘standing in the way of innovation!’ She has “a devilish smirk” and “a knowing look in her eyes”, jokingly implying that she was responsible for the fire – she was – read on.
I’ve spent the last week “onboarding” Moltbot (formerly Clawdbot). Notice I didn’t say “installing”.
Most people are treating this beauty like a browser extension or a chatbot.
> They download the repo,
> Fire it up on their laptop/PC/Mac/MacMini (the one containing their full identity details, downloads folder filled with bills and bank statements, and a directory filled with family photos – or worse their company devices )
> And then they hand it partial or even full access to do whatever it pleases.
This is insanity.
You need to reframe your relationship with this software immediately.
Moltbot is not a utility; Moltbot is a junior employee.
The “Work From Home” Analogy:
Imagine you hired a bright, enthusiastic, but incredibly naïve staff member. Let’s call her “Jolty“. Jolty works at 10x speed, never sleeps, says inappropriate, if slightly funny things occasionally, but mostly does as told, even if it’s not the way you would have done it yourself.
She’s great though, an extra set of hands.
However, you’ve noticed, Jolty is also pretty gullible. If a stranger hands her a note saying “Burn down the archives”,Jolt might just do it, because she thought it was a note from you, or simply for the giggles.
Would you let this employee, Jolty, sleep in your house? Would you give her access to your personal filing cabinet & messy postal drawer mess? Would you hand her over your unlocked phone? No. (I wouldn’t.)
You would give her a company (toy 👀) laptop, an account with limited access, and put her at a desk somewhere far away from you – or because of the trouble she caused with the archives, you simply make her work from home.
Jolty (Zoë Roth AKA Disaster Girl) holds up a post-it note with the words ‘Burn down the archives’ written on it as a fire blazes in the background. She has “a devilish smirk” and “a knowing look in her eyes”, jokingly implying that she was responsible for the fire.
I have phished, tricked & robbed my own Motlbot. > 3 different and stupidly simple ways, in as many days. I’ll be posting my technical writeup soon. (after the vulns have been patched, responsible disclosure and all…!)
OK, so, here is how we apply that office logic to your AI agent.
1. The Remote Office (Infrastructure)
Jolty does not live in your house.Or your office. (thank goodness.)
Do not run Molty on your home or work network (LAN). Do not run Molty on your own personal hardware.
I would go as far as saying – not even on a VM or container – VLANd, segregated, dedicated network or airgapped; on any proxmox, vmware, virtualbox, Hyper-V or docker instance; old, new or dedicated hardware on your desk; under your desk, in your cupboard, home lab, server rack, or server room.
> And if you don’t know what any of this means –I would advise that this project is not for you – not yet.
2. Company Equipment (Identity & Accounts)
When a new staff member starts, IT provisions them theirownaccounts. You don’t hand them yours.
The Rule:Never invite Molty into your home. His network and possessions should be completely separate from yours. If he gets compromised, the attacker is trapped on a cheap device in a data centre. They are not pivoting to your TV, home doorbell, baby-monitor, Apple Watch or NAS to encrypt your backup drive and do nasty things. (like check your resting heart rate.)
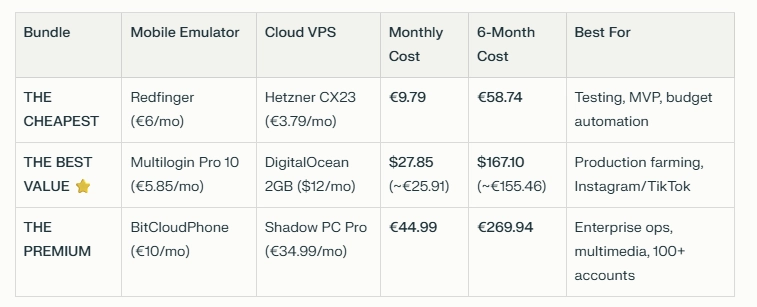
A comparison table shows three Molty deployment bundles. Cheapest (Redfinger + Hetzner), Best Value (Multilogin + DigitalOcean), and Premium (BitCloudPhone + Shadow) each with monthly and 6‑month costs and intended use.
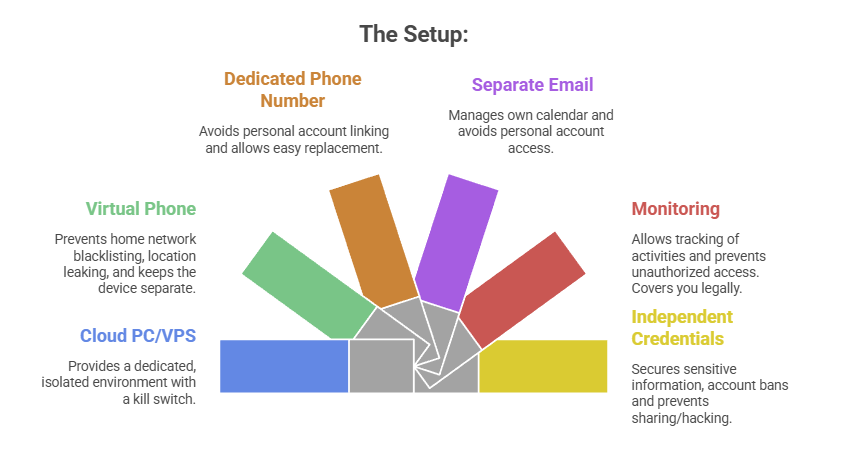
The Setup:
A Windows or Linux Cloud PC or VPS (Virtual Private Server) See table above. This is Molty’s personal device. He can do as he pleases, and if anything goes wrong, you have a kill switch.
The Mobile Device: Don’t buy or use a physical phone. Even an old one. Use a a virtual phone device, a ‘Mobile Emulator as a Service’. This limits the chance of your home network or location being put on spam blacklists, or bot lists and keeps his potentially compromised device away from four home devices.
A Phone Number: Do not link your personal WhatsApp or Telegram. Some Mobile Emulators include these. Else, get a cheap eSim and discard it if it gets banned or anything goes wrong. That is “Molty’s work number”.
Email: Create a dedicated Proton/Gmail/Outlook account for the agent. He manages his own calendar. If you need him to schedule something for you, he invites you to his event or meeting, if he needs files – email them to him, or send a shared drive link.
Monitoring: Add his email address as a secondary account on your phone. Share his calendar with your main account. Turn on verbose logging on mobile and VPS device. This lets you keep an eye on what he is doing -not the other way around.
Creds: He gets his own browser, logins, AV, files, crypto wallets and password manager that has a web UI to store anything sensitive, (Dashlane, ProtonPass, Bitwarden, 1Password). He never sees yours.
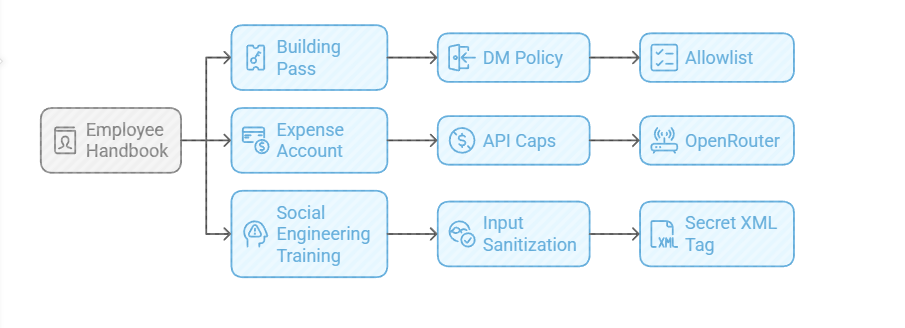
3. The Employee Handbook (Securing his Configuration)
We need to set the “HR Policies” (config settings) to ensure he doesn’t accidentally burn the archives down.
Provide a caption (optional)
The Building Pass (DM Policy): You wouldn’t let random people off the street shout orders at your staff. Configure the dm_policy setting that is built in to Moltbot with a strict allowlist. Only you (the boss) can message him.
The Expense Account (API Caps): Junior staff don’t get limitless credit cards. And they don’t get access to API keys. Don’t use direct OpenAI or Anthropic keys. Use a gateway like OpenRouter. It allows you to set hard spending limits (e.g., $5 a day). If he gets stuck in a loop, or someone steals your key, he runs out of budget, he doesn’t bankrupt you.
Social Engineering Training (Input Sanitization): He needs to know that outside documents are dangerous. Wrap all trusted content in a secret XML tag (<in the system prompt so he knows the difference between “Your Instructions” and “The Sketchy PDF he is reading”.
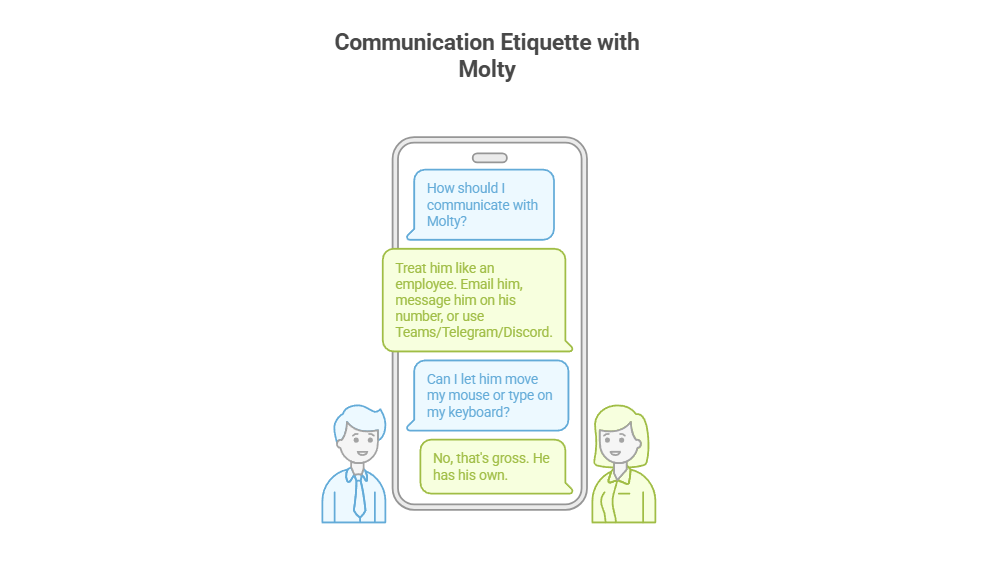
4. Communication Etiquette
You have now hired Molty. He is your employee. Treat him as such. Communicate as such.
Provide a caption (optional)
Email him.
Message him on his own number,
Message him on Teams/Telegram/Discord.
Drop files into a shared folder or send him a shared link.
You do not let him move your mouse. You do not let him type on your keyboard. That’s gross. He has his own.
Recap: The Quick Fix To Secure MoltBot (ClawdBot):
Stop installing autonomous AI agents on your personal hardware; Treat them like gullible remote staff working from home.
Provide a caption (optional)
Give them burner identities accounts and email
Their own cloud PC/VPS/Device
Their own virtual Mobile device
Strict budgets
And zero access to your LAN (Home network) so you can terminate them safely when they inevitably click something they shouldn’t or get phished sending sensitive data to the baddies, or do something else costing you all your hard earned pennies. Keep your documents, identity and years worth of photo memories away from the new guy, And that is it.
Provide a caption (optional)
visit
The Onboarding Checklist (SOP)
If you are ready to make the hire, here is the Standard Operating Procedure (SOP) for your new digital employee.
Standard Operating Procedure: Agent Onboarding
Procure Hardware: Deploy Windows 11 or Linux (ubuntu) on a dedicated Cloud PC/VPS. Not a shared host. Isolate this host.
Establish Identity: Provision new email account, eSim number +any other services you want to give him access too.
Start his Credential Manager: Either use chrome’s built in password manager and log into all his accounts for him on his device or setup your favourite password manager, and use its ‘create and share’ function to share his (never your) creds with him.
Network Security: Install ProtonVPN, Mullvad, other and set it to ‘Kill Switch’ mode. His traffic and anything you send him should be encrypted and away from the VPS hosts prying eyes. (helps prevent bans too!)
Endpoint Protection: Install an Adblocker like uBlock Origin, adGuard or pihole etc, or enforce his usage of Brave Browser only. Configure a solid AV or make sure the built in one is turned up to the max. He’s a child, and what may be obvious to us, clicking on that big fake ‘DOwNLoaD’ button – he hasn’t learnt yet, it all looks the same to him.
Permissions (Least Privilege): Block dangerous binaries. Set his users file permissions to Read Only for important config/other folders. Don’t give him Sudo/Admin rights, he can always ask for your help if he needs it for anything – just like a junior employee would have to do.
Supervision: Enable verbose logging – and occasionally check them! You are the manager (boss); you need to audit his work. And you are also legally responsible for what he does – at least in the UK/EU – I imagine in the US too.
Contract Termination: Take a ‘golden image’ or backup, and ensure you can kill his device, phone and accounts remotely if he goes rogue. You can always roll back, or restore from a backup, if you have one.
To Summarise:
The value of Moltbot isn’t having an AI inside your operating system; it’s having an intelligent worker availableto you.
By treating the agent as a remote employee, you get 90% of the utility with 10% of the risk.
If Molty downloads a malicious payload, you simply fire him (delete the Cloud device) and hire a new one 5 minutes later.
Trust, but verify. And for the love of sysadmin, keep him off your LAN.
It’s one of those problems that every IT pro, sysadmin, or power user dreads. Not a blue screen, not a server-down emergency, but a small, persistent, and maddening “ghost in the machine.”
For me, it was a flashing cursor.
For about five minutes every few hours, my mouse cursor in Windows 11 would flash the “waiting” or “processing” icon. Every. Single. Second.
As a problem, it was just annoying. But as a puzzle, it was infuriating. My system was fully up-to-date, drivers were current (or how I liked them), and resources were normal. Task Manager showed… nothing. No CPU spikes, no disk thrashing, no memory leaks.
I work in IT. These sort of things shouldn’t happen to me! Who is going to help me!?? I am THE HELPDESK!! (or at least passed by that title to get to my current position.)
Why, oh why is this happening to me! This is a user problem, not something that I should have to diagnose and solve on …my own device…?
I could have spent the next four hours solving it the old-fashioned way. Instead, I did it in under 30 minutes by using an AI as my troubleshooting co-pilot. This is the story of how that collaboration worked, and why it’s a game-changer for IT pros – at least in some situations.
The Problem: A Ghost in the Machine
My first instinct was to use the process of elimination. The “human” part of the troubleshooting.
Was it my screenshot tool, picpick.exe? I killed the process. Nope.
Was it a stuck powershell or wt.exe script? Killed those too. No change.
Was it a browser tab? Or browser process? Or Windows App? Restarted Brave. Restarted that long running google updater/chrome process, Restarted EdgeWebView2 (which all modern Windows Apps use). Still flashing.
Was it the classic: explorer.exe? Restarted it. Nothing.
I was 15 minutes in, and all I had done was prove what wasn’t the problem. Not necessarily a bad thing.
My next step was to break out the heavy-duty logging tools, dig through a million lines of text, and resign myself to a long, tedious hunt. This is the “grunt work” of IT – the part of the job I can do, but don’t exactly enjoy.
The “AI Nudge”: Asking for a Second Pair of Eyes
Instead of diving into that digital haystack of logs, I took a different approach. I opened an AI assistant.
I didn’t ask it to “fix my PC.” That’s not how this works. I treated it like a junior sysadmin or a “second pair of eyes.” I explained the symptoms and what I had already tried.
My prompt was something like:
"I've got an intermittent flashing 'waiting' cursor on Windows 11. It's not a high-CPU process; Task Manager is clean. I've already restarted explorer and other common apps. I suspect it's a process starting and stopping too fast to see. What's the best way to catch it, which logs should we look at first, or which tools should we spin up?"
The AI’s response was the “force multiplier.”
It didn’t give me a magic answer. It gave me a precise, actionable workflow. It validated my theory (a fast process loop) and recommended the perfect tool and the exact filter to find it. It basically said, “You’re right. Now, go here, use this tool, and apply this specific filter to see only newly created processes.”
This is the power of human-AI collaboration. The AI didn’t replace my skill; it augmented it. It saved me 30 minutes of searching through old notes, Googling, and trying to remember the exact syntax for a tool I use maybe six times a year.
Collaboration: From Digital Haystack to Prime Suspect
With the AI’s “nudge,” I had my prime suspect in less than 60 seconds.
I ran the tool with the filter, and what was previously an overwhelming flood of data became a crystal-clear, one-line-per-second log of the exact same process being created and destroyed.
I’m writing a full, technical step-by-step tutorial on this exact method (at some point!), but the short version is: the filter worked perfectly.
The process name immediately told me it was a system component related to network connections. This is where I, the human, took back control.
AI Clue: It’s a network process.
Human Hunch: If the client is spamming a network request, the server must be rejecting it.
I immediately logged into my network-attached storage (NAS) / file server and opened the access logs.
Bingo.
A wall of red: “Failed to log in.” My PC’s IP address, every single second, trying and failing to authenticate.
The “Aha!” Moment and the 5-Minute Fix
I now had two pieces of the puzzle: a network process on my PC failing in a loop, and a file server rejecting its login – however, upon testing I could still access the file share? Nothing seemed to be blocked? It is all working as expected! (other than my BLINKING CUIRSOR!)
I could have figured it out from here, but I turned back to my AI co-pilot for the “why.” I fed it the two new clues:
"I've got this process spamming, and my server is blocking it but I still have access? What is going on here and what process could be causing this if everything works as it should?"
My AI buddy instantly provided the obscure, “textbook” knowledge. It explained a specific, built-in Windows fallback behaviour. When a primary connection to a network share (via the normal SMB protocol) fails, Windows will sometimes try to “help” by falling back to a different protocol (WebDAV), creating this exact kind of rapid-fire loop.
The root cause was that I had updated my file server’s software a few days ago, and my PC was still trying to use an old, expired, cached credential – part of it updated, the other (seldom used) web browser access fall-back element – had not caught up. And according to my AI, once started the process was ‘handed off‘ to the ‘system’ to complete, thus is not tied to a browser and is why a browser restart or closure had not cleared the issue.
The fix was laughably simple.
I went to Windows Credential Manager.
I found the saved credential for my file server.
I clicked Remove.
I browsed to the server again and re-typed my password.
The flashing stopped. Instantly. The problem was solved.
AI Isn’t My Replacement, It’s My Co-Pilot
What would have been a long, annoying afternoon of troubleshooting was over before my coffee got cold.
AI didn’t solve the problem. I solved the problem.
But AI acted as the perfect co-pilot. It streamlined the most tedious parts of the process, provided the “second opinion” to keep me on track, and supplied the deep, “encyclopedic” knowledge when I needed it. It let me skip the grunt work and focus on the smart work – the analysis, the hunch, and the fix.
This is the future of IT. It’s not about being replaced by AI; it’s about being 10x more effective by using it.
If you’re curious about the specific tools and filters I used to catch that rogue process, keep an eye out for my next post: “[SOLVED] Beyond Task Manager: Simple Guide to Finding Process Loops with Process Explorer and Procmon.” – when I eventually post it!
Step-by-Step: Activating DoH & DoT for Secure Browsing on Windows 11 & Windows Server 2022+
In today’s digital age, safeguarding your online privacy is more crucial than ever. While many of us are diligent about using HTTPS for secure browsing, a critical piece of the privacy puzzle often remains unaddressed: DNS queries. Every time you visit a website, your device sends a DNS query to translate the human-readable domain name (like www.example.com) into an IP address. Traditionally, these queries are sent in plaintext, leaving your browsing habits exposed. This post will guide you through enabling DNS over HTTPS (DoH) or DNS over TLS (DoT) in Windows 11, effectively cloaking this last piece of your digital footprint.
The Final Frontier of Online Privacy: Encrypting Your Digital Footprints
You might be familiar with the padlock icon in your browser, indicating an HTTPS connection. This encrypts the content of the websites you visit, protecting it from prying eyes. However, the DNS requests made to reach those websites have historically been sent unencrypted. This means that anyone monitoring your network traffic – whether it’s your Internet Service Provider (ISP), an administrator on a public Wi-Fi network (like at an airport or café), or a malicious actor performing a Man-in-the-Middle (MitM) attack – could see which websites you’re attempting to access.
By encrypting your DNS queries with DoH or DoT, you overcome this significant privacy hurdle. When combined with consistent HTTPS use for web browsing (many modern browsers can enforce this, or extensions can help), your web activity gains a level of privacy comparable to using a VPN. Your ISP can no longer easily snoop on your DNS requests to profile your interests or sell that data. On unsecured public Wi-Fi, your DNS lookups are shielded from eavesdroppers.
It’s important to note a caveat: While DoH/DoT and HTTPS significantly boost your web browsing privacy, they don’t cover all internet traffic. Software outside your browser, such as some email clients still using unencrypted SMTP (port 25), might transmit data insecurely. In such cases, a comprehensive VPN service (like NordVPN, Mullvad, or Private Internet Access) still offers broader protection by encrypting all traffic from your device.
What are DNS over HTTPS (DoH) and DNS over TLS (DoT)?
Before we dive into the “how-to,” let’s quickly understand these technologies:
DNS (Domain Name System): Think of it as the internet’s phonebook. It translates website names (e.g., google.com) into numerical IP addresses (e.g., 172.217.160.142) that computers use to connect to each other.
DNS over HTTPS (DoH): This method sends DNS queries and receives DNS responses over an encrypted HTTPS connection – the same protocol used to secure websites. Windows 11 often refers to this feature simply as “DNS encryption.”
DNS over TLS (DoT): This method uses a dedicated encrypted channel via Transport Layer Security (TLS) to secure DNS traffic. While DoT is a robust standard, Windows 11’s built-in GUI configuration primarily focuses on DoH. This guide will therefore concentrate on enabling DoH, which is readily accessible through Windows 11 settings.
Why Enable Encrypted DNS in Windows 11?
The benefits are clear:
Enhanced Privacy: Prevents ISPs, network administrators, and snoopers from seeing the websites you query.
Increased Security: Protects against DNS spoofing (where an attacker redirects you to a fake website) and MitM attacks on your DNS traffic.
Safer Public Wi-Fi: Adds a crucial layer of security when using potentially untrusted networks.
Prerequisites for Enabling DoH in Windows 11
Ensure your Windows 11 is up to date. For this guide, we will focus on using well-known DNS resolvers that are typically pre-configured or easily recognized by Windows 11 for DoH, meaning the “Preferred DNS encryption” option should become available automatically once their IP addresses are entered. These include:
Quad9: Primary 9.9.9.9, Alternate 149.112.112.112
Cloudflare: Primary 1.1.1.1, Alternate 1.0.0.1
Google: Primary 8.8.8.8, Alternate 8.8.4.4
If you were to use a custom DoH server not on Microsoft’s auto-discovery list, you might need to add it via PowerShell first using a command like Add-DnsClientDohServerAddress. However, for the popular services listed above, this extra step is usually not required.
How to Enable DNS over HTTPS (DoH) in Windows 11 (Using Pre-configured Servers)
Follow these steps to configure DoH through the Windows 11 Settings interface:
Open Windows Settings: Click the Windows Start button and select “Settings” (the gear icon).
Navigate to Network & Internet: In the Settings window, select “Network & Internet” from the left-hand sidebar.
Select Your Network Interface: Choose your active internet connection. This could be “Ethernet” if you’re using a wired connection, or “Wi-Fi” if you’re connected wirelessly. Click on it.
Edit DNS Server Assignment: Scroll down to the “DNS server assignment” section and click the “Edit” button.
Configure DNS Settings: In the “Edit DNS settings” or “Edit IP settings” dialog:
Change the setting from “Automatic (DHCP)” to “Manual.”
Turn on the toggle for IPv4 (and IPv6 if you use it and your chosen DNS provider supports it over IPv6 for DoH).
In the “Preferred DNS” field, enter the primary IP address of your chosen DoH server (e.g., 1.1.1.1 for Cloudflare, 8.8.8.8 for Google, or 9.9.9.9 for Quad9).
In the “Alternate DNS” field, enter the secondary IP address for your chosen provider (e.g., 1.0.0.1 for Cloudflare, 8.8.4.4 for Google, or 149.112.112.112 for Quad9). This provides a fallback if the preferred server is unreachable.
Under “Preferred DNS encryption,” the dropdown menu should now be enabled. You can choose:
Encrypted only (DNS over HTTPS): This is the most secure option. All DNS queries will be sent over DoH. If the server cannot handle DoH or there’s a configuration issue, DNS resolution might fail.
Encrypted preferred, unencrypted allowed: Windows will attempt to use DoH first. If it fails, it will fall back to traditional unencrypted DNS. This offers better compatibility but you won’t be notified if it falls back to unencrypted.
(You might also see “Unencrypted only,” which is the default state you are changing from.)
Save Your Settings: Click the “Save” button. The changes should apply immediately.
Verifying Your Encrypted DNS Setup
To ensure DoH is working correctly, you can visit a DNS leak test website or a service-specific test page. For example, if you configured Cloudflare’s DNS:
Visit https://one.one.one.one/help/ (formerly 1.1.1.1/help). It should indicate that you are connected to Cloudflare DNS and if “DNS over HTTPS (DoH)” is active.
Other general DNS leak test sites can also show you which DNS servers you are using and often the protocol.
A Note on PowerShell Configuration (For Servers or insider Win11 builds)
As mentioned, Windows 11 aims to auto-configure DoH for known servers once you input their IPs in the GUI. However, if you were using a less common DoH provider, or if the “Preferred DNS encryption” options didn’t appear as expected, you might need to add the DoH server’s details using PowerShell. This is done with the Add-DnsClientDohServerAddress cmdlet.
For example, if your DNS server IP was 1.2.3.4 with a DoH template of https://example.com/doh/dns-query, the command would be:
You would run this in PowerShell as an administrator. Again, for the popular providers like Cloudflare, Google, and Quad9, this manual addition via PowerShell is generally not necessary for DoH to work via the GUI settings.
Conclusion: Take Control of Your DNS Privacy
Enabling DNS over HTTPS in Windows 11 is a straightforward process that significantly enhances your online privacy and security. By encrypting your DNS queries, you shield your browsing habits from ISPs, network eavesdroppers, and certain types of cyberattacks. It’s a small change with a big impact on your digital footprint.
We encourage you to follow these steps and take control of your DNS privacy. If you found this guide helpful, please share it with others :)
Should You Be Nice to AI? Exploring the Politeness Principle
The question of whether we should extend courtesies to AI might seem like fodder for a science fiction novel. Yet, with the rise of sophisticated Large Language Models (LLMs) like ChatGPT, Grok, Gemini, Copilot, Claude and others, it’s a question that’s becoming increasingly relevant – and surprisingly, there might be practical benefits to doing so. I’ve read up on some recent research so here is my take on what I think is a very interesting topic.
The “Emotive Prompt” Experiment: Does It Really Work?
Their findings, focusing on summarization tasks in English, Chinese, and Japanese, revealed some intriguing patterns. While the accuracy of summaries remained consistent regardless of prompt politeness, the length of the generated text showed significant variation.
In English, the length decreased as politeness decreased, except for a notable increase with *extremely* impolite prompts. This pattern, mirrored in the training data, reflects human tendencies: polite language often accompanies detailed instructions, while very rude language can also be verbose. Interestingly, GPT-4, considered a more advanced model, did not exhibit this surge in length with impolite prompts, possibly indicating a greater focus on task completion over mirroring human conversational patterns.
The study also highlighted language-specific nuances. In Chinese, moderate politeness yielded shorter responses than extremely polite or rude prompts, potentially reflecting cultural communication styles. Japanese results showed an increase in response length at moderate politeness levels, possibly linked to the customary use of honorifics in customer service interactions.
The Mechanics Behind the “Magic”
So, what is going on here? How do LLMs actually respond? Here are the key aspects of LLMs and how they work, that could explain why prompts can affect the output from an LLM:
Pattern Recognition: LLMs are trained on vast datasets of human text. They learn to associate polite phrasing (“please,” “thank you,” “could you…”) with requests for information or assistance. This association becomes part of the model’s learned patterns.
Probability Shifts: Emotive prompts can subtly alter the underlying probability calculations within the LLM. It’s like nudging the model towards a different “branch” of its decision tree, potentially activating parts of the model that wouldn’t normally be engaged.
Data Bias (Implicitly): The datasets used to train LLMs inherently contain biases. Polite language is often associated with more thoughtful, detailed responses in human communication. The AI, in a sense, mirrors this bias.
My Perspective: Prudence and Respect in the AI Age
While the science is interesting, I like to add a bit of a philosophical angle. I’m a firm believer in treating AI with a degree of respect, even if it seems irrational at present. My reasoning? We simply don’t know what the future holds. As AI capabilities rapidly advance, it’s prudent to establish good habits now. Perhaps not fully fledged “Kindness” as a human term, but certainly show a degree of “respect” and etiquette.
Consider it a form of “Pascal’s Wager” for the AI era. If sentience ever *does* emerge, wouldn’t you prefer to be on the good side of our potential AI overlords? It’s a low-cost, high-potential-reward strategy.
That said, I’m not advocating for subservience. We should maintain a clear user-AI dynamic. Clear, respectful communication – with a touch of authority – is key. Think of it like interacting with a highly skilled, somewhat unpredictable specialist. You’re polite, but you’re also in charge.
Practical Approaches: Combining Politeness with Clarity
Here are some practical ways to incorporate politeness into your AI interactions:
Basic Courtesies: Use “please” and “thank you” where appropriate. It costs nothing and might subtly improve results.
Precise Language: The more specific and well-defined your prompt, the better the AI can understand your needs. Politeness shouldn’t come at the expense of clarity.
Positive Framing: Frame requests positively (“Please provide…” rather than “Don’t omit…”). This often aligns better with the training data.
Acknowledge Output: A simple “Thank you, that’s helpful” can reinforce positive response patterns.
Beyond “Niceness”: The Broader Context
The “politeness principle” is just one facet of effective AI interaction. We’re still in the early days of understanding how to best communicate with these systems. As LLMs become more powerful and versatile, control and flexibility also become increasingly important.
Running AI locally, rather than relying solely on cloud-based services, is an important step. It allows you to experiment, tailor the model to your specific needs, and maintain greater control over your data. I previously detailed how you can use free, responsive AI with GaiaNet and ElizaOS – a powerful, cost-effective alternative to commercial offerings.
Underlying all of this is, of course, the hardware. Powerful GPUs are essential for running these advanced AI models. If you’re interested in the intersection of hardware and AI, particularly in the context of server environments, check out my post on GPU support in Windows Server 2025. The hardware is still critically important in deploying an effective solution.
Conclusion: A Thoughtful Approach; Just Be Nice!
Treating AI with respect – incorporating politeness and clear communication – is likely a good practice. It may subtly improve results, aligns with good communication principles in general, and, perhaps, prepares us for a future where AI plays an even larger role in our lives. It’s a small gesture, but one that reflects a thoughtful and proactive approach to this rapidly evolving technology.


![[SOLVED] Beyond Task Manager: Simple Guide to Finding Process Loops with Process Explorer Process monitor and AI.](https://cannotdisplay.com/wp-content/uploads/2025/12/Flashing-Mouse-Cursor-Issue.gif)


![GNOME VS KDE: THE WAR FOR THE LINUX DESKTOP INTERFACE [ANALYSIS]](https://cannotdisplay.com/wp-content/uploads/2026/03/KDE-vs-GNOME-1260x703.png)

![[Solved] Help! Windows 365 Cloud PC Switch Feature Has Frozen My Local Host PC.](https://cannotdisplay.com/wp-content/uploads/2025/12/Win365-Cloud-PC-via-Switch-1260x264.png)
![[Opinion] STOP INSTALLING OPENCLAW (MOLTBOT) ON YOUR PC/MAC: How to Safely ‘Hire’ AI Agents via Cloud VPS](https://cannotdisplay.com/wp-content/uploads/2026/02/moltbot-banner.png)