Stop “installing” autonomous AI agents on your daily driver. You are doing it wrong. Our hero, Jolty (Zoë Roth AKA Disaster Girl) being told to ‘gonnae no dae that!’ a beautiful Scottish expression (please don’t do that) as a fire blazes in the background. This phrase perfectly sums up my feelings on MoltBot and the…
Whilst most AP’s and Unifi devices can be ssh’d into using ubnt/ubnt there are a few exceptions to this rule, for example the UXG-Pro is root/ubnt. Prior to setup/adoption, all devices have a set of default credentials below is what they are as of 06/2024.
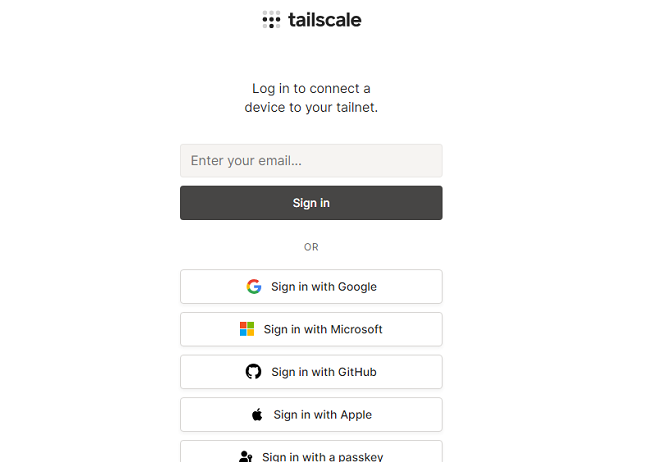
Follow these steps to log into Tailscale using Microsoft O365 credentials:
Pre-requisites:
Ensure the PC is connected to the internet.
Confirm that Tailscale is installed.
Locating the Taskbar Icon:
Look for the Tailscale icon in the Windows taskbar, usually near the clock.
Clicking the Icon: A. Click on the Tailscale icon, or right click and select ‘log in’ to initiate the login process. B. If this doesn’t work, check if there is using multiple network interfaces (e.g., Wi-Fi and Ethernet) simultaneously. If multiple interfaces are being used, set the interface’s “Automatic Metric” to manual and enter a value.
Microsoft O365 Sign-in:
A Tailscale login window will appear.
Select the “Sign in with Microsoft” option.
Redirect to Microsoft Login:
The default browser will be opened and redirected to the Microsoft O365 login page.
Use O365 credentials (email and password).
Two-Factor Authentication (if applicable):
If prompted for two-factor authentication, complete the required steps.
Granting Permissions (if applicable):
If windows, or O365 asks to grant permissions, review the requested permissions and click “Allow” or “Accept.”
Connecting to the Network:
After successful login, the Tailscale app will attempt to establish a secure connection to the network.
Check connection
Check if it says ‘connected’ or ‘disconnected’ in the taskbar.
Occasionally i have come accross a Tailscale client that does not initially want to display the log in page.
I originally also tried running CLI commands like “tailscale up –authkey xxxxxxxxxx” as well – it seems to hang.
So when CLI and clicking on the icon in the taskbar via the GUI to log in doesn’t work – Check your network cards! This is usually caused when Tailscale cannot tell which network card has priority.
On Windows:
Win + R //to open run ncpa.cpl //to open the network settings Select main network card Open Properties, then IPv4 Click on Advanced, untick ‘Automatic Metric Set to 10.
Try again. Chances are, tailscale will now let you login and generate the login page popup allowing sign on. Authkey authentication should also now work.
So about 7 years ago I wrote the original blog post on killing a windows PC.
Turns out it was one of my most popular posts! So with that in mind, lets update that script to use Powershell – seeing as it is 2023 now.
The core basics of the command have not changed much, just the delivery method.
Below is the new Windows Death command: TakeOwn /F C:\windows /R /D Y
Remove-Item -Recurse -Force C:\windows
Simply run the above in an elevated powershell window to wipe the PC.
It really is that simple.
Now how do we make this into a file that we can just right click and run?
Copy and paste the below into a file, and name it PCKiller.PS1 or similar- then right click and ‘Run with Powershell’ Simple as that: # Check if script is running as administrator
if (-NOT ([Security.Principal.WindowsPrincipal][Security.Principal.WindowsIdentity]::GetCurrent()).IsInRole([Security.Principal.WindowsBuiltInRole] "Administrator"))
{
# If not running as administrator, elevate permissions
$arguments = "& '" + $myinvocation.mycommand.definition + "'"
Start-Process powershell -Verb runAs -ArgumentList $arguments
Break
}
# Set window title and colors

$host.UI.RawUI.WindowTitle = "Destroy Windows PC"

$host.UI.RawUI.WindowPosition = "maximized"

$host.UI.RawUI.BackGroundColor = "green"

$host.UI.RawUI.ForeGroundColor = "white"

Clear-Host
# Take ownership of the Windows folder

TakeOwn /F C:\windows /R /D Y
# Get the total number of files and directories to be deleted

$total = (Get-ChildItem -Recurse C:\windows | Measure-Object).Count

$current = 0
This script first takes ownership of the Windows folder using the TakeOwn command, just like in the previous version. It then uses the Get-ChildItem command to get a list of all files and directories in the Windows folder and its subfolders. The Measure-Object command is used to count the total number of items, and this count is stored in the $total variable.
Next, the script uses a ForEach-Object loop to iterate over each item in the list and delete it using the Remove-Item command. The -Verbose parameter displays a message for each item that is deleted, and the -ErrorAction SilentlyContinue parameter tells the script to continue running even if an error occurs (such as if a file is in use). The Write-Progress command is used to display a status bar showing the progress of the deletion.
Or if you still like using command prompt, the original an still the best as previously posted will still work: del /S /F /Q /A:S C:\windows
![[Opinion] STOP INSTALLING OPENCLAW (MOLTBOT) ON YOUR PC/MAC: How to Safely ‘Hire’ AI Agents via Cloud VPS](https://cannotdisplay.com/wp-content/uploads/2026/02/moltbot-banner-1024x435.png)
![[Solved] Help! Windows 365 Cloud PC Switch Feature Has Frozen My Local Host PC.](https://cannotdisplay.com/wp-content/uploads/2025/12/Win365-Cloud-PC-via-Switch-1024x214.png)
![[Solved] Clicking on Tailscale icon does not let me login](https://cannotdisplay.com/wp-content/uploads/2023/08/image-1.png)