Enable or Disable user account from command line (CMD)
To Disable or Enable an account from a CMD terminal (command prompt)

Net user Nick /active:no
To re-enable the account :
Net user Nick /active:yes
To Disable or Enable an account from a CMD terminal (command prompt)
Net user Nick /active:no
To re-enable the account :
Net user Nick /active:yes
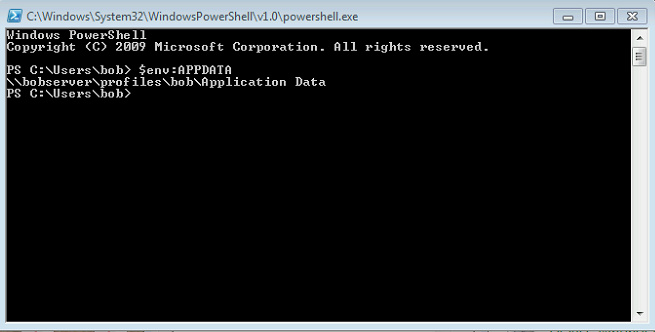
There are 2 ways to find the folder location of AppData on a PC, and to check appdata path.
The first method uses the simple $env: command. This command has long been used by C# users to make multi platform software, in the case where your AppData or any other environmental variable may be living somewhere other than the normal factory set location.
Simply open up powershell and type:
$env:APPDATA
Method 2 is basically doing the exact same as above, but this time using a call and answer approach:
Get-Childitem env:APPDATA | %{ $_.Value }

Below are some extra $env: variables that you may find useful;
Name                           Value
----                           -----
TEMP                           C:\DOCUME~1\bob\LOCALS~1\Temp
SESSIONNAME                    Console
PATHEXT                        .COM;.EXE;.BAT;.CMD;.VBS;.VBE;.JS;.JSE;.WSF;.WSH;.PS1;.PSC1
USERDOMAIN                     WINGROUP
PROCESSOR_ARCHITECTURE         x64
SystemDrive                    C:
APPDATA                        C:\Users\bob\Application Data
windir                         C:\WINDOWS
USERPROFILE                    C:\Users\bob
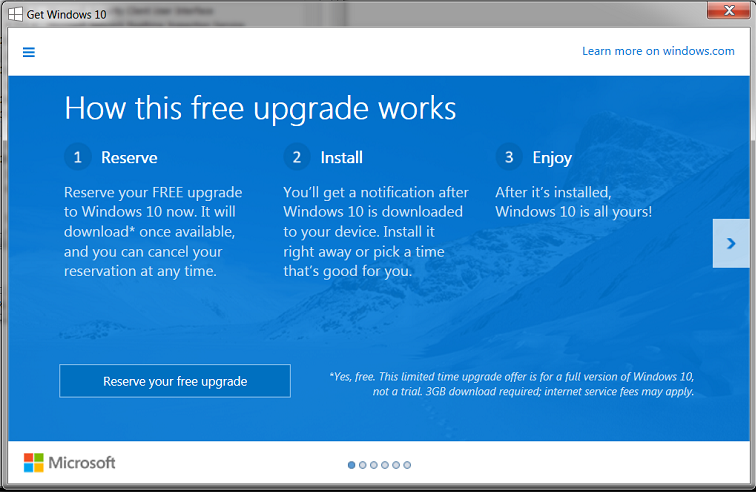
After a batch of updates over the weekend, Windows is now providing more info on the long awaited FREE windows 10 upgrade
![]()
The popups, now appearing on some windows 7 and 8 PC’s are causing quite a stir. With some people on reddit calling it both ‘intrusive’ and ‘malware-like’
It would appear that it is KB3035583 that installs this notification, but that requires Windows 7 SP1 or Windows 8.1 to function correctly, at the bottom of the article we have included a step by step guide in forcing this update in order to be able to reserve your own copy of Windows 10
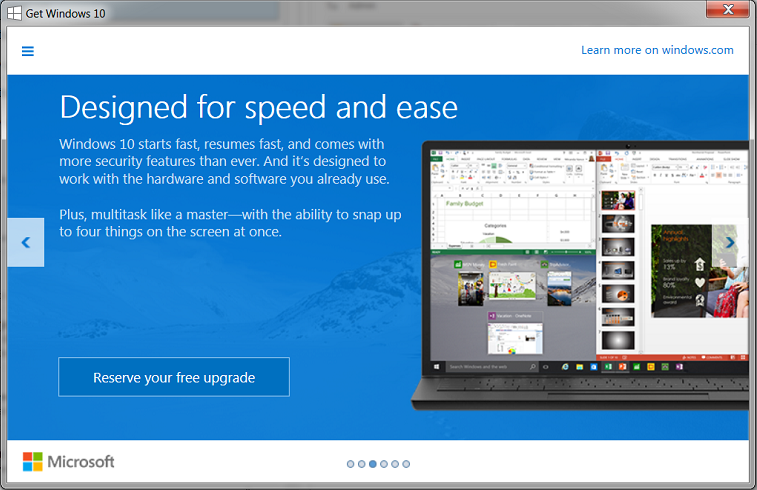
Below, the sirst 5 screens, then taking you through to the final offer, of ‘reserving Windows 10’


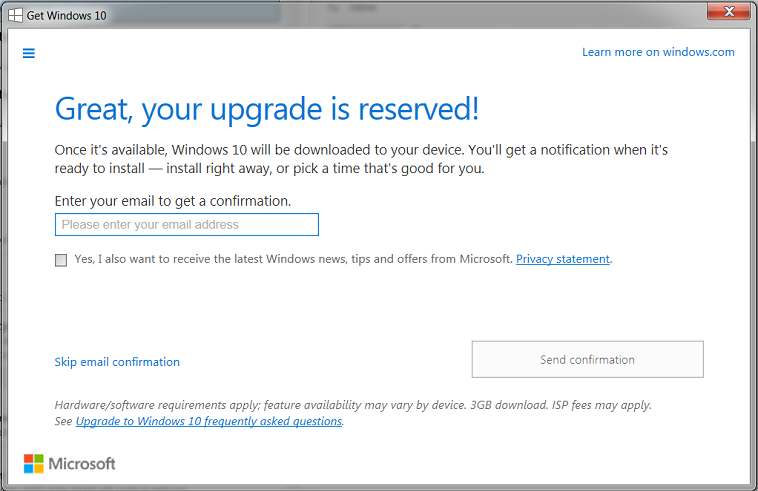
If you are still looking to get a hold of the update supplying this notification then Reddit user FearGX_ explains that you can force the update to do its thing. We’ve reformatted his instructions below.
Again, this will only work if you’re running a legitimate copy of Windows 7 SP1 or Windows 8.1, have KB3035583 installed, and have all the latest updates.
Without going into detail about how this process works, or what it does, If you have just migrated a new Server and are ready to make it the live master for the forrest and domain, simply open up a command prompt (CMD) and enter the following lines in one after the other;
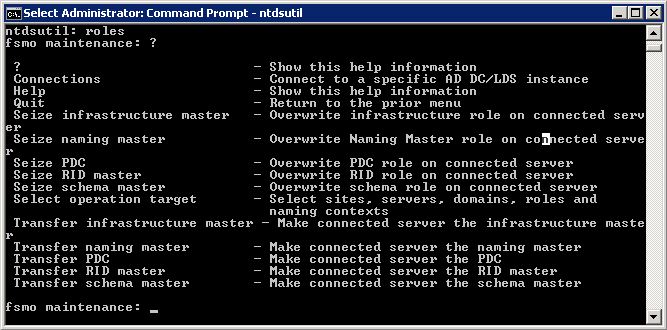
Ntdsutil
Roles
Connections
Connect to server *New Server Name*
Q
Seize infrastructure master
Seize naming master
(if success – continue to the below)
Seize PDC
(Server “*Server Name*” knows about 5 roles)
Seize RID master
Sieze schema master
Q
Finito. (<– dont type that!)
Because an Active Directory role is not bound to a single DC, it is referred to as a Flexible Single Master Operation (FSMO) role. Currently in Windows there are five FSMO roles:
Schema master
Domain naming master
RID master
PDC emulator
Infrastructure master
And that is your FSMO roles all transferred over using simple command line. Please keep your eyes peeled for further posts looking deeper into each of the FSMO Roles,
Here is a quick way to check the health of a PC joined to a domain controller. This is very useful if you need to do a quick check in the first instance of diagnosing a trust relationship issue.
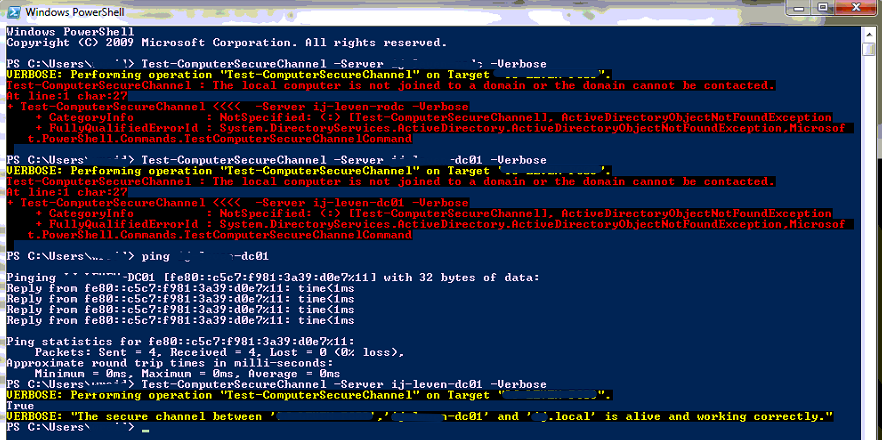
1) Open up a powershell console
2) Type or copy/paste the following, replacing the *dc mane* with your networks domain controller
Test-ComputerSecureChannel –Server *dc name* -Verbose
3) check results, If it comes back with red text it is a pretty good indicator that there is some form of problem going on, however if it returns “The secure chanel between ‘*’, ‘*dc name*’ and ‘*domain*.local’ is alive and working correctly” then you can continue investigating your problem knowing that the PC is nice and safely connected to the domain.
For troubleshooting Trust Relationship issues with a Microsoft Domain, please keep your eyes pealed for part 2
If you have ever been in the situation where a time server or an old server will just not keep in sync, perhaps due to a CMOS battery error, or simply old hardware, then this cmdlet is for you.
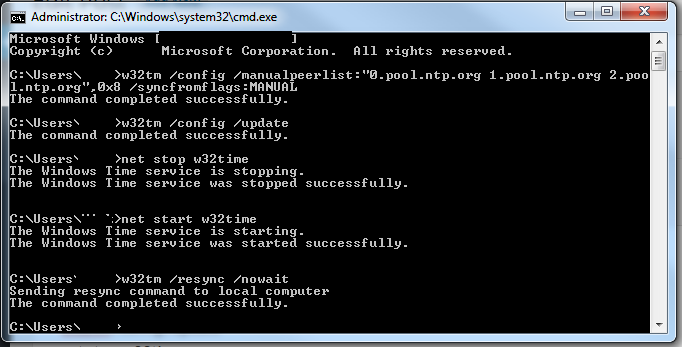
Open up a command prompt and copy/paste the below:
w32tm /config /manualpeerlist:”0.pool.ntp.org 1.pool.ntp.org 2.pool.ntp.org”,0x8 /syncfromflags:MANUAL
w32tm /config /update
net stop w32time
net start w32time
w32tm /resync /nowait
All that this is now doing is setting the clock to update automatically from a web time server, the servers we are using are the public pool 1, 2 and 3 at ntp.org
We stop and start the time services, and then tell it to resync with the new settings.
It would seem that the last batch of updates from Microsoft around the 12th-14th May 2015 have been causing quite a few PC’s to hang stopping at Update 3 of 3.
This so far looks like it is only affecting Windows 7 Pro X64 based PC’s
As with most IT Professionals, we would never suggest performing a Hard shut-down to your PC, unless there really is no other option, however it does look like in this case this is the only way to fix this particular ‘Stuck Update‘ issue.

Option 1)
Press CTRL + ALT +DEL
This seems to be working for 50% of users encountering this issue, if it does not work then proceed to option 2.
Option 2)
Step 1) Hold down the power button on your PC for 10+ seconds,
Step 2) Restart PC by repressing the power button
Step 3) If confronted with a windows error ‘Your PC did not shut down normally’ screen, select “Start Windows Normally”
Out of the 7 PC’s we have now done this to, all in different environments, we are yet to see any errors or corruptions caused by this. We are continuing to look into which update specifically caused this and why, and so check back later to keep yourself updated.
For further reading see this Reddit thread.
There are multiple reasons why you may want to find out the last boot time of a server or a PC, Perhaps your server has been restarted without you knowing, and you want to be able to have a starting time to aid in your search through event logs to see what happened prior to the restart. Maybe you are remotely logged onto a PC which is running slow, but the user hasn’t restarted it for a while.
Anyhow, below is how to check the last boot time using either Powershell or CMD:
Powershell:
Get-WmiObject -class Win32_OperatingSystem | Select-Object __SERVER,@{label=’LastBootUpTime’;expression={$_.ConvertToDateTime($_.LastBootUpTime)}}

The built in systeminfo command may however be easier to remember using CMD:
systeminfo | find /i "Boot Time"
Or with the help of WMIC:
wmic os get lastbootuptime
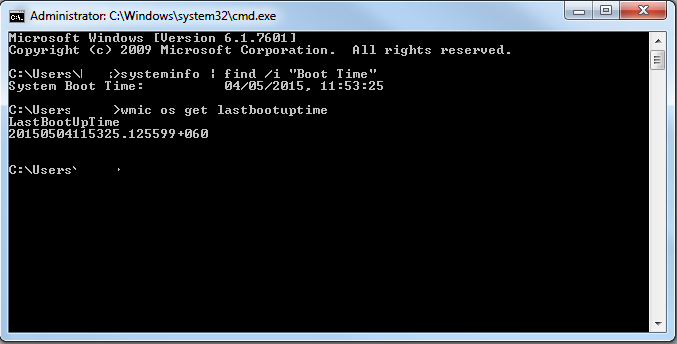
As you can see, the easiest and probably most useful quick command is by using SystemInfo, easy to remember, quick and nicely formatted.