The Windows Death command – Kill a Windows PC

Sometimes in the IT world you just need to let off some steam – sometimes a pile of old PC’s through in the PC ‘Graveyard’ are a fun way to do so.


Kill a Widows PC

Often we will play with various ways to kill off old PC’s before they are then securely wiped and recycled, and this command we are about to go into is one of the basics.

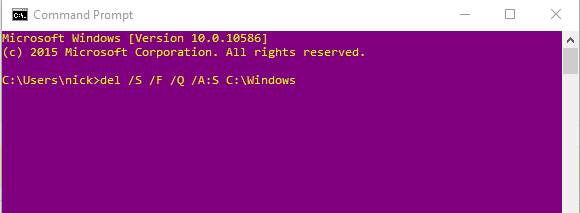
del /S /F /Q /A:S C:\windows

Thats it.

Yes it really is that easy to kill a windows PC!

Lets go through it and some of the pitfalls you may find.

del – This is the windows command to delete an object, pretty self explanatory
/S – Deletes specified files from the current directory and all subdirectories. Displays the names of the files as they are being deleted.
/F – Forces deletion of read-only files.
/Q – Specifies quiet mode. You are not prompted for delete confirmation.
/A:S – Deletes files based on the following file attributes, in this case: s = System files
C:\windows – The destination we are deleting.

Why does this work? – Well most people reading this know already, but if you didn’t – the Windows folder simply put is the heart of the Windows operating system. Killing it will stop the OS from booting.

Most users readers will be asking “Why put the C:\Windows” at the end of the script, should it no logically be put in front of the other switches? Well this is to do with personal preference really, and to do with the fact that it is convinient to then go about and delete more contect using the same script, by hitting up arrow, then simply backspacing and changing your destination. Lazy much? You bet you!

Bonus post of to Kill a Windows PC and to make this more effective coming next week – little hint:
takeown /f C:\Windows /r /d y

p.s. This is for information only – be responsible!

Change message size limits in exchange 2016

There is the odd occasion that you may need to change the allowed message size limits in exchange, either to send or to receive – below we look specifically at self hosted Exchange 2016

First, open up Exchange powershell, and and enter any required domain credentials.

Next we are going to view the current message limits on the server by the following multiline command:

get-transportconfig | ft maxsendsize, maxreceivesize
get-receiveconnector | ft name, maxmessagesize
get-sendconnector | ft name, maxmessagesize
get-mailbox Administrator |ft Name, Maxsendsize, maxreceivesize

Once armed with this information we can proceed to string together a command in order to get the desired messages allowed through the system. The main command is the below:

get-transportconfig | Set-TransportConfig

This calls the transport layer configurations and allows you to pipe changes to it. Next we have the different set commands for different limits;

-maxsendsize 30MB -maxreceivesize 30MB; get-receiveconnector | set-receiveconnector -maxmessagesize 30MB; get-sendconnector | set-sendconnector -maxmessagesize 30MB; get-mailbox | Set-Mailbox -Maxsendsize 30MB -maxreceivesize 30MB

From the above, you can pick and choose what you need to change the message size limits, as in the example, this will set ALL connectors ingoing and outgoing to 30MB. The full command will look something like the below:

get-transportconfig | Set-TransportConfig -maxsendsize 30MB -maxreceivesize 30MB; get-receiveconnector | set-receiveconnector -maxmessagesize 30MB; get-sendconnector | set-sendconnector -maxmessagesize 30MB; get-mailbox | Set-Mailbox -Maxsendsize 30MB -maxreceivesize 30MB

ownCloud server replied: Forbidden (ownCloud Forbidden)

I recently installed the latest version of ownCloud. A self hosted cloud platform for syncing all your favourite documents and files you may need to access from elsewhere.

The install was easy enough – See other post – however i did then encounter a few issues when using the Windows sync software,

Here is what i had to do to fix a: “ownCoud server replied: Forbidden” ownCloud Forbidden error.

(Well hopefully it works for you also! )

ownCloud Forbidden

I had to do 2 things in order to get this installed:

The first error i got was;
“download of ownCloud source file failed.
SSL certificate problem: self signed certificate in certificate chainSSL certificate problem: self signed certificate in certificate chain”

The solution i found here was to add the below into my installer.php :

curl_setopt($ch, CURLOPT_CERTINFO, FALSE);
curl_setopt($ch, CURLOPT_SSL_VERIFYPEER, FALSE);

This allowed me to start the install, and then supply it with my DB creds and table to get started.

The second error, was only once i had set up my default file structure using the web interface and finally installed the desktop based client was the aforementioned ownCloud Forbidden error.

The solution? After endless hours of scrolling through countless Forums and the full ownCloud documentation;

ownCloud Forbidden Spydah


In plain text, to show spydah’s fix to an ownCloud Forbidden error:

Simply add the following to your .htaccess file:

<Limit GET POST>
order allow,deny
allow from all
</Limit>
<Limit PUT DELETE>
order allow,deny
allow from all
</Limit>


Done. Sorted. finally!

Find PC model and serial from CMD

Ever  been in the situation where  you need to  find PC model and serial, but just don’t have access to the bottom of the PC to check.
Perhaps you need the model but the sticker has been removed, or marked on the bottom. Well, there’s a alternate way to find the computer’s serial number without you having to go under the desk:

Here is how to find the PC model and Serial from CMD

Open the command prompt (Start – > CMD) and type the following command:

wmic bios get serialnumber

Another command that will also print the model number (or make) of your computer is:

wmic csproduct get name, identifyingnumber

The system model number can also be found using the System Information program available under All Programs – > Accessories – > System Tools.

And there you have it, how to find your PC model and Serial from CMD 

serial from cmd

Turing Phone will work in all countries & announcement of the Black Dragon model


Following our updates with the latest batch of emails leading up to the Turing phone release, and with one day to go, we have been provided with yet another added feature to this already jam packed ultra-phone. In the latest email we were told that the phone will support all major frequency bands used by international carriers, including;  GSM, WCDMA, TD-SCDMA, CDMA EVDO, TDD LTE, FDD LTE.

We were also given information, that a Fourth model the ‘Black Dragon’ model of the Turing phone will also be coming soon, exclusively with 128GB, and a “style and aesthetic is unlike any phone on the market”


Pre-orders open up tomorrow, but with the US and Canada getting first dibs, I have no idea on when i will finally get my hands on what promises to be a game changing phone for 2015.


one day until you can reserve your Turing Phone black dragon model
There’s only one day left before you can reserve your Turing Phone™. We’ve received an overwhelming number of requests, but since you’re on this list, you get access to reserve yours before anyone else.

The world is your playground

In the last few weeks Turing Phone has reinvented itself with major enhancements. Turing Phone is now a world phone. This means you can use the phone anywhere in the world. It works for every band* with every carrier in every country. Turing Phone is sold unlocked and supports all carriers in the U.S. and carriers around the world. Travel anywhere and you can still use your Turing Phone.

How to reserve Beowulf, Cardinal and Pharaoh

1. Go to www.turingphone.com
2. Enter your email address
3. Reserve up to four phones (no credit card required)

Beowulf, Cardinal and Pharaoh will be available to reserve between 12:00PM EDT on July 31st through 11:59PM EDT on August 13th. Reservations will be tracked via your email address.

Purchase and pricing

U.S. and Canadian customers will be the first to purchase and receive shipment. If you reside in the United States or Canada, once your reservation is received we will email you the next step for payment (on www.turingphone.com) when the Turing Phone is close to the final shipping date.

Customers from other countries will be notified to make their purchase (onwww.turingphone.com) when it’s close to the shipment date in their regions.

The Beowulf, Cardinal and Pharaoh come in three models: 16GB ($610), 64GB ($740) and 128GB ($870).

Black Dragon

This special edition Turing Phone to be released will be epic. Very soon we’ll provide details of our bellwether model. Black Dragon’s style and aesthetic is unlike any phone on the market. We can’t wait to show it to you.

Black Dragon comes in one model, the 128GB ($999).

The world is ready, are you?

Thank you,

– Turing Robotic Industries

P. S.Forward to a friend. so they can reserve their own Turing Phone.

*Bands Turing Phone will work on include GSM, WCDMA, TD-SCDMA, CDMA EVDO, TDD LTE, FDD LTE

Stay Connected
LinkedInFacebookTwitterInstagram
“Turing the world, one person at a time.”
– SYL Chao
www.turingphone.com

Turing Robotic Industries

Spear Tower
One Market Plz

San Francisco, CA 94105

Add us to your address book

Copyright © 2015 All rights reserved.

Turing phone model names revealed: Introducing Pharaoh, Beowulf and Cardinal.

We for One Cannot wait for the pre-orders to open up, but which Turing Phone will we choose? Pharoh, Beowulf or Cardinal? Turing phone model names revealed.

If you have been following the recent Turing Robotic industries ‘Turing Phone updates, you may have received the below email:

Every legend has an origin story. Today we’d like to introduce you to three legends in the making, Cardinal, Beowulf and Pharaoh.In a few days, you’ll have a chance to make one of these yours.
Front and back of the Turing Phone model: Cardinal
Cardinal
While the Cardinal wasn’t developed by the Earth Federation, it is inspired by the Gundam RX-78, piloted by Amuro Ray. Just as the famed mobile combat suit was built from ultra performing metals, the Cardinal was forged of Liquidmorphium™, a metal three times harder than stainless steel and more than twice as hard as titanium. One thing’s for sure, the Cardinal is a phone fit for a hero.
Back of the Turing Phone Beowulf
Beowulf
For the Beowulf, Turing Phone™ drew from the classic Old English poem about a warrior turned king of the same name. Nowhere is this more evident than the gold crown that adorns the camera. Also on the back you’ll find more retelling of the tale. The dark blue signifies battles at sea, while the scales represent victory over the great dragon of Earnaness. And just like the story, Turing’s Beowulf is epic. (photo credit: The Verge)
Pharaoh
The third Turing Phone™ named Pharaoh symbolizes innovation and wonder. The cherry and cranberry reds, navy blue and gold on the phone’s back all allude to the colored garments Ramesses II, Pharaoh’s namesake, would have adorned. Since the Valley of the Kings, technology has enabled us to do amazing things. Pharaoh is the perfect device to take us into the future. (photo credit: Digital Trends)
It’s almost time to choose,- TRI TeamP.S. Forward to a friend and show them the future.
Never miss anything! Follow us here:
FacebookTwitterInstagramLinkedIn
“We are moving into the cipher phone era.”
– SYL Chao, CEO TRI
www.turingphone.com

Turing Robotic Industries

Spear Tower
One Market Plz

San Francisco, CA 94105

Add us to your address book

Copyright © 2015 All rights reserved.

New Email out from Turing Phone

New Email out from Turing Phone
turing phone
Welcome to the latest in Turing Phone™ news!First of all, thank you for your interest in the Turing Phone™.

We’re overwhelmed by the response and support you’ve given us since announcing our July 31st pre-order date. We’re working through your questions and will reveal much in the coming weeks.

Watch your inbox and receive the news first. Next week, we’ll be sharing pre-order details and unveiling new product photography.

Last week our CEO, SYL, stopped by the Mashable office to talk about the next evolution of phones, the cipher phone, as well as give a sneak peek of the Turing Phone™. In case you missed it, take a look:

Read Article
Thanks again for joining us in building the future. Patrons and supporters, like you, inspire us to keep challenging the status quo and pushing the limits of technology.Stay tuned for more exciting news,

– TRI Team

P.S. Forward to a friend and show them the future.

Run elevated command prompt (CMD)

The quickest way to run an elevated command prompt from windows xp all the way through to Windows 10, is to simply right click and ‘Run as Administrator’ from the start menu, see below

Click on the start menu, or press the WIN key, then simply type (win vista+)  CMD
Right click on cmd.exe and select, run as administrator Run elevated command prompt (CMD)


If that does not for some reason work, or you cannot get into your start menu, try pressing WIN + R and typing CMD, then enter:

 runas /noprofile /user:Administrator cmd

This will prompt you for your admin password
run box windows elevate command prompt

Create new user via cmd

How to create new user via cmd (command Prompt)

create new user via cmd

Below are the quick steps to take if you are in the situation where you need to create a new pc user from command line. The example below is for creating a user named nick, with admin privileges.

Open up an elevated command prompt:
Type the below, exchanging *nick* ad *password* with your own username and password.

net user /add *NICK*  *password*

To give this user admin privileges;

net localgroup administrators *NICK* /add