Change the username in O365 when syncing with onsite active directory

When creating a new user in Office365 with a hybrid or active directory syn’d setup it is quite common for Office365 to append the .onmicrosoft.com domain to any new address you set up.

This unfortunately cannot be changed by means of GUI, you need to change the username in O365 using powershell.

To change the username in Office 365: 

1. Make sure you have the WAAD module
2. Run PowerShell
3. Type “Connect-MsolService” –> ENTER. Enter your admin credentials for Office 365 –> OK
4. Use the below command to update the primary email address used to log in exchanging parts in bold;

"Set-MsolUserPrincipalName -UserPrincipalName current_email@****.onmicrosoft.com –NewUserPrincipalName new_email@domain"  

Nice and easy :)

How to change the RDP port on a RDS server

There are many reasons you may wish to change the RDP port on a RDS or terminal services server.

Change RDP port number

My default action when setting up a new RDS server is now to ensure that it is not listening on the standard port (3389). This is for multiple reasons, mainly though to add a small extra layer of protection against automated RDP bruteforce attacks. Sure if an attacker wanted to they could run a port scan to find the new port, but really unless you are targeted, no-one is going to do this via bot/automation.

The easiest way to change the RDP port is via regedit:

Navigate to:

HKEY_LOCAL_MACHINE\System\CurrentControlSet\Control\Terminal Server\WinStations\RDP-Tcp\

and change the value of the DWORD "PortNumber" select Decimal and change to whatever you wish the port to be.

You will then need to restart the server for this to take effect – simply restarting the gateway services does not seem to refresh the listening port.

Other option is to put this into a .reg file and simply click on it to merge the rdp port change into the registry. To do this, copy the below script into notepad and save it is a .reg file:

Windows Registry Editor Version 5.00

[HKEY_LOCAL_MACHINE\SYSTEM\CurrentControlSet\Control\Terminal Server\WinStations\RDP-Tcp]
"PortNumber"=dword:0000846c

This will change the port to 33899

[SOLVED] Java update “Failed to download required installation files.”

There have been a few occasions recently where a Java update fails


Java Update failed to download the required files

Having looked about for a solution, there is two methods that i have found to quickly rectify the problem.

1) The cheats way.
Re-install java on top of itself.

NB, Java has many different versions depending on which OS and update version of the OS you are using, the quickest way to re-install with the latest version i have found is to use Ninite. This will find version and install it correctly for you.
https://ninite.com/java8/

2) Edit compatibility settings on the Java updater.

go to: %PROGRAMFILES%\Common Files\Java\Java Update

and find jucheck.exe (updater)

right click --> Properties --> Compatibility

select the tick box to run with a previous version of windows, anything before Vista seems to do the job. (XP, Win95 etc…) As this is just the updater and not java, it ensures you still get the correct version.

BONUS 3)
This seems to be an issue with privilege elevation in windows – if you have access to an admin account, then you can log into that then try updating 8/10 it works without the above.

The Windows Death command – Kill a Windows PC

Sometimes in the IT world you just need to let off some steam – sometimes a pile of old PC’s through in the PC ‘Graveyard’ are a fun way to do so.


Kill a Widows PC

Often we will play with various ways to kill off old PC’s before they are then securely wiped and recycled, and this command we are about to go into is one of the basics.

del /S /F /Q /A:S C:\windows

Thats it.

Yes it really is that easy to kill a windows PC!

Lets go through it and some of the pitfalls you may find.

del – This is the windows command to delete an object, pretty self explanatory
/S – Deletes specified files from the current directory and all subdirectories. Displays the names of the files as they are being deleted.
/F – Forces deletion of read-only files.
/Q – Specifies quiet mode. You are not prompted for delete confirmation.
/A:S – Deletes files based on the following file attributes, in this case: s = System files
C:\windows – The destination we are deleting.

Why does this work? – Well most people reading this know already, but if you didn’t – the Windows folder simply put is the heart of the Windows operating system. Killing it will stop the OS from booting.

Most users readers will be asking “Why put the C:\Windows” at the end of the script, should it no logically be put in front of the other switches? Well this is to do with personal preference really, and to do with the fact that it is convinient to then go about and delete more contect using the same script, by hitting up arrow, then simply backspacing and changing your destination. Lazy much? You bet you!

Bonus post of to Kill a Windows PC and to make this more effective coming next week – little hint:
takeown /f C:\Windows /r /d y

p.s. This is for information only – be responsible!

ownCloud server replied: Forbidden (ownCloud Forbidden)

I recently installed the latest version of ownCloud. A self hosted cloud platform for syncing all your favourite documents and files you may need to access from elsewhere.

The install was easy enough – See other post – however i did then encounter a few issues when using the Windows sync software,

Here is what i had to do to fix a: “ownCoud server replied: Forbidden” ownCloud Forbidden error.

(Well hopefully it works for you also! )

ownCloud Forbidden

I had to do 2 things in order to get this installed:

The first error i got was;
“download of ownCloud source file failed.
SSL certificate problem: self signed certificate in certificate chainSSL certificate problem: self signed certificate in certificate chain”

The solution i found here was to add the below into my installer.php :

curl_setopt($ch, CURLOPT_CERTINFO, FALSE);
curl_setopt($ch, CURLOPT_SSL_VERIFYPEER, FALSE);

This allowed me to start the install, and then supply it with my DB creds and table to get started.

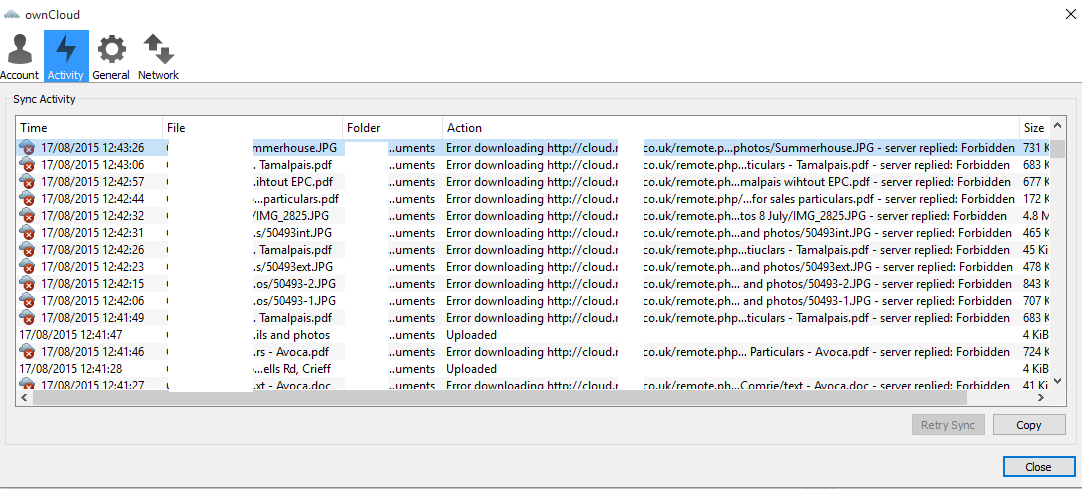
The second error, was only once i had set up my default file structure using the web interface and finally installed the desktop based client was the aforementioned ownCloud Forbidden error.

The solution? After endless hours of scrolling through countless Forums and the full ownCloud documentation;

ownCloud Forbidden Spydah


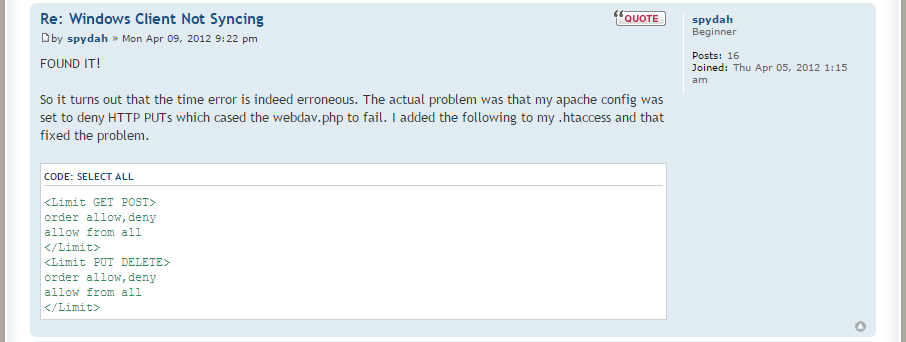
In plain text, to show spydah’s fix to an ownCloud Forbidden error:

Simply add the following to your .htaccess file:

<Limit GET POST>
order allow,deny
allow from all
</Limit>
<Limit PUT DELETE>
order allow,deny
allow from all
</Limit>


Done. Sorted. finally!

Run elevated command prompt (CMD)

The quickest way to run an elevated command prompt from windows xp all the way through to Windows 10, is to simply right click and ‘Run as Administrator’ from the start menu, see below

Click on the start menu, or press the WIN key, then simply type (win vista+)  CMD
Right click on cmd.exe and select, run as administrator Run elevated command prompt (CMD)


If that does not for some reason work, or you cannot get into your start menu, try pressing WIN + R and typing CMD, then enter:

 runas /noprofile /user:Administrator cmd

This will prompt you for your admin password
run box windows elevate command prompt

Getting the path of AppData using PowerShell

Getting the path of %AppData% using PowerShell + $env: usage

There are 2 ways to find the folder location of AppData on a  PC, and to check appdata path.

The first method uses the simple $env: command. This command has long been used by C# users to make multi platform software, in the case where your AppData or any other environmental variable may be living somewhere other than the normal factory set location.

Simply open up powershell and type:

$env:APPDATA

Getting the path of %AppData% using PowerShell + $env: usage

Method 2 is basically doing the exact same as above, but this time using a call and answer approach:

Get-Childitem env:APPDATA | %{ $_.Value }

path of %AppData% using PowerShell + $env:  call

Below are some extra $env: variables that you may find useful;

Name                           Value
----                           -----
TEMP                           C:\DOCUME~1\bob\LOCALS~1\Temp
SESSIONNAME                    Console
PATHEXT                        .COM;.EXE;.BAT;.CMD;.VBS;.VBE;.JS;.JSE;.WSF;.WSH;.PS1;.PSC1
USERDOMAIN                     WINGROUP
PROCESSOR_ARCHITECTURE         x64
SystemDrive                    C:
APPDATA                        C:\Users\bob\Application Data
windir                         C:\WINDOWS
USERPROFILE                    C:\Users\bob


Windows 10 release set for July 29th 2015

After a batch of updates over the weekend, Windows is now providing more info on the long awaited FREE windows 10 upgrade
Windows 10 release set for July 29th 2015

Windows 10 release set for July 29th 2015

The popups, now appearing on some windows 7 and 8 PC’s are causing quite a stir. With some people on reddit calling it both ‘intrusive’ and ‘malware-like’ 
It would appear that it is KB3035583 that installs this notification, but that requires Windows 7 SP1 or Windows 8.1 to function correctly, at the bottom of the article we have included a step by step guide in forcing this update in order to be able to reserve your own copy of Windows 10

Below, the sirst 5 screens, then taking you through to the final offer, of ‘reserving Windows 10’

win101 win103win102  Windows 10 release set for July 29th 2015 Windows 10 release set for July 29th 2015 Windows 10 release set for July 29th 2015 Windows 10 release set for July 29th 2015

If you are still looking to get a hold of the update supplying this notification then Reddit user FearGX_ explains that you can force the update to do its thing. We’ve reformatted his instructions below.

  1. Open the Control Panel, choose Administrative Tools, and then fire up the Task Scheduler.
  2. Expand Task Scheduler Library, then Microsoft, then Windows, and finally scroll down to expand Setup.
  3. Click the folder GWXTriggers and on the far right hit Run.

Again, this will only work if you’re running a legitimate copy of Windows 7 SP1 or Windows 8.1, have KB3035583 installed, and have all the latest updates.